Content Source: 2021 Scout / Scout Sixty Owner’s Manual (9931427 R02) > Maintenance Chapter

IMPORTANT

The Owner's Manual for this vehicle contains warnings, instructions and other information you must read and fully understand before safely riding or performing maintenance on this vehicle.Always follow the warnings and instructions in Owner's Manual.

Click the CONTENTS link above for the Table Of Contents, or download a full PDF of the Owner Manual in the Owner Support area of Polaris.com

Brakes

Rear Brake Pedal

  1. Lubricate the pivot bushing at the intervals recommended in the Periodic Maintenance Table. Also lubricate any time binding is evident. Use all-purpose grease.
  2. Inspect brake pads as outlined in the Brake Disc Inspection / Cleaning section.

Brake Hoses/Connections

Inspect all brake hoses and connections for dampness or stains from leaking or dried fluid. Tighten any leaking connections and replace components as necessary. See the INDIAN MOTORCYCLE Service Manual or an authorized INDIAN MOTORCYCLE dealer or other qualified dealer.

Brake Fluid Precautions

WARNING
Using the wrong fluid or allowing air or contaminants into the fluid system can damage the system seals or result in a malfunction that could lead to serious injury or death. Use only DOT 4 brake fluid from a sealed container.
Do not operate the front brake with the reservoir cover removed. Fluid could overflow from the reservoir and allow air to enter the system. Air in the brake system could cause the brakes to malfunction.
An over-full reservoir may cause brake drag or brake lock-up, which could result in serious injury or death. Maintain brake fluid at the recommended level. Do not overfill.
NOTICE
Brake fluid will damage painted surfaces and plastic parts. Always clean spilled brake fluid immediately with water and a mild detergent.

Rear Brake Fluid

Change the brake fluid at the intervals recommended in the Periodic Maintenance Table section. Always add brake fluid from a new, unopened container. Always use the recommended fluid. See Brake Fluid.
  1. Position the motorcycle on level ground in the fully upright position.
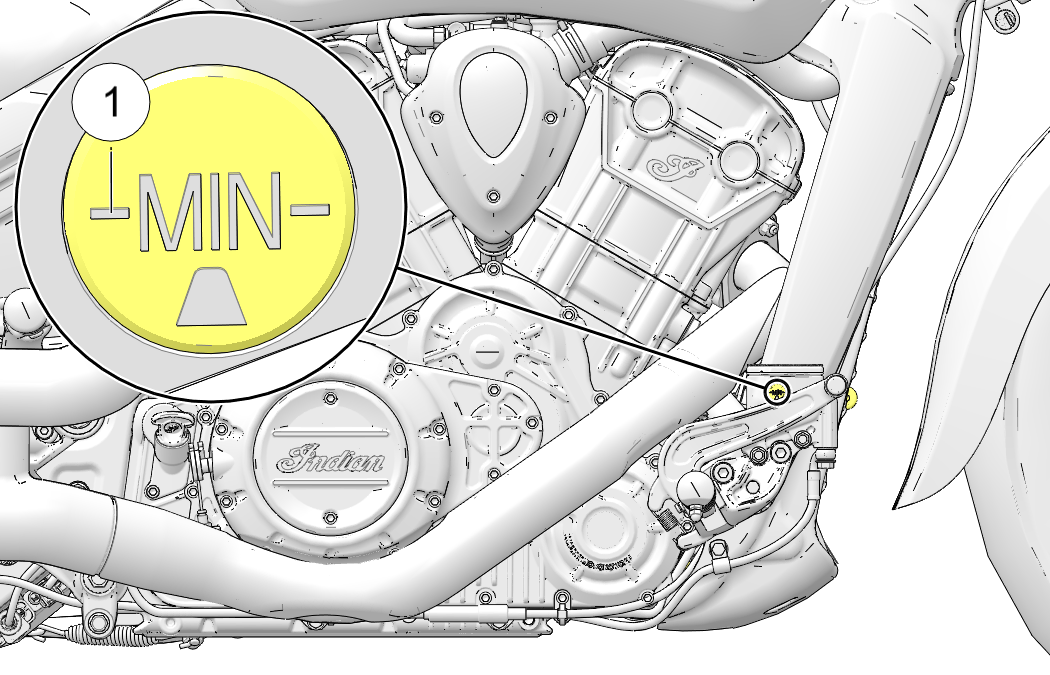
  2. The rear brake fluid reservoir is located near the rear brake pedal. View the reservoir from the right side of the vehicle.
  3. Wipe the fluid container and the area around the reservoir cover with a clean cloth.
  4. If the fluid level is low, inspect brake pads as outlined on Brake Pads. If pads are not worn beyond the service limit, inspect the brake system for leaks.
  5. Remove the cover and diaphragm. The fluid level should be above the minimum indicator mark on the reservoir body . Add brake fluid as needed. Do not overfill.Image
  6. Reinstall the cover and diaphragm. Tighten the cover screws.
    TORQUE
    13 in-lbs (1.5 N·m)
  7. Wipe away any fluid spills. Check for signs of brake fluid leaks around hoses, fittings, reservoir, and brake calipers.

Front Brake Lever

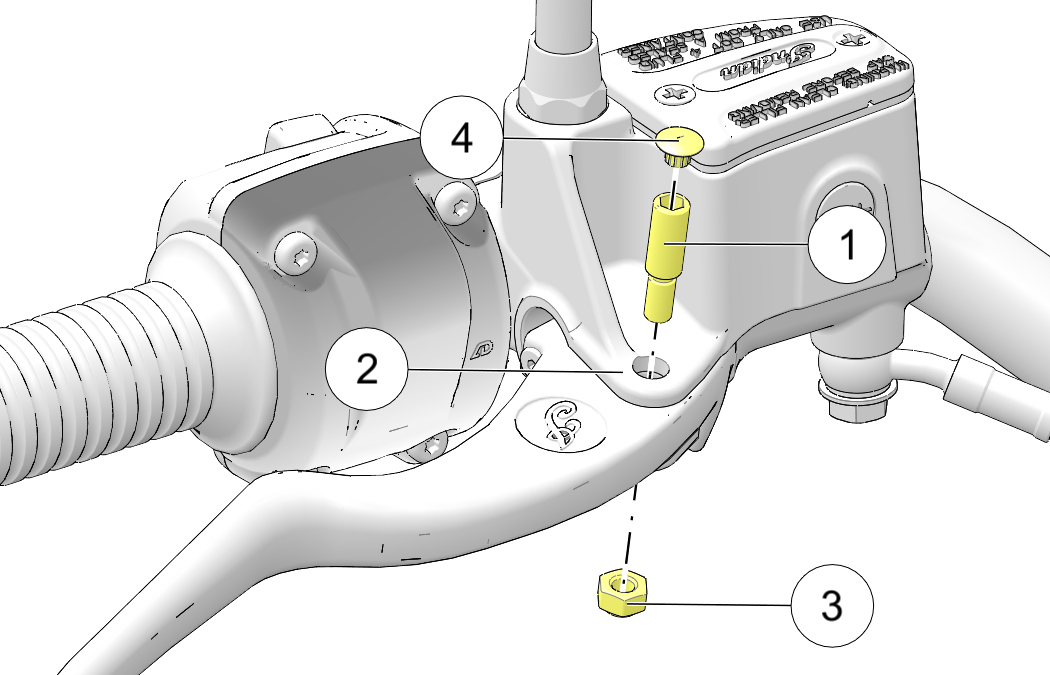
  1. To lubricate the front brake lever, start by removing the plastic cap from the pivot pin . Unscrew the bottom nut and pivot pin to access the hinge point .
  2. Lubricate the pivot pin and brake lever hinge point at the intervals recommended in the Periodic Maintenance Table on Periodic Maintenance Table. Also lubricate any time binding is evident. Use all-purpose grease.Image
  3. Inspect brake pads as outlined on Brake Pads.
  4. Once properly lubricated, reinstall the components in accordance with their proper torque values. Return plastic cap to the top of the pivot pin.
TORQUE
Pivot Pin: 8.9–17.7 in-lbs (1–2 N·m)
TORQUE
Nut: 35.4–62 in-lbs (4–7 N·m)

Front Brake Fluid

Change the brake fluid at the intervals recommended in the Periodic Maintenance Table on Periodic Maintenance Table.
Do not attempt to change the anti-lock brake system fluid. Please see your dealer for this service.
Always add brake fluid from a new, unopened container. Always use the recommended fluid. See Brake Fluid.
  1. Position the motorcycle on level ground in the fully upright position. Position the handlebars so that the fluid reservoir is level. Wipe the fluid container and the area around the reservoir cover with a clean cloth.
  2. If the fluid level is low, inspect brake pads as outlined on Brake Pads. If pads are not worn beyond the service limit, inspect the brake system for leaks.
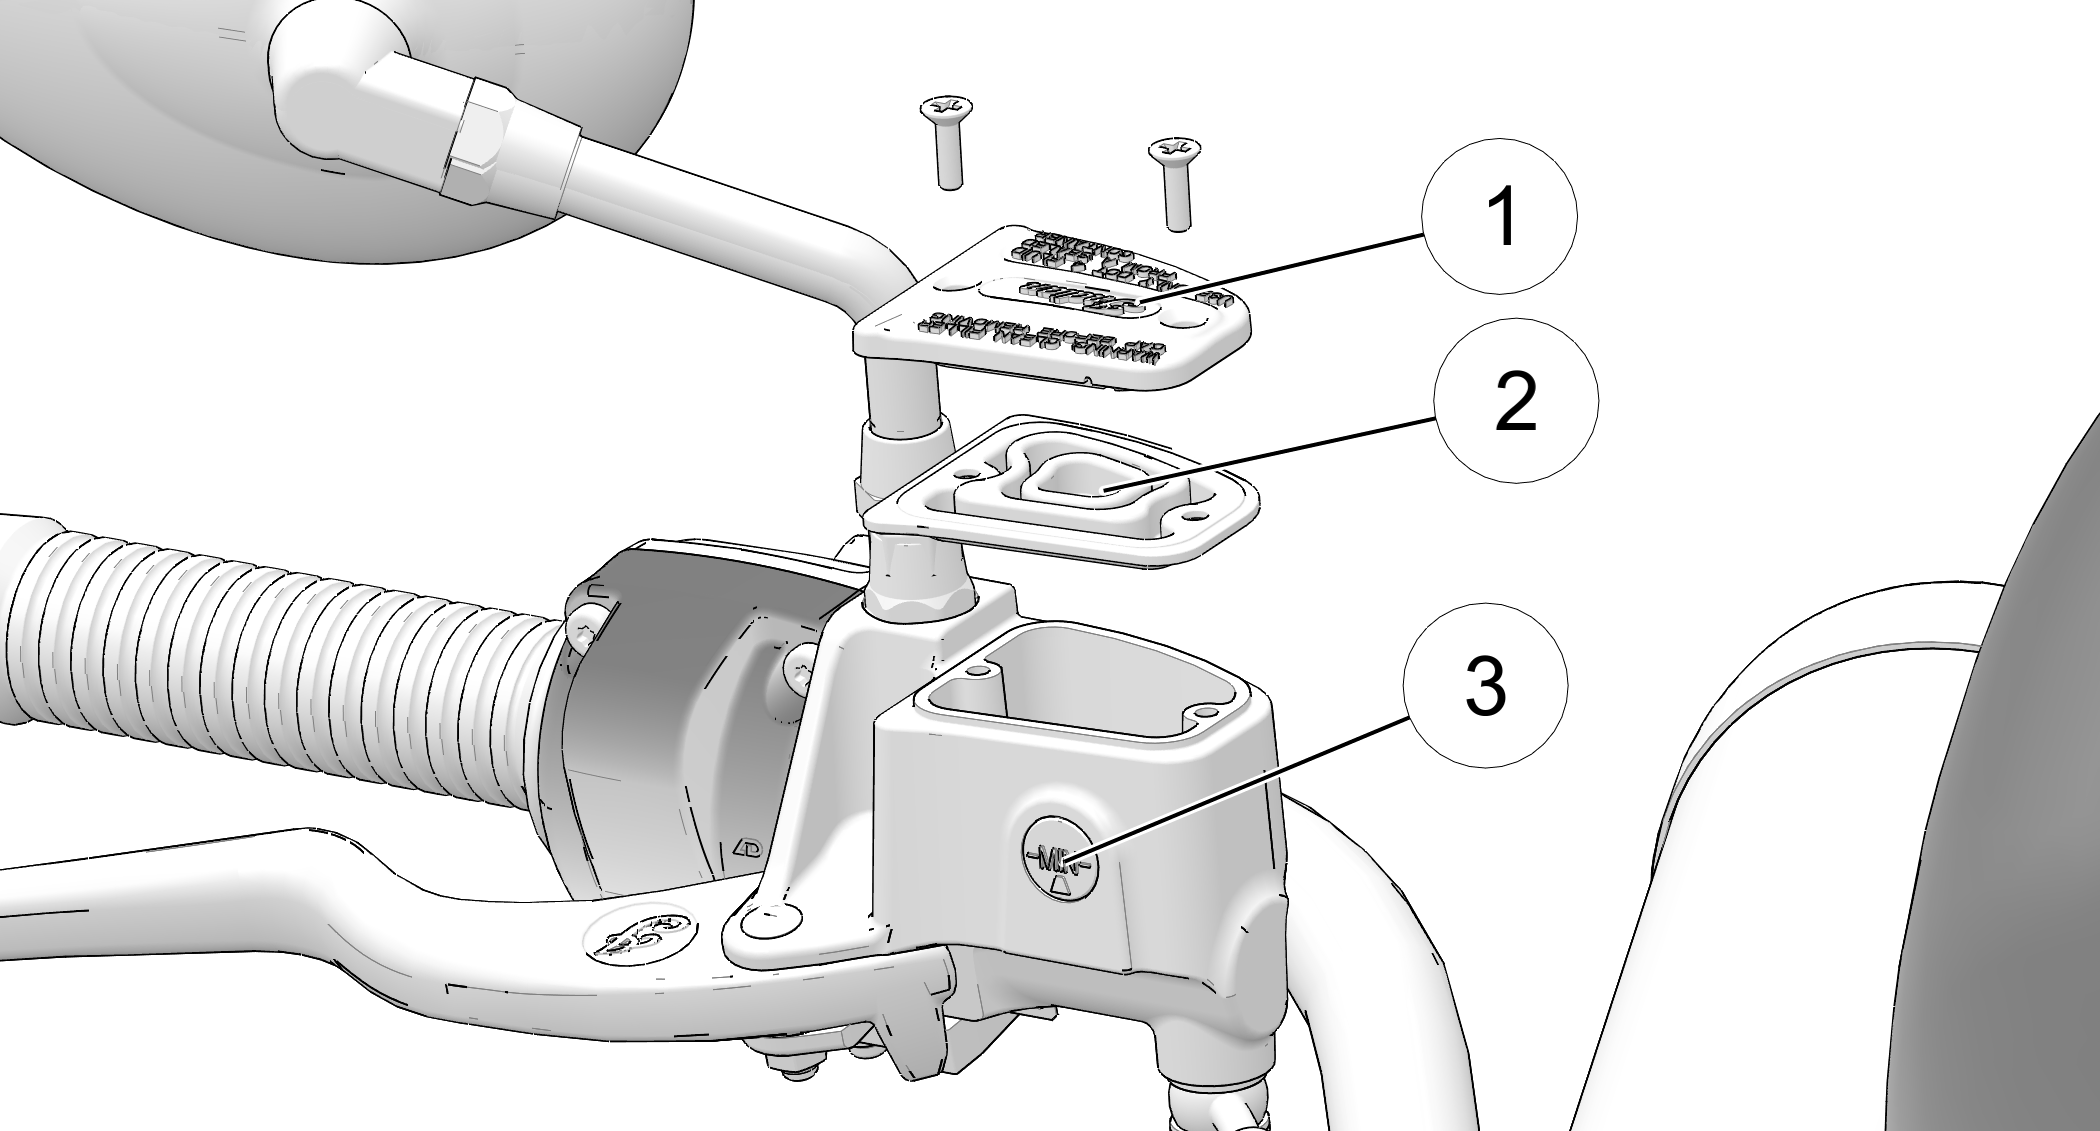
  3. To add fluid, remove the reservoir cover screws. Remove the cover and diaphragm .

    Image

  4. The fluid level should be above the minimum indicator mark in the sight glass . Add brake fluid as needed. Do not overfill.
  5. Reinstall the diaphragm, cover and screws.
    TORQUE
    13 in-lbs (1.4 N·m)
  6. Wipe away any fluid spills. Check for signs of brake fluid leaks around hoses, fittings, reservoir and brake calipers. Check for deterioration of hoses.

Brake Pads

Inspect each front brake pad on both sides of the front disc. Inspect each rear brake pad on both sides of the rear disc.
When checking brake pad friction material thickness, check each brake caliper for dampness or stains from leaking or dried brake fluid. If inspection reveals signs of fluid leakage, do not operate the vehicle. See your dealer for service.
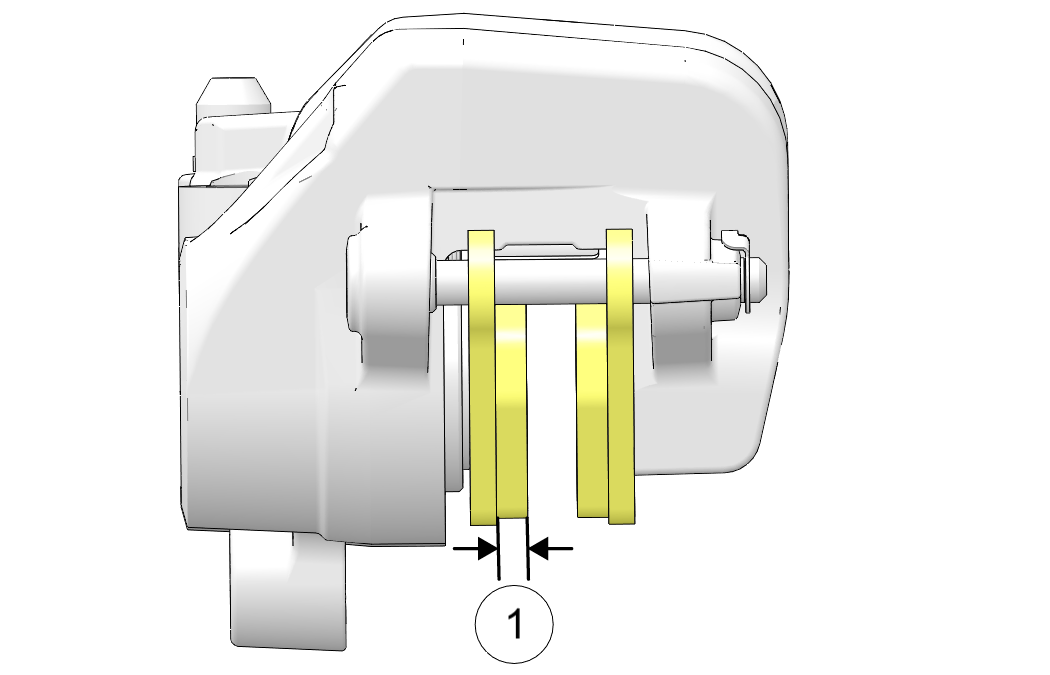
Use an inspection mirror, positioned at the front side of the caliper, to view the friction material.
Replace brake pads when the thinnest point of the friction material has worn to 1.0 mm . Please see your dealer for this service.
Image
NOTICE
After replacing pads, allow up to 250 miles (500 km) of operation in urban driving conditions (not highway cruising) to allow pads to mate with new rotors. Brakes should be used frequently. During this time brake performance will be less effective. Avoid using brakes harshly unless in an emergency. Brake efficiency will gradually increase during this seating period.

Brake Disc Inspection / Cleaning

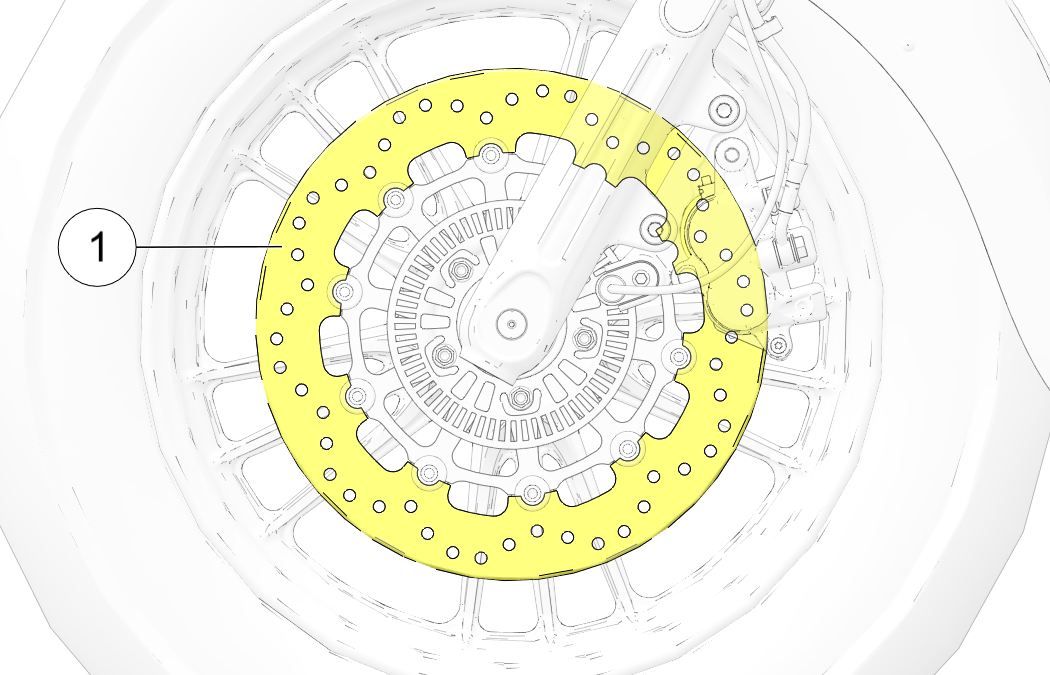
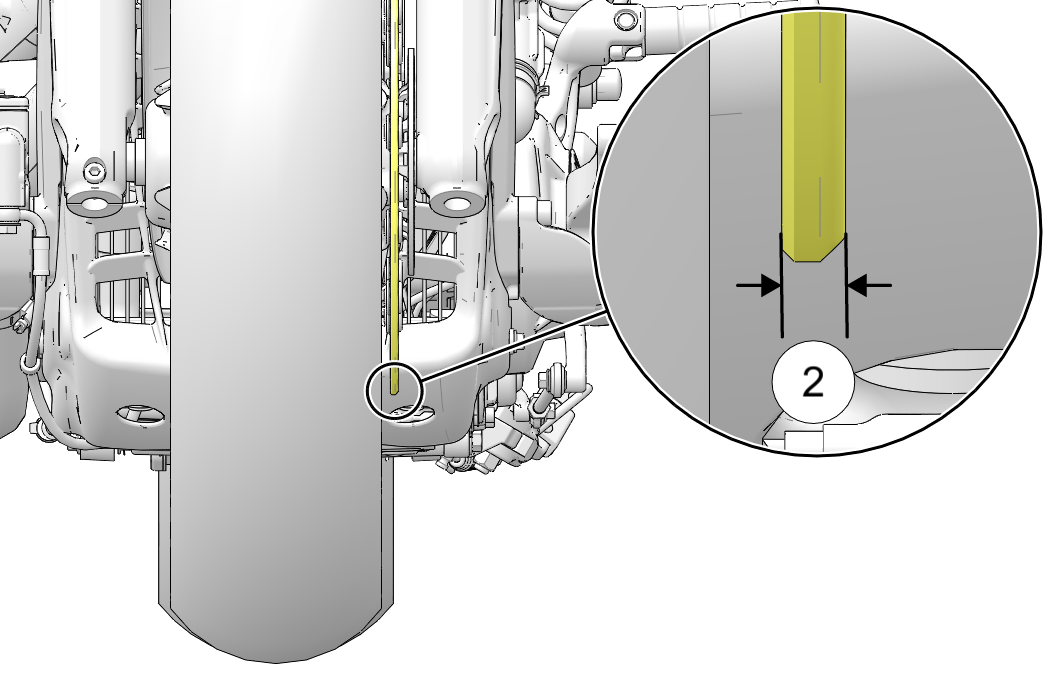
  1. Inspect brake discs for nicks, scratches, cracks or other damage. Inspect the thickness of each brake disc at four or more locations around the disc. If any disc is worn to the minimum thickness at the thinnest point, or if a disc is damaged, see your dealer for replacement.Image
  2. Clean discs if minor squeaks develop due to dirt or dust. Apply brake cleaner to a clean shop towel and wipe the discs. DO NOT allow brake cleaner to contact painted or plastic parts. Read all precautions on the label.
IMPORTANT
Minimum Thickness (Front): 4.5 mm
Image

Anti-Lock Brake System (ABS) Tone Ring/Sensor Inspection (if equipped)

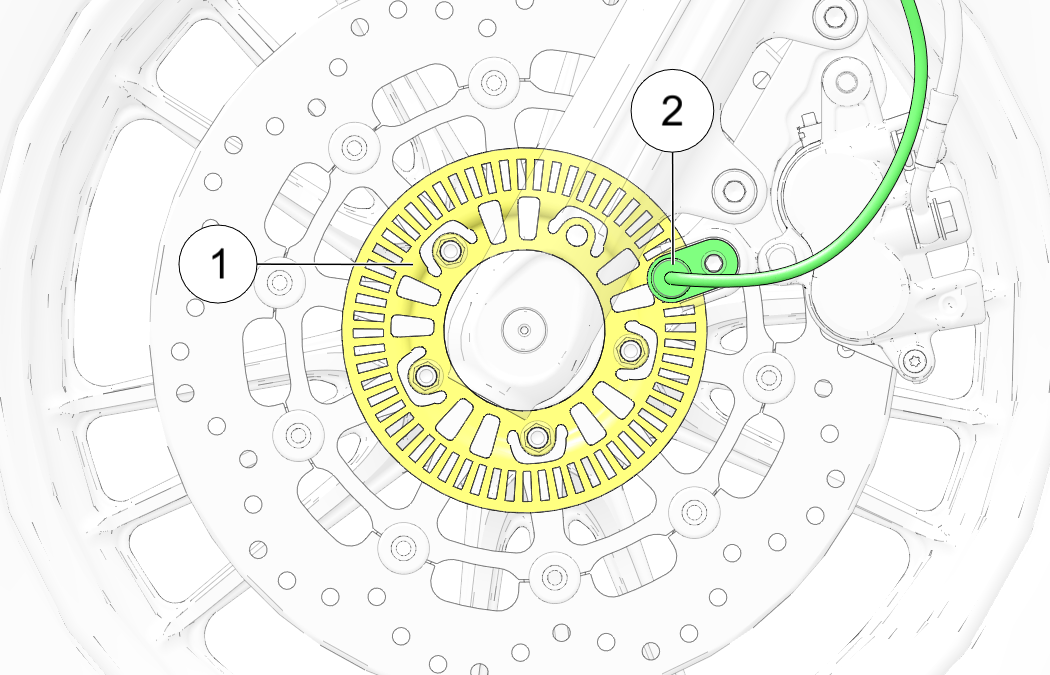
  1. Visually inspect for damaged teeth on the front and rear ABS tone rings . Inspect for nicks and dents on the face of the teeth. The teeth edges should be consistent in appearance. If a tone ring is damaged, see your dealer for replacement as soon as possible.Image
  2. Inspect for debris adhering to the end of the wheel speed sensors . If contamination is observed, or if you are unable to visually inspect, slide a thin towel across the face of the sensor between the sensor and the tone ring to remove any potential debris.

© Copyright Polaris Inc. All rights reserved.