Content Source: 2019 Slingshot Owner’s Manual (9928978 REV 05) > Features and Controls Chapter

IMPORTANT

The Owner's Manual for this vehicle contains warnings, instructions and other information you must read and fully understand before safely riding or performing maintenance on this vehicle.Always follow the warnings and instructions in Owner's Manual.

Click the CONTENTS link above for the Table Of Contents, or download a full PDF of the Owner Manual in the Owner Support area of Polaris.com

Multi-Function Display

WARNING
Driving while distracted can result in loss of vehicle control, crash and serious injury or death. Use extreme caution when using any device that may take your focus off the road.
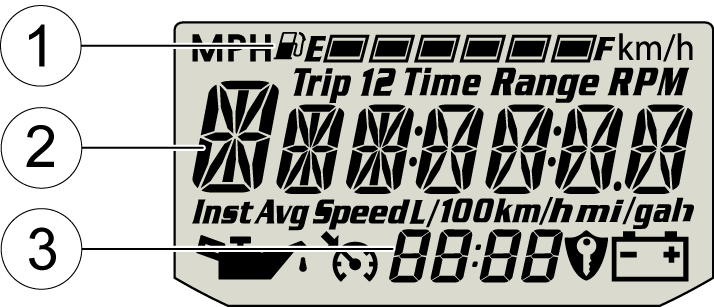
Use the mode button to toggle through the modes of the multi-function display. See Mode Button. Press and hold the mode button to reset the trip odometers and average fuel economy.
Modes Available
Fuel Level Gauge Fuel Range
Trip Odometer 1 Average Fuel Economy
Trip Odometer 2 Clock
Ambient Air Temperature  

Image
Fuel Gauge Display - The segments of the fuel gauge show the level of fuel in the fuel tank. When the last segment clears, a low fuel warning is activated. All segments including the fuel icon will flash. Refuel immediately
TIP
If the fuel icon fails to display, an open or short circuit has occurred in the fuel sensor circuit. Your dealer can inspect the vehicle and perform service.
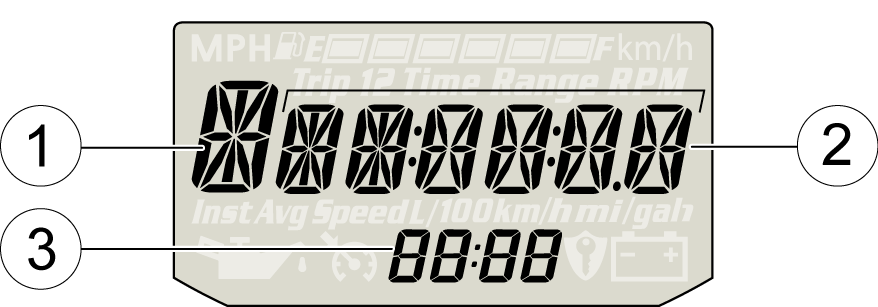
Information Display - This area displays odometer, trip meters (2), air temperature and fuel economy.
Clock Display - The clock displays time in a 12-hour or 24-hour format. See Display Units (Standard/Metric) for resetting instructions.


Display Units (Standard/Metric)

The display can be changed to display either standard or metric units of measurement.
NOTE
To exit the set-up mode at any time, wait 10 seconds. The display automatically exits and returns to the odometer display.
  Standard Display Metric Display
Distance Miles Kilometers
Fuel U.S. Gallons I = Imperial Gallons Liter = Liters
Temperature Fahrenheit Celsius
Time 12-Hour Clock 24-Hour Clock
  1. Turn the key to the OFF position.
  2. Press and hold the mode button while turning the key to the ON or ACC position.
  3. When the display flashes the distance setting, tap the mode button to advance to the desired setting.
  4. Press and hold the mode button to save the setting and advance to the next display option.
  5. Repeat the procedure to change remaining display settings.

Clock Mode

WARNING
The clock must be reset any time the battery has been disconnected or discharged.
  1. Turn the key to the ON position. Use the MODE button to toggle to the odometer display.
  2. Press and hold the MODE button until the hour segment flashes. Release the button.
  3. With the segment flashing, tap the MODE button to advance to the desired setting.
  4. Press and hold the MODE button until the next segment flashes. Release the button.
  5. Repeat steps 3–4 twice to set the 10-minute and 1-minute segments. After completing the 1-minute segment, step 4 will save the new settings and exit the clock mode.
  6. Turn the key to the OFF position.

Odometer/Trip Meter Mode

The odometer displays the total distance traveled by the vehicle. Each trip odometer displays distance traveled since the trip odometer was reset. To view the trip odometer, turn the key to the ON position. Use the mode button to toggle to the trip odometer.
To reset the trip odometer, toggle to the trip odometer, then press and hold the mode button until the trip odometer resets.

Engine Error Codes

The error screen displays only when the CHECK ENGINE light is on or when it goes on and off during one ignition cycle. Error codes are not stored. When the key is turned OFF, the code and message is lost, but will reappear if the fault reoccurs after restarting the engine.
If the CHECK ENGINE indicator lamp illuminates, retrieve the error codes from the display.
  1. If the error codes are not displayed, use the MODE button to toggle until “Ck ENG” displays on the main line of the display.
  2. Press and hold the MODE button to enter the diagnostics code menu.
  3. Record the numbers displayed in the gear position (if any), clock and odometer displays.
  4. Press the MODE button to advance to the next error code.
  5. Press and hold the MODE button to exit the diagnostics code menu.
  6. See your authorized dealer for code details and diagnosis.

  • Error Code Number (0-9)
  • Suspect Parameter Number (SPN)
  • Failure Mode Indicator (FMI)

Image

© Copyright Polaris Industries Inc. All rights reserved.