Content Source: 2021 Timbersled SX 120 / ARO / RIOT Owner’s Manual (9931501 R01) > Maintenance Chapter

IMPORTANT

The Owner's Manual for this vehicle contains warnings, instructions and other information you must read and fully understand before safely riding or performing maintenance on this vehicle.Always follow the warnings and instructions in Owner's Manual.

Click the CONTENTS link above for the Table Of Contents, or download a full PDF of the Owner Manual in the Owner Support area of Polaris.com

Track Maintenance

Track Inspection

  1. Using a hoist, safely lift and support the rear of the snow bike off the ground.
  2. Rotate the track by hand to check for damage.
  3. Carefully examine the track along the entire length of each rod. Bend the track to check for breakage.
  4. Replace the track if any rod damage is found.
WARNING
Broken track rods can cause a rotating track to come off the snow bike, which could cause serious injury or death. Never operate with a damaged track. Never rotate a damaged track under power.

Track Alignment

Proper track alignment is an essential factor in proper snow bike handling and in preventing excessive wear to the track and rail slides (i.e hifax).

Inspecting Track Alignment

To inspect track alignment, follow the steps below.
  1. Elevate the track off the ground using a stand.
  2. Idle the bike in-gear for several revolutions. Inspect whether track is revolving evenly.
    NOTE

    The track is properly aligned when he track clips run evenly along the hifax and the track is centered on the suspension.

  3. Shut off the engine.
  4. Measure the horizontal distance between the hifax and the track edge on both sides of the bike.
  5. If the track is aligned properly, both sides should measure approximately the same distance .

    If the track is running too far to one side, track alignment must be adjusted. See Adjusting Track Alignment section for proper adjustment procedure.

Image

Adjusting Track Alignment

To adjust track alignment, follow the steps below.
  1. Loosen axle bolt .
  2. Loosen the adjustment bolt jam nuts and .Image
  3. If the track is running too far to the left, turn the right tension adjustment bolt clockwise approximately one-half turn.

    If the track is running too far to the right, turn the left tension adjustment bolt clockwise approximately one-half turn.

    NOTICE
    Tune the adjustment bolt one half-turn at a time. Check the alignment between adjustment to determine if additional adjustment is needed.
  4. When track is revolving evenly along the hifax, tighten the adjustment bolt jam nut and tighten axle bolt to specified torque.
    TORQUE

    Axle Bolt

    36.9 ft-lbs (50 N·m)

  5. Idle the bike in-gear for several revolutions for track alignment adjustment to take full effect. Observe the running track for several additional revolutions.
  6. Shut the engine off. When aligned properly, the track should run straight and center on suspension rails.
  7. Re-measure the horizontal distance between the hifax and track edge on both sides of the bike.
    • Proper alignment: Distance between hifax and track edge are approximately the same on both sides and track appears to run centered on the rails.
    • Not aligned properly: Distance between the hifax and track edge is NOT the same on both sides of the bike and the track is NOT centered on the rails. Repeat steps 1 through 5 until track is properly aligned.
IMPORTANT
Adjusting track alignment will alter the tension of the track. When track is properly aligned, measure track tension and adjust if necessary. See Track Tension section for more information.

Track Tension

WARNING
Moving parts can cut and crush body parts. When performing the checks and adjustments recommended on the following pages, stay clear of all moving parts. Never perform track measurement or adjustments with the engine running.
caution
Always ensure proper track tension. Operating your snow bike with a too loose or too tight track could cause the rails to pierce the track (stabbing). Stabbing a track may result in bodily harm and / or damaged equipment.
Proper track tension adjustment is critical for proper snow bike handling. Always maintain proper track alignment and tension. Each track is slightly unique and will break-in a bit differently depending on where and how you ride.
Track tension warning signs:
  • Too loose: Track is skipping on the drivers.
  • Too tight: The rail sliders (hifax) are wearing quickly.
NOTICE
Before measuring and adjusting track tension, ensure the track is properly aligned. For more information, see Track Alignment section.

Measuring Track Tension


Image
TRACK TENSION DATA
SUSPENSION PROPER SLACK MEASUREMENT APPLIED WEIGHT MEASUREMENT LOCATION -
All Model Types 3/4” to 1” 10 lbs 10” to 15” in front of the rear axle
To measure track tension:

  1. Using an appropriate hoist or stand, safely lift and support the rear of the snow bike off the ground.
  2. Place the recommended weight or downward pressure on the track at the measurement location specified (see table).
  3. At the measurement location , measure the vertical slack or space between the bottom of the hifax (i.e. rail slider) and the wear surface of the track clip . This is the slack measurement.

Image
  1. If the track is properly tensioned, the slack measurement should be between 3/4” to 1” (as shown in the table).

    If the slack measurement is less or greater than the proper slack measurement ( 3/4” to 1”), the track tension should be adjusted (see the following section, Adjusting Track Tension).


Adjusting Track Tension

Measure track tension to be sure adjustment is needed.
NOTICE
If the track starts to skip on the drivers, the track is too loose and needs to be adjusted. Occasionally this will happen after a new track has been run.
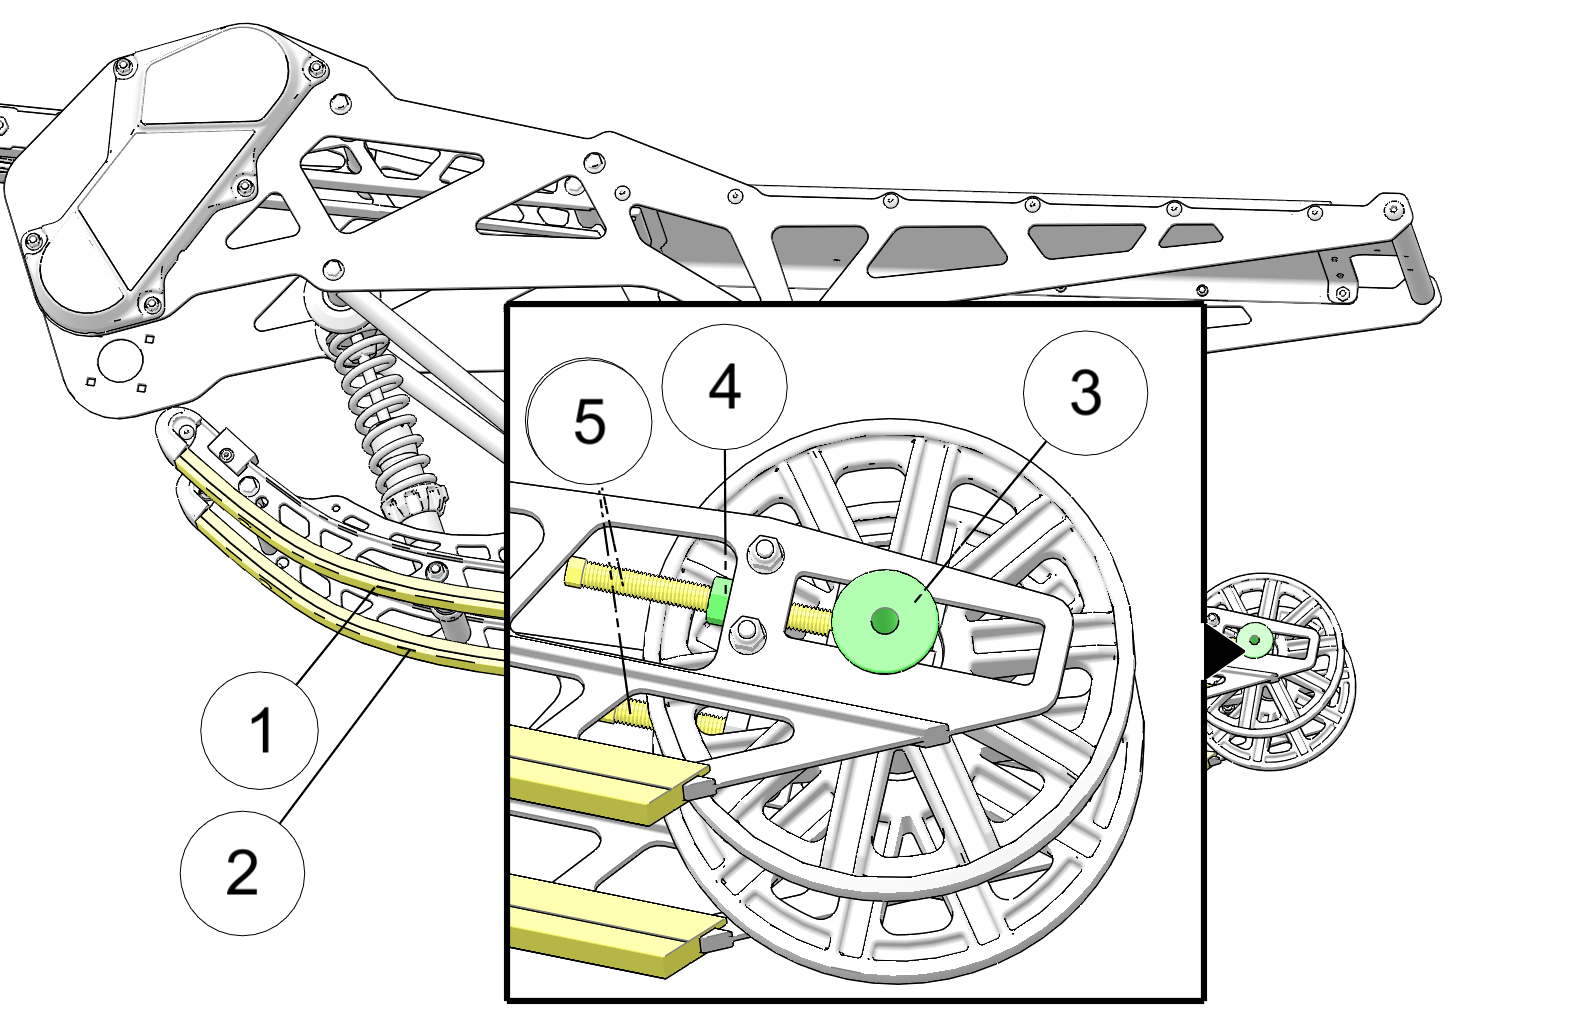
Image
  1. With the rear of the bike off the ground and properly supported by a stand, loosen the axle bolt on the track tensioning block.
  2. Loosen the adjustment bolt’s jam nut .
  3. Then tighten or loosen the tension adjustment bolt , a half-turn at a time on both the right and left side of the bike. Turn the adjustment bolts the same amount on both sides of the track to tension the track evenly and keep the track aligned (track alignment should be performed before measuring and adjusting track tension).

    Turning the adjustment bolts on each side of the bike to the right will push the rear axle back and tighten track tension.

    Turning the adjustment bolts on each side of the bike to the left will allow the rear axle to move forward toward the front of the bike putting less tension on the track.

  4. Re-tighten the adjustment bolt’s jam nut.
  5. Torque the axle bolt once again.
    TORQUE

    Axle Bolt

    36.9 ft-lbs (50 N·m)
  6. With the bike still secure and the track off the ground, rotate the track several times by hand or by running the engine in gear for several seconds. Then stop or turn the bike off. (It takes several track revolutions for track adjustment to take effect.)
  7. Measure the track tension again (see Measuring Track Tension).

    If the slack measurement is within the proper slack measurement range, your track tension is set properly.

    If the tension is still too loose or too tight, repeat the steps above until your track tension is set properly.

  8. Once the track tension is set, check to ensure the track is still properly aligned. To check and adjust track alignment, see the Track Alignment section.

© Copyright Polaris Inc. All rights reserved.