Content Source: 2022 Indian FTR Owner’s Manual (9931166 R02) > Features and Controls Chapter

IMPORTANT

The Owner's Manual for this vehicle contains warnings, instructions and other information you must read and fully understand before safely riding or performing maintenance on this vehicle.Always follow the warnings and instructions in Owner's Manual.

Click the CONTENTS link above for the Table Of Contents, or download a full PDF of the Owner Manual in the Owner Support area of Polaris.com

Ride Command Display (if equipped)

Image
For the latest information about your Ride Command display, including software updates, please visit:
https://ridecommand.indianmotorcycle.com
WARNING
Do not enter information while operating your vehicle. Failure to pay attention to operating your vehicle could result in loss of control, serious injury, or death. You assume all risks associated with using this device. Read your User Guide.
WARNING
Driving while distracted can result in loss of vehicle control, crash, and serious injury. We strongly recommend that you use extreme caution when using any device that may take your focus off the road. Your primary responsibility is the safe operation of your motorcycle. We recommend against the use of any hand-held device while driving and encourage the use of voice-operated systems when possible. Make sure you are aware of all applicable local laws that may affect the use of electronic devices while driving.
Before riding with your new display, do the following:
  • Read this entire manual.
  • Familiarize yourself with the features and operations of the display while the vehicle is stationary.
  • Download the Indian Motorcycle Ride Command app from the Apple® App Store®/Google Play™ store and create your personalized account.
  • Check http://www.polaris.com/en-us/rider-support/owners-manual for the latest updates to the owner’s manual.
NOTICE
Using the display for an extended period of time while the vehicle’s engine is off can drain the battery.

Ride Command Hand Controls

Right Trigger

Press the right-hand trigger switch to toggle through the Ride Command display screens.
Image

Select Joystick

The 5–way Select Joystick allows you to navigate through the display screen from the left-hand switch cube.
Image
Use the 5–way select joystick to do the following:
  • Long press to show App Tray
  • Navigate through menu gauge/menu screens
  • Enter/Select
  • Change gauge style

Back Button

Press the back button to do the following:
  • Close Pop-ups
  • Navigate back in menu
  • Long press to return to gauges screen
  • When viewing a top-level display screen, press the back button to cycle through the Ride Command display screens.
Image

Ride Command Display Screens

Image
The Ride Command display has four top-level display screens:
  • Gauge Screen
  • Music Screen
  • Phone Screen
  • App Tray
To cycle through the display screens, do one of the following:
  • Press the physical up or down button on the gauge.
  • Press the right trigger switch.
  • While viewing one of the four top-level screens, press the back button on the left hand control.

Gauge Screen

Image

Image
The gauge screen displays the vehicle’s speed, current gear, fuel level and range, ambient and engine temperature, odometer, trip meter, and compass. You have two different gauge styles to choose from, round or linear (both shown above). The display style can be changed by swiping up or down on the touchscreen, or by pressing up or down on the select joystick.

Music Screen

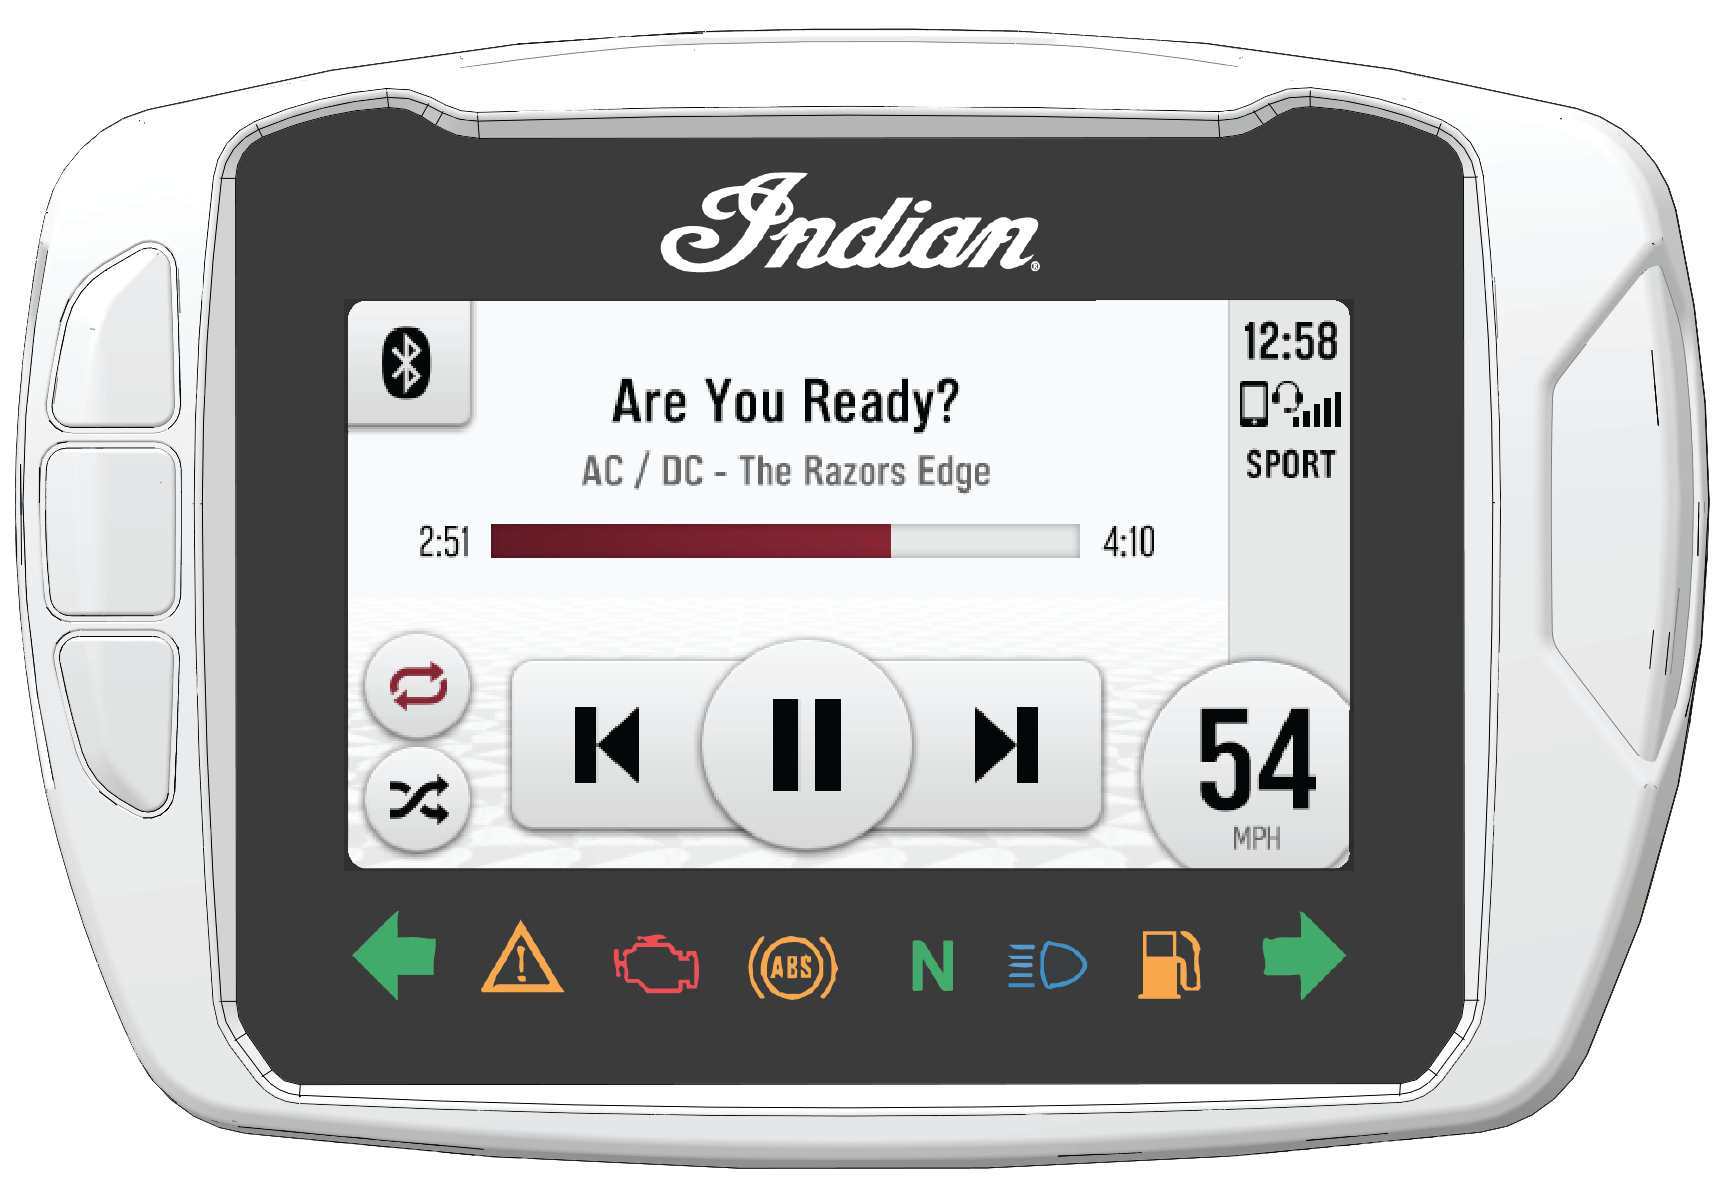
The music screen allows you to access music stored on your smart-phone or other music device. You can pair your device using Bluetooth®, or by connecting it to the display’s USB port.

USB audio playback is only available on flash drives formatted to ex-FAT or FAT32. Playback from an iOS® devices is only available on iPhone® 5S models or later.

Image

Phone Screen

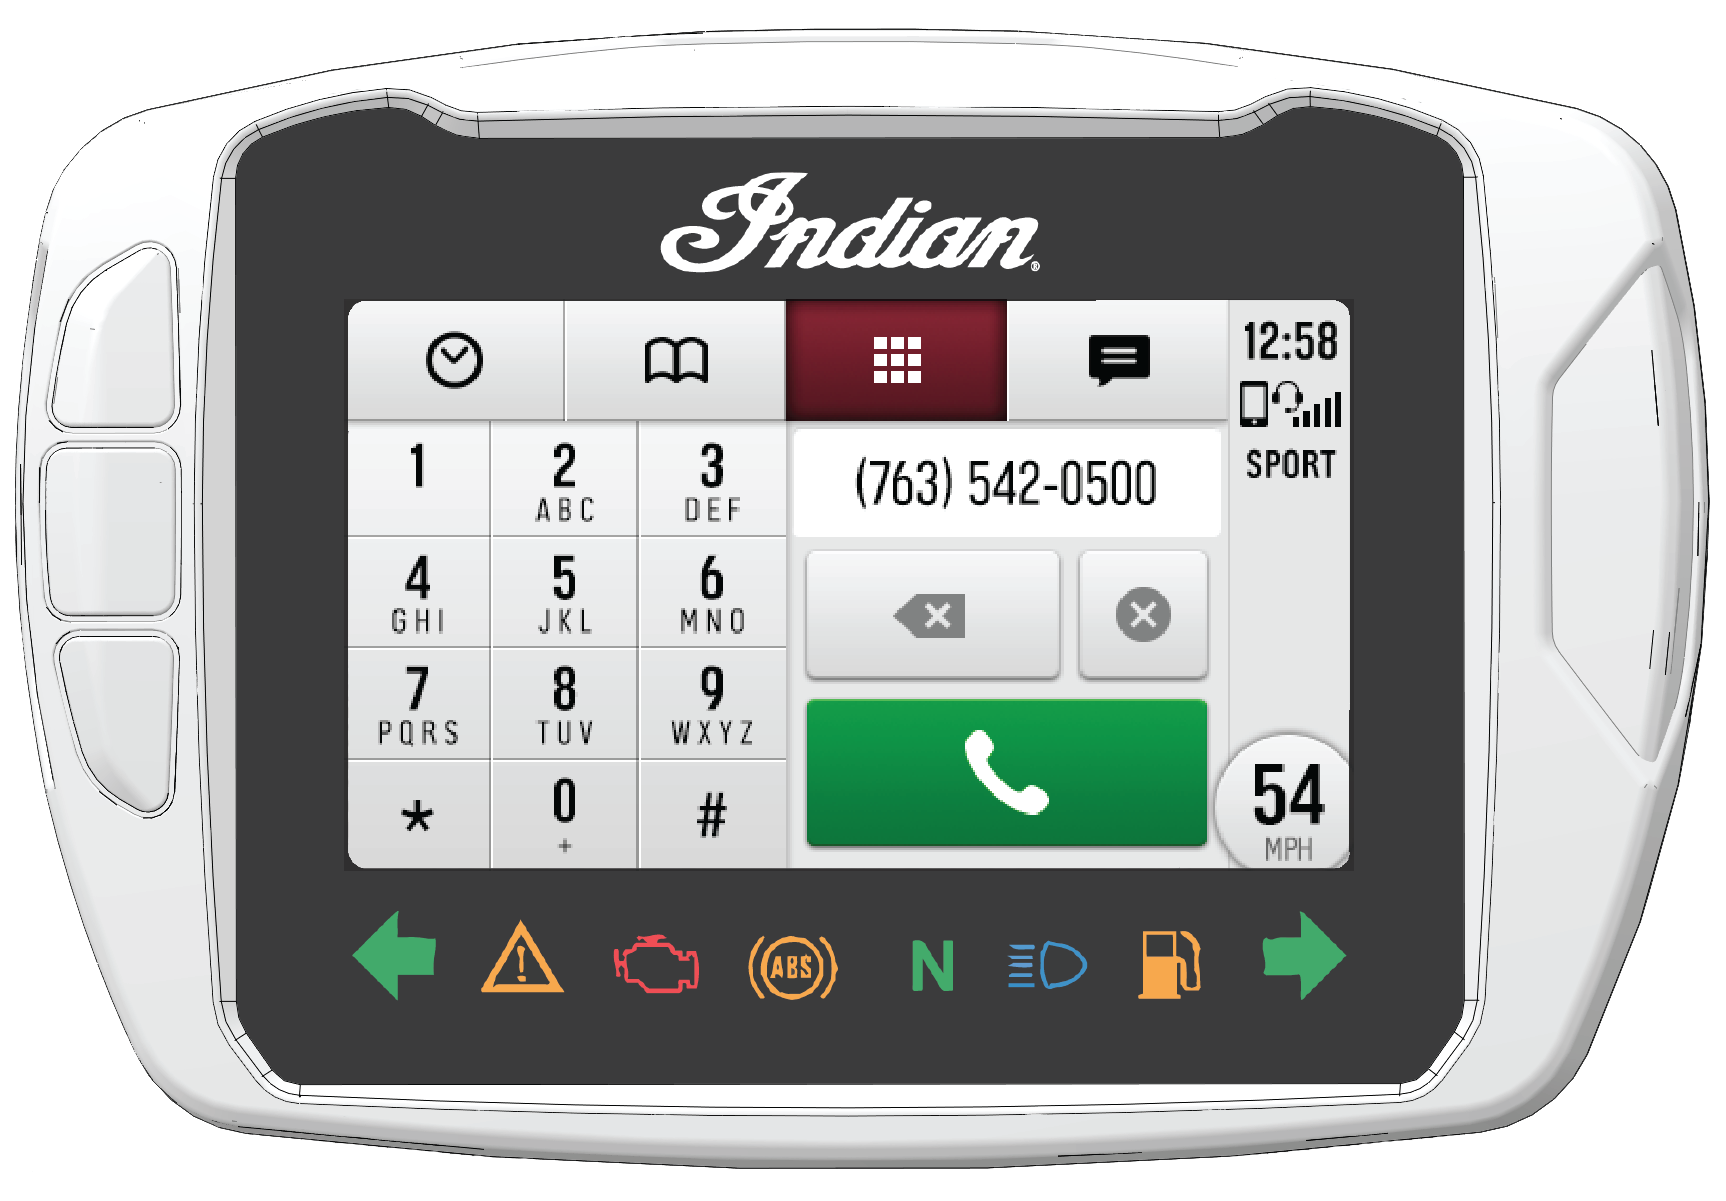
The phone screen displays recent calls, contact list, key pad, and messages. The display will only show messages received while smart-phone is paired via Bluetooth®.

Image

App Tray

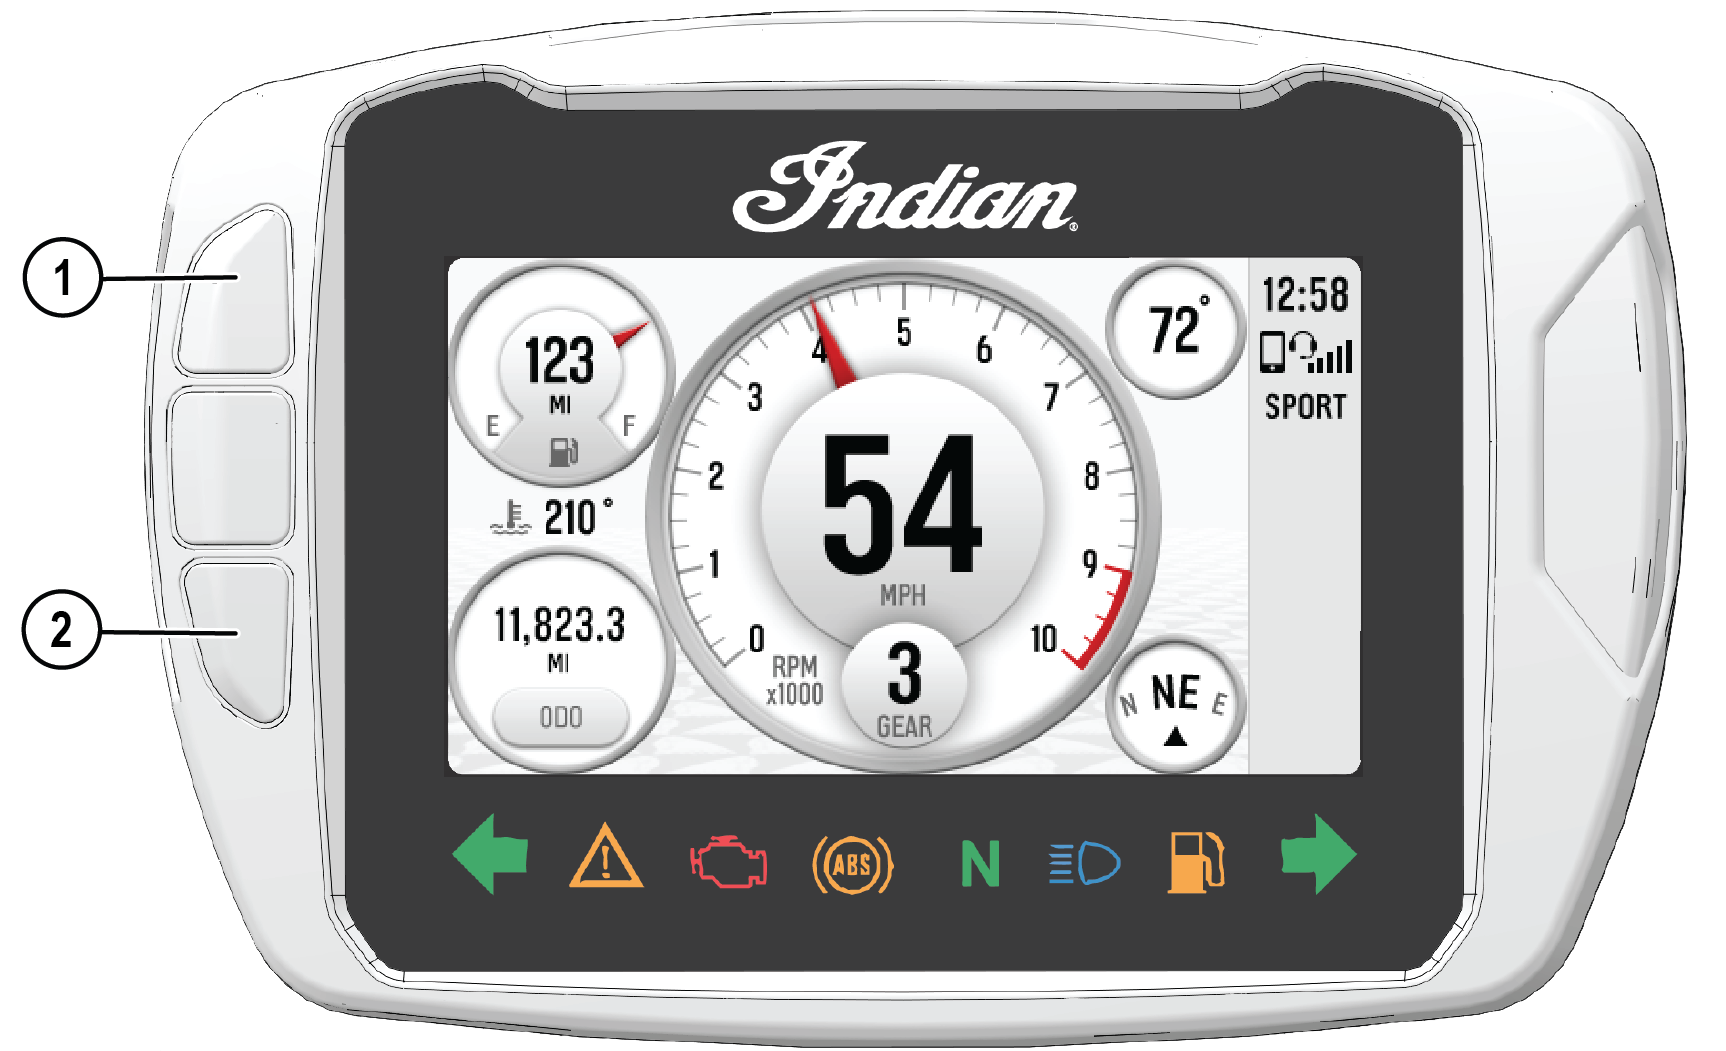
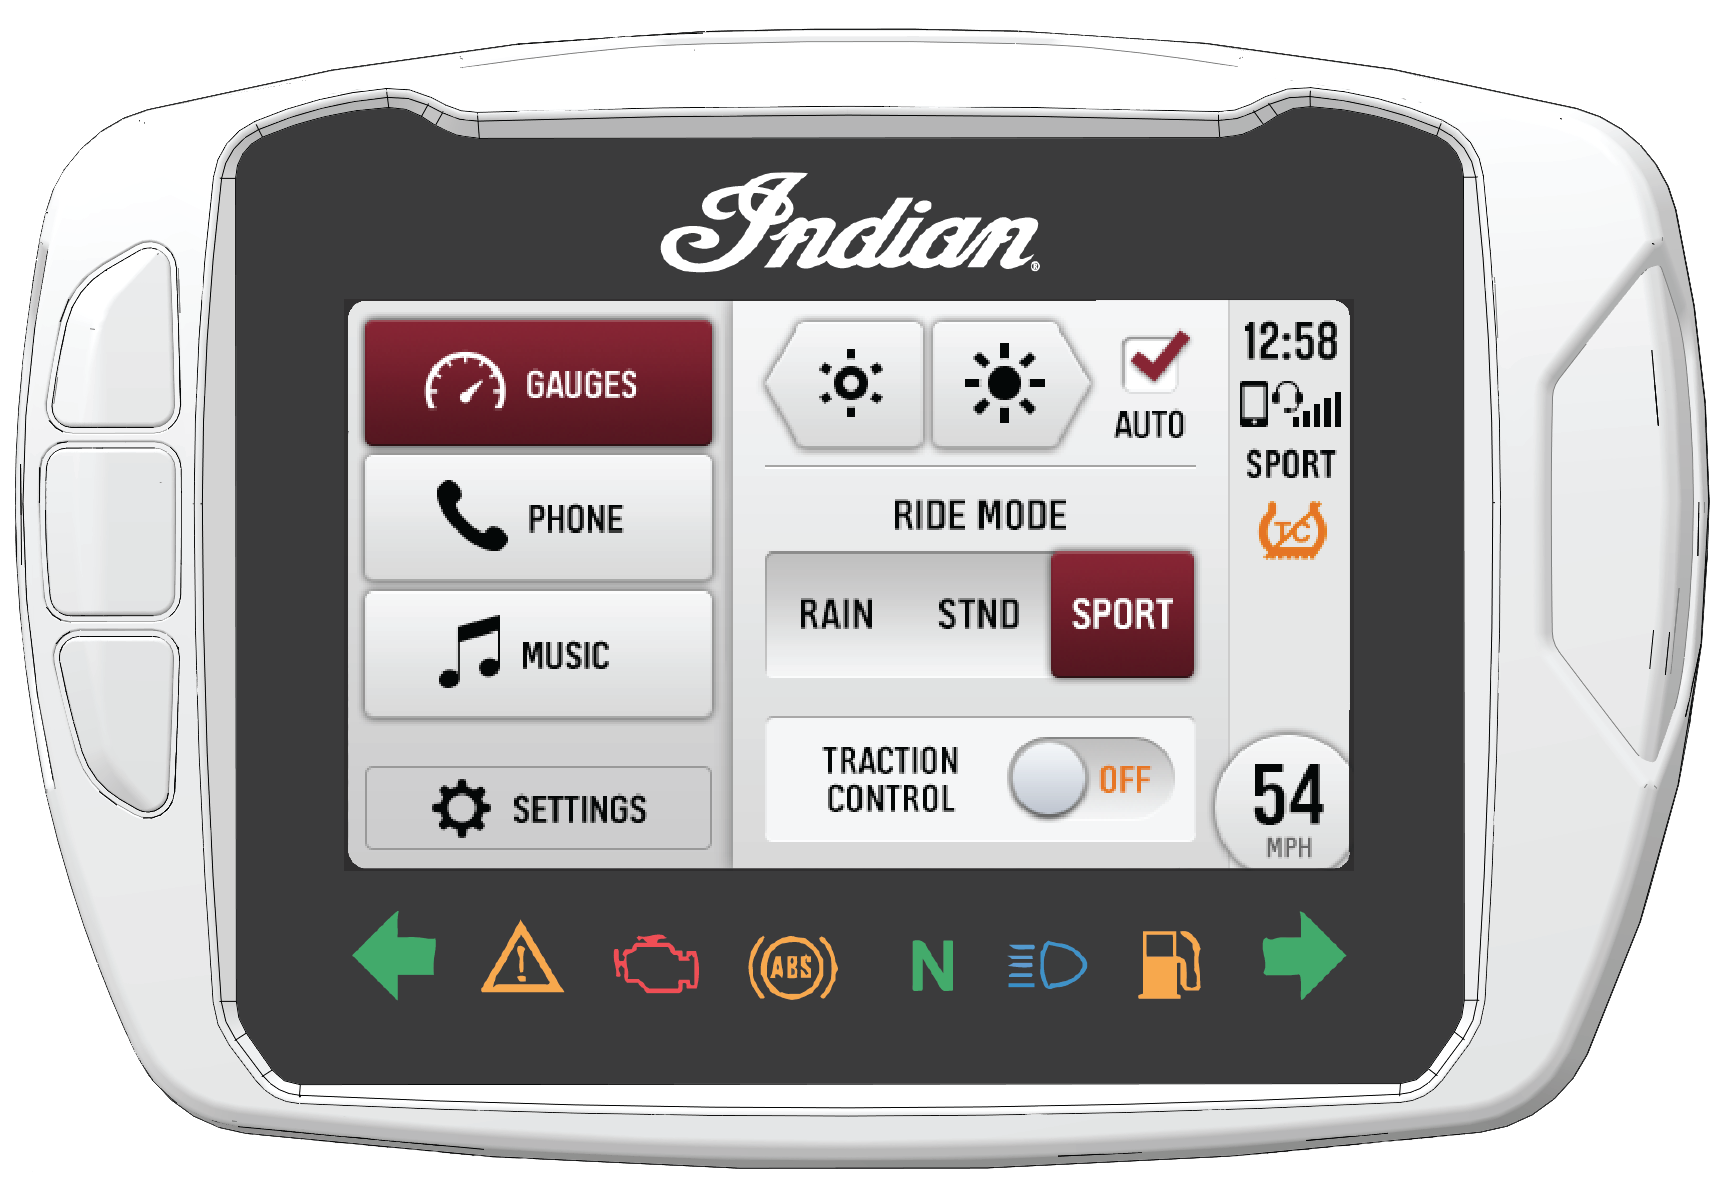
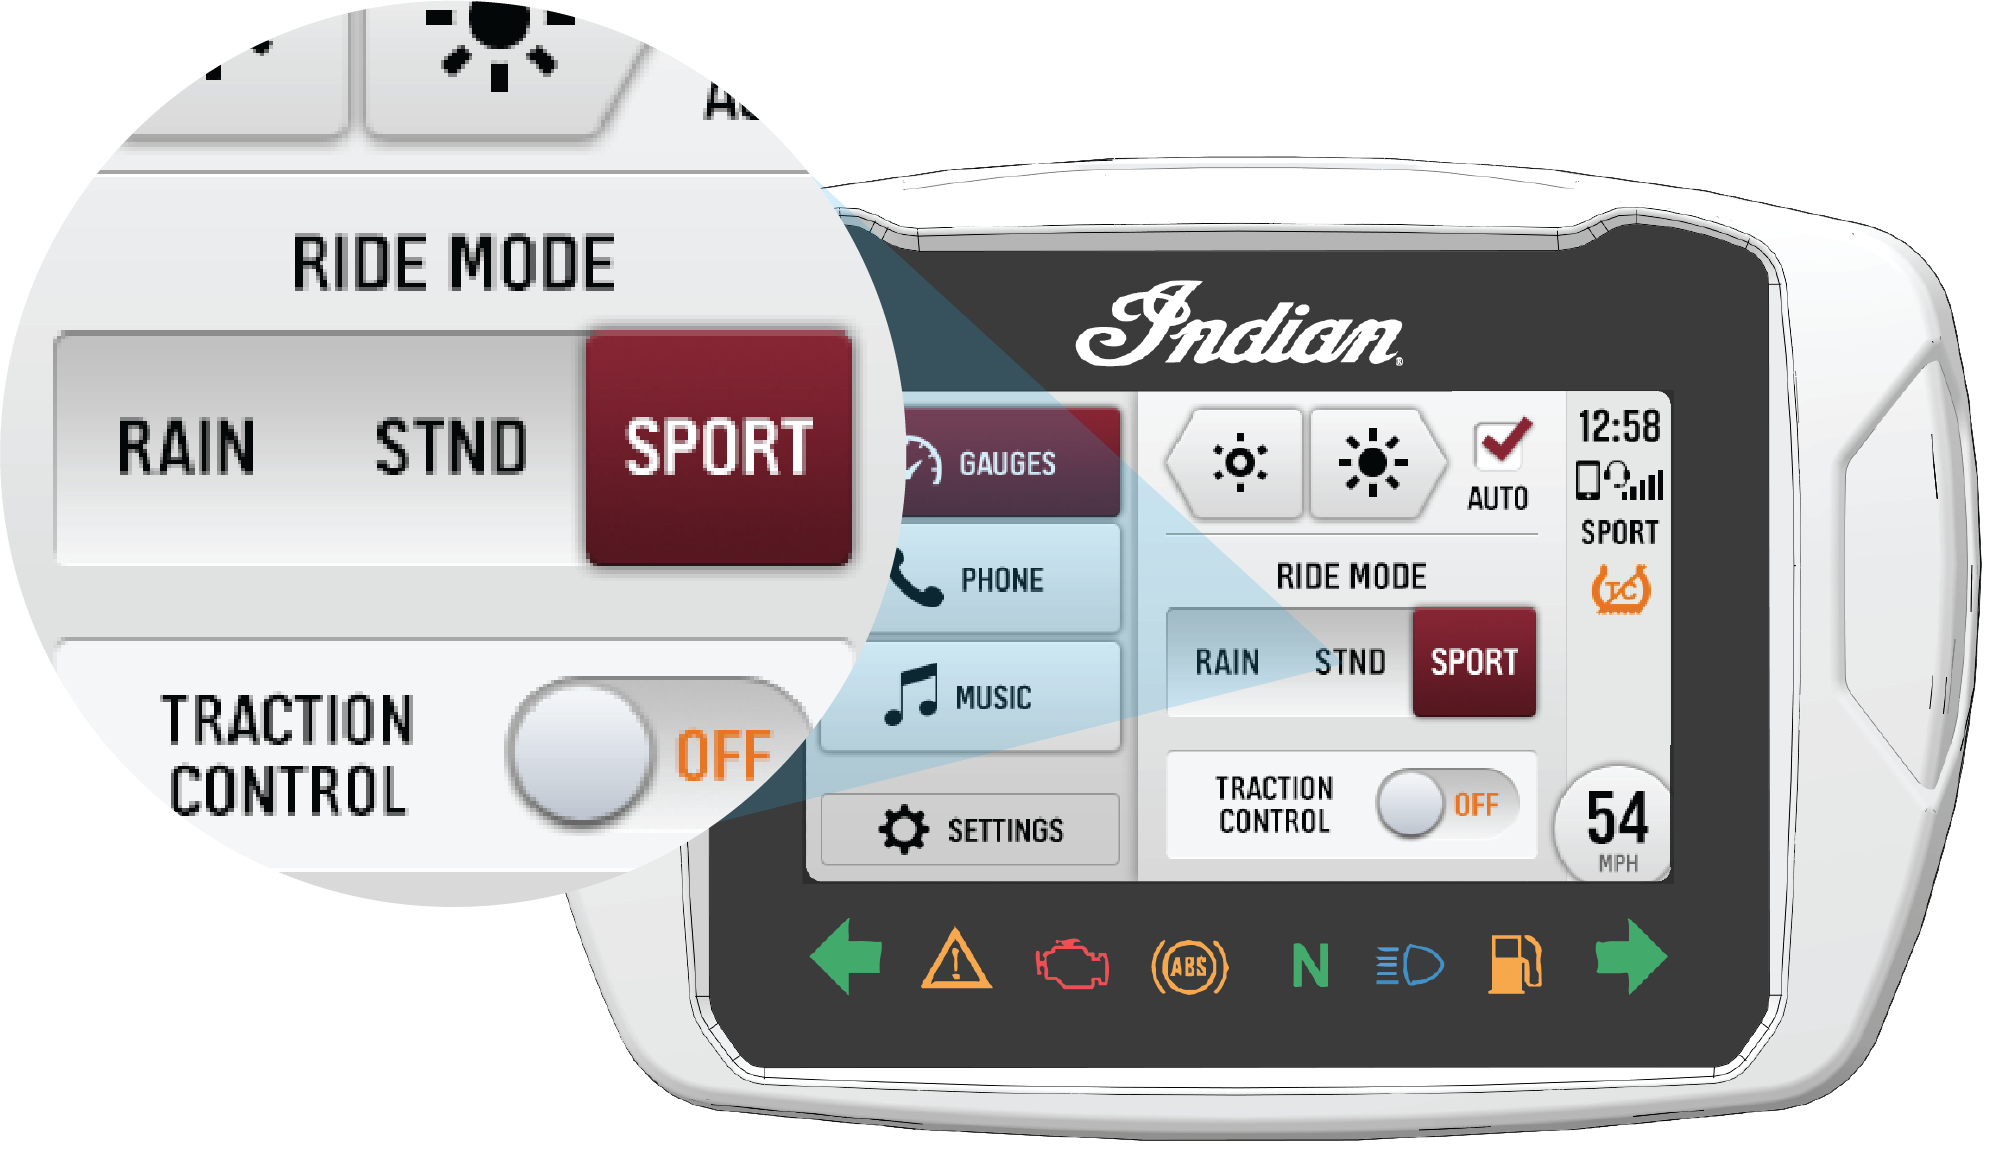
From the App Tray you can access settings, adjust display brightness, select ride mode, and enable/disable ride mode.

You can access the App Tray at anytime by pressing the center button on the gauge or a long press of the select joystick.

Image

Right Side Menu Bar Indicators

Lamp Indicates Condition
Image
Engine Overheat The engine overheat symbol will illuminate when the engine temperature exceeds normal operating temperature.
Image
Battery Warning The Battery Voltage lamp illuminates if high or low battery voltage is detected, or if there is a charging system fault. Turn non-essential accessories off to conserve power. Make sure the charging system is operating properly.
Image
Low Oil Pressure The Low Oil Pressure lamp illuminates when oil pressure drops below a safe operating pressure while the engine is running. If this lamp illuminates while the engine is running above idle speed, turn the engine off as soon as safely possible and check the oil level. If the oil level is correct and the lamp remains on after the engine is restarted, turn the engine off immediately. See your dealer.
Image
Sidestand The side-stand symbol illuminates if the side-stand is in the extended position.
Image
Image
Cruise Control Status Amber Lamp: Cruise control is enabled, but not set. When flashing, a cruise control related fault exists. Green Lamp: Cruise control is set to the desired speed. Read the safety and operation procedures before using cruise control. See Using Cruise Control.
Image
Traction Control Fault The traction control fault indicator remains on until the traction control system activates, which occurs when vehicle speed exceeds 6 mph (10 km/h). The traction control fault indicator also illuminates when the traction control system has experienced abnormal operation and will remain on as long as the fault condition exists.
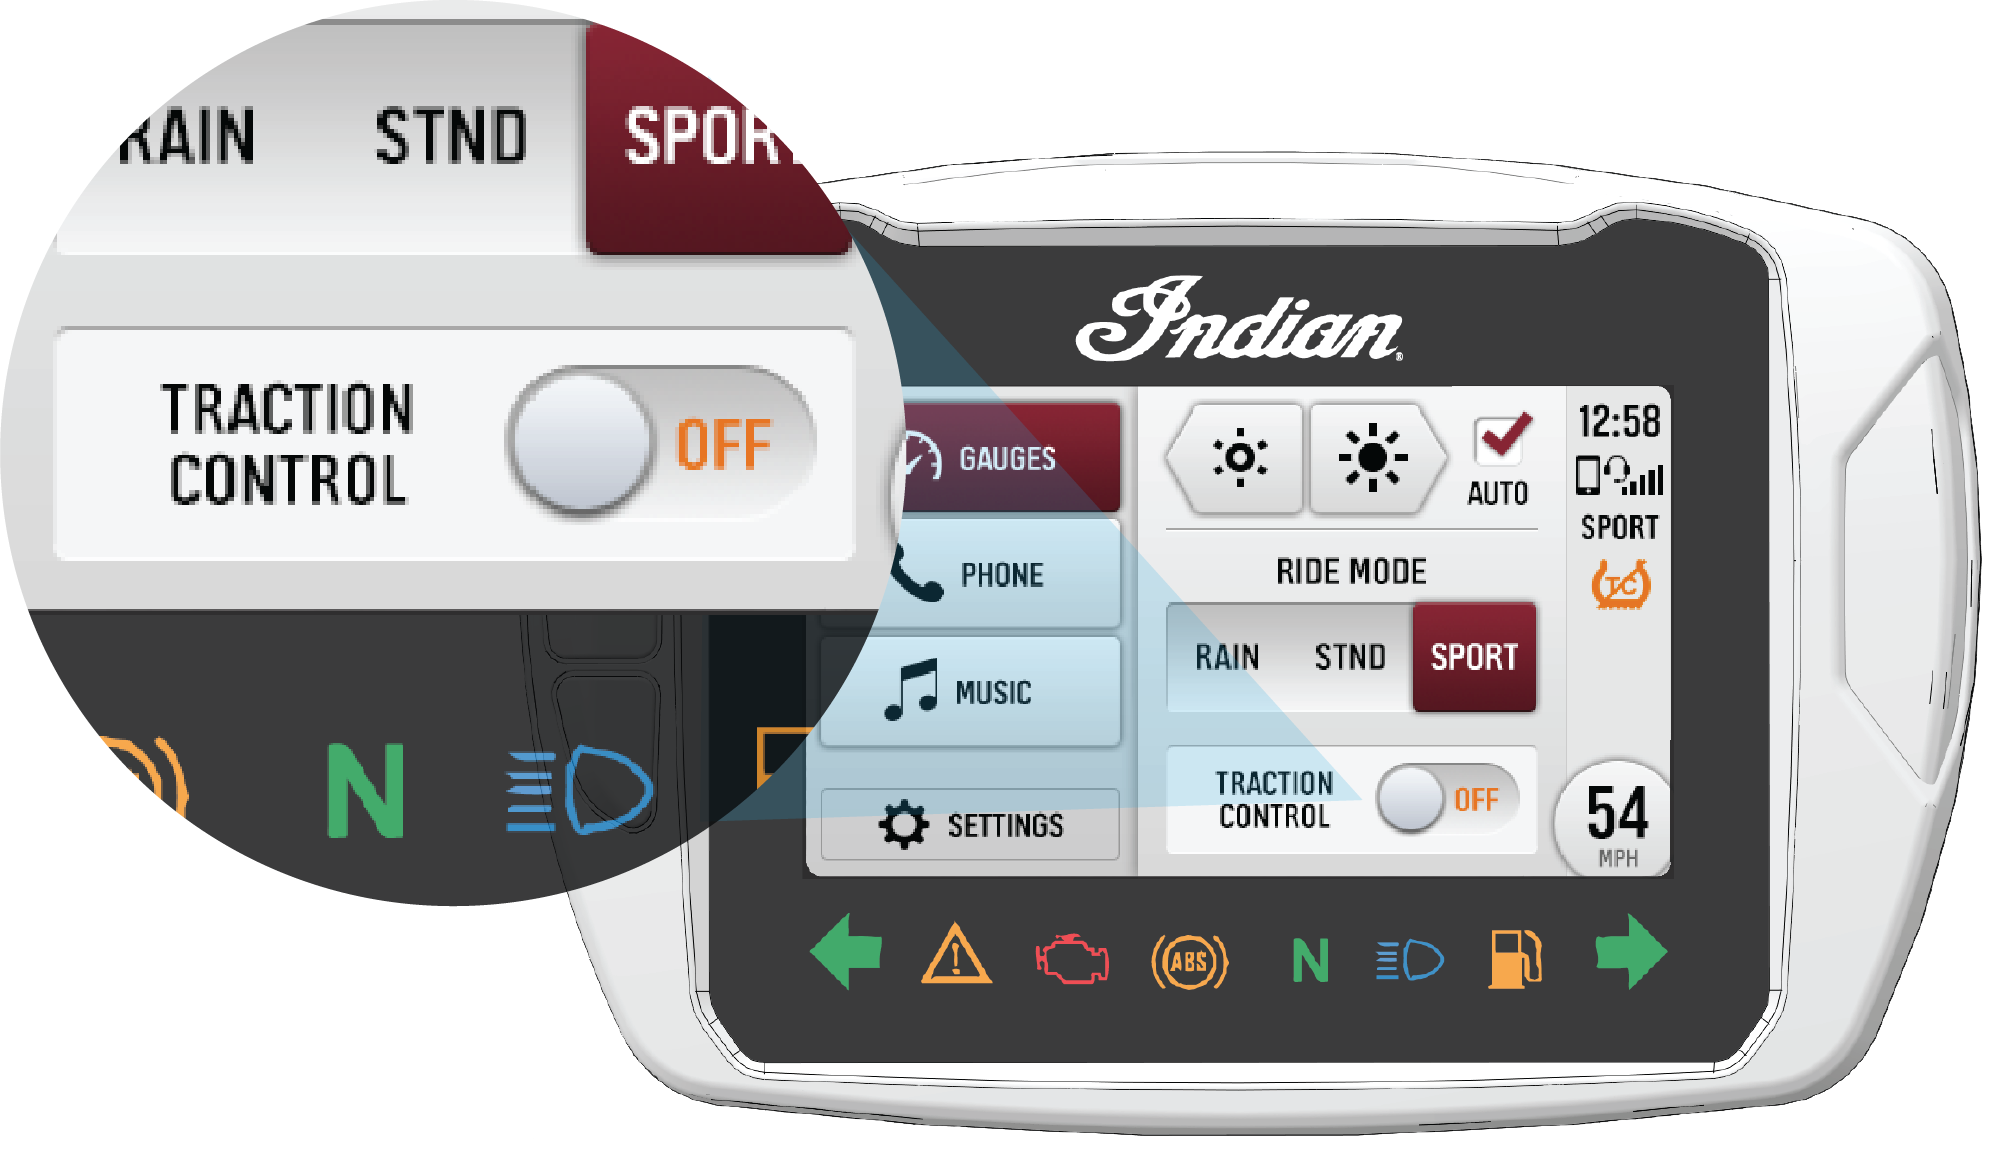
Image
Traction Control Off The traction control off symbol illuminates when the traction control system is off. See Traction Control.
Image
Rear Cylinder Deactivation Designed as an aid to reduce engine and exhaust heat to the rider, Rear Cylinder Deactivation shuts down the rear cylinder when the engine is at operating temperature and at idle speed. See Rear Cylinder Deactivation.

Ride Command Ride Modes

Image
You can choose between three ride modes, Rain, Standard, or Sport, for an experience customized to your riding style. The throttle map for each ride mode was designed with a specific application in mind, resulting in one motorcycle with three distinct personalities.
NOTICE
For the ride mode to change the throttle must be fully disengaged. If you change the ride mode while the throttle is engaged, a spinning icon will appear indicating that the ride mode has not yet changed. Once the throttle has been disengaged the icon will disappear and the ride mode will change.

Rain

Rain mode is ideal for rainy conditions, or when the road is wet. The throttle response is decreased, giving you more control and traction.

Standard

Standard mode features a crisp throttle response and well-balanced power delivery for responsive passing power and predictable, slow-speed handling.

Sport

Sport mode is designed for situations when instant response is needed. Sport mode quickens the throttle response and has a more aggressive power delivery for increased acceleration.

Traction Control

Image
To disable the traction control, do the following:
  1. Tap on the Traction Control toggle switch to disable traction control.
  2. A prompt will appear asking you to confirm that you want to disable the Traction Control System. Press DISABLE to confirm.
    NOTICE
    If the traction control is disabled while the throttle is engaged, the traction control will stay active until the throttle has been disengaged.
  3. To re-enable traction control, press the Traction Control toggle switch again.

RIDE COMMAND Settings

From the Settings Menu you can view important details about your vehicle and personalize your touchscreen display. The settings menu is comprised of four categories: Information, General, Time, and Vehicle.

General Information

From the Information settings menu you can view the following:
  • Vehicle Identification Number (VIN)
  • Mileage
  • Installed Software Version
  • Oil Change Interval

General Settings

From the General settings menu you can do the following:
  • Themes (Day/Night/Auto)
  • Manage Bluetooth® Devices
  • Change the Language
  • Set the Speed Units of Measure (MPH or KPH)
  • Set the Temperature Units (F or C)
  • Update Software

Clock

From the Time Settings you can do the following:
  • Set the Time Format (12 hour or 24 hour)
  • Enable GPS Time (automatically sets the time to the time zone you are currently in)
  • Set Time (if GPS Time is not enabled)

Vehicle Information

From the Vehicle Settings you can do the following:
  • Oil Life/ Service Reset
  • Access Vehicle Diagnostics
  • Activate/Deactivate Cylinder Deactivation

Bluetooth® Pairing

The Ride Command touchscreen display can be connected to a smart-phone and a headset simultaneously.
To pair a device, do the following:
  1. From the Bluetooth® Devices settings screen, the Phone screen, or the Music screen, tap on the Add Device button to bring up the pairing prompt.
  2. Put your Bluetooth® device into pairing mode.
  3. Select the name of the device you want to pair from the touchscreen display to finish the pairing process.
  4. Confirm pairing (if applicable). Depending on the device you are pairing to the display you may be prompted to confirm pairing.

Update Software

For the latest software for RIDE COMMAND, go to:
https://ridecommand.indianmotorcycle.com.
The display software can be updated by connecting a USB stick containing the latest software version to the USB port located on the bottom left of the display. The Update Software menu in Settings will list any available updates on the USB stick. Choose the correct version and wait for the update to complete before removing the USB stick. The touchscreen display will automatically restart when software is updated.
NOTICE
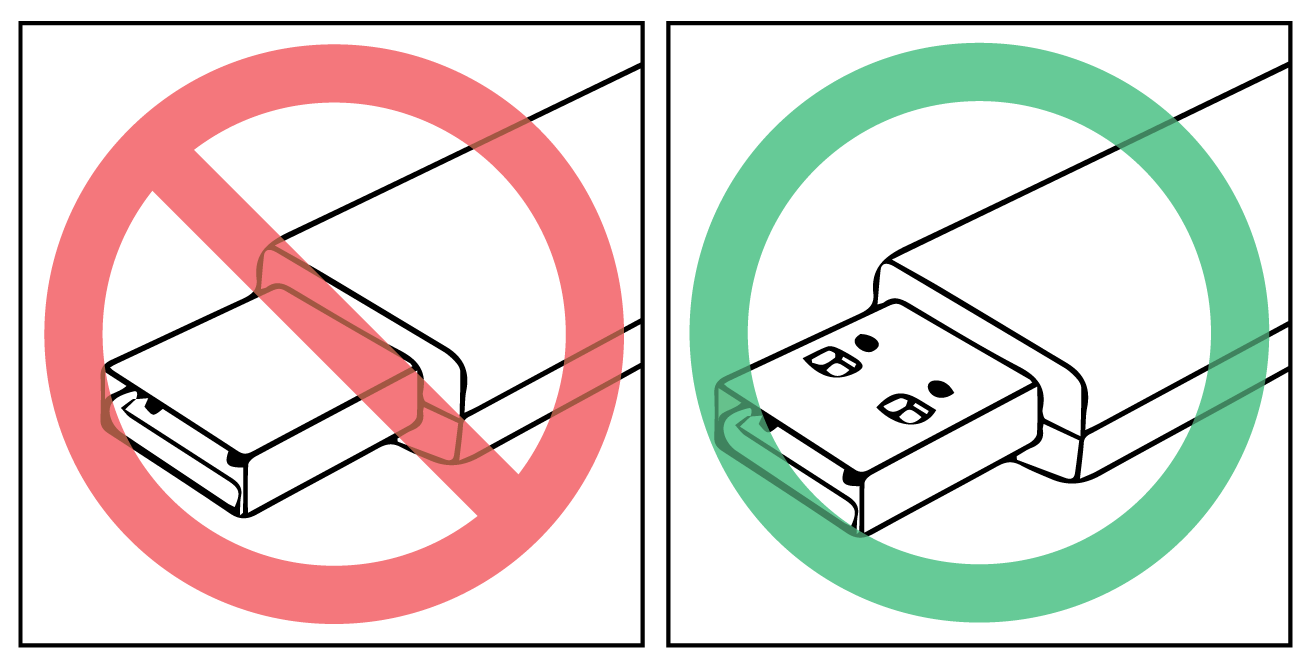
A USB 2.0 or USB 3.0 flash drive formatted to ex-FAT or FAT32 is required to successfully perform an update. The display will not recognize flash drives that do not meet these requirements.
IMPORTANT
Do not remove power from the display during the update process.

USB Port (IF EQUIPPED)

The USB Port makes it easy to power devices, such as phones, audio sources, or GPS units, in addition to allowing you to stream music through the LCD display to your Bluetooth® headset. On models equipped with a INDIAN MOTORCYCLE Ride Command display, the USB port is also used to update the display software. For the latest software, go to https://ridecommand.indianmotorcycle.com.
IMPORTANT
Due to harsh riding environments, INDIAN MOTORCYCLE recommends using a USB device with retention features.
Image

© Copyright Polaris Inc. All rights reserved.