Change the engine
oil at the intervals specified in the Periodic Maintenance Table beginning
on
Maintenance
Intervals. Change the oil more frequently if the motorcycle is
subjected to severe use, especially operation in cold weather. See
Severe
Use Definition.
| NOTICE |
| Failure to perform frequent oil changes during cold weather operation
can result in condensation forming. Freezing condensation
can result in plugged oil lines
and serious engine damage. |
The total amount of
oil required for the oil and filter change is approximately 5 qts.
(4.7 l). Follow all instructions carefully.
Do not overfill.
| NOTICE |
| After an oil change, the low oil pressure indicator may illuminate
when the engine is started. If this occurs, do not increase
RPM above idle speed until
the indicator turns off. Operating above idle speed could result in
damage to the engine. |
- Change the oil and
filter when the engine is warm. If the engine is cold, start the engine
and allow it to run at idle for
at least 5 minutes.
- Park the motorcycle
with the sidestand down on a firm, level surface. If using a service
lift, the motorcycle should be centered.
- Clean the area around
the scavenge area drain plug
 . Place a drain
pan under drain plug.
. Place a drain
pan under drain plug.
| caution |
| Hot oil can cause burns to skin. Do not allow hot oil to contact
skin. |
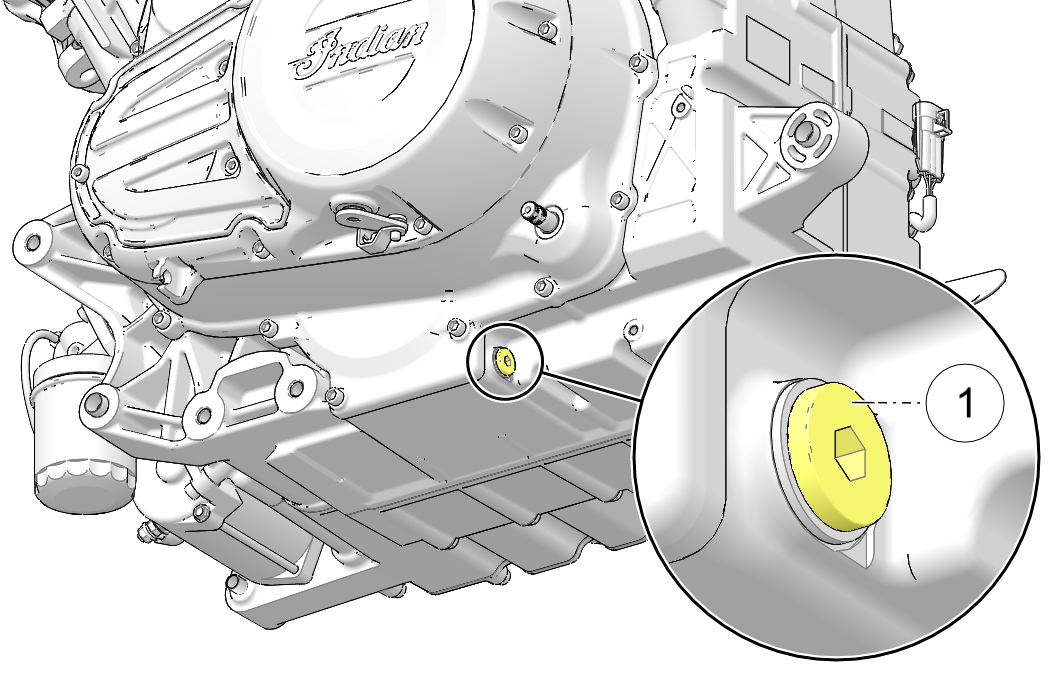
- Remove the drain
plug. Allow the oil to drain completely.
| NOTE |
| Remove sidestand bumper bracket for improved clearance to drain plug. |
- Install new sealing
washer and o-ring on the drain plug. The sealing surfaces on drain
plug and engine should be clean and
free of burrs, nicks or scratches.
- Reinstall the drain
plug. Torque to Specification. If sidestand bumper bracket was removed,
reinstall. Torque fastener to
specification.
| TORQUE |
| Drain Plug: 15 ft. lbs. (20 Nm)Bracket
fastener: 84 in-lbs (9.5 Nm) |
| caution |
| Hot oil can cause burns to skin. Do not allow hot oil to contact
skin. Wear leather gloves when handling hot components. |
- Place oil pan beneath
the oil filter. Using an oil filter wrench, turn the filter counter-clockwise
to remove it.
- Using a clean dry
cloth, clean the filter sealing surface on the engine.
- Lubricate the o-ring
on the new filter with a film of fresh engine oil. Check to make sure
the o-ring is in good condition.
- Install the new filter
and rotate it clockwise by hand until the filter gasket contacts the
sealing surface, then turn it
an additional 3/4 to one full turn.
- Remove the dipstick.
Add only 4 qts. (3.8 l) of the recommended oil at this step. Do not overfill.
- Reinstall the dipstick
securely.
- With the motorcycle
in an upright, centered position, start the engine and idle for approximately
30 seconds.
- Stop the engine and
add an additional 1 qts. (0.95 l) of engine oil. Do not overfill.
Overfilling can result in loss of engine
performance and an oil-saturated air filter.
Use a suction device to remove excess oil if overfilled.
- To ensure the oil
level is within the safe operating range, re-check the oil level as
outlined in Engine
Oil Level.
| NOTICE |
| After an oil change, the low oil pressure indicator may illuminate
when the engine is started. If this occurs, do not increase
RPM above idle speed
until the indicator turns off. Operating above idle speed could result
in damage to the engine. |
- Dispose of used filter
and oil properly.
- Reset the oil change
life in the instrument gauge.
