
Content Source: 2020 Timbersled ARO/RIOT Owner’s Manual (9929951 R01) > The Perfect Fit Chapter
| IMPORTANT |
|
The Owner's Manual for this vehicle contains warnings, instructions and other information you must read and fully understand before safely riding or performing maintenance on this vehicle.Always follow the warnings and instructions in Owner's Manual. Click the CONTENTS link above for the Table Of Contents, or download a full PDF of the Owner Manual in the Owner Support area of Polaris.com |
| NOTE |
| The best suspension setting depends on many variables including the riding terrain and the rider’s weight, riding style, and individual preferences. |
| caution |
|
DO NOT EXCEED MIN/MAX preload values (as shown in the tables on Front
Track Shock Spring Settings and Rear
Track Shock Spring Settings). Failure to comply may result in
personal injury or damage to equipment.
|
| NOTE |
| Always perform shock spring preload adjustments with the weight of the vehicle removed from the shock and the shock at full extension. Make spring preload adjustments in small (approximately 1/16th of an inch) increments and test ride quality between adjustments. |
| NOTE |
| For Timbersled ARO bikes with monotube shocks (i.e. shocks with NO
clickers), the rear track spring preload can also be decreased
to increase ride softness
and increased to increase ride stiffness and reduce bottoming out.
However, for Timbersled ARO bikes equipped with clickers,
using the clickers is typically the best way to adjust for these
ride quality characteristics.
|
| NOTE |
| To learn more about compression and rebound damping with shock clickers, see the sections on QS3 Shocks ( FOX QS3 Shocks) and 1.5 Zero LSC-R Shocks ( FOX 1.5 Zero LSC-R Shocks). |
| NOTE |
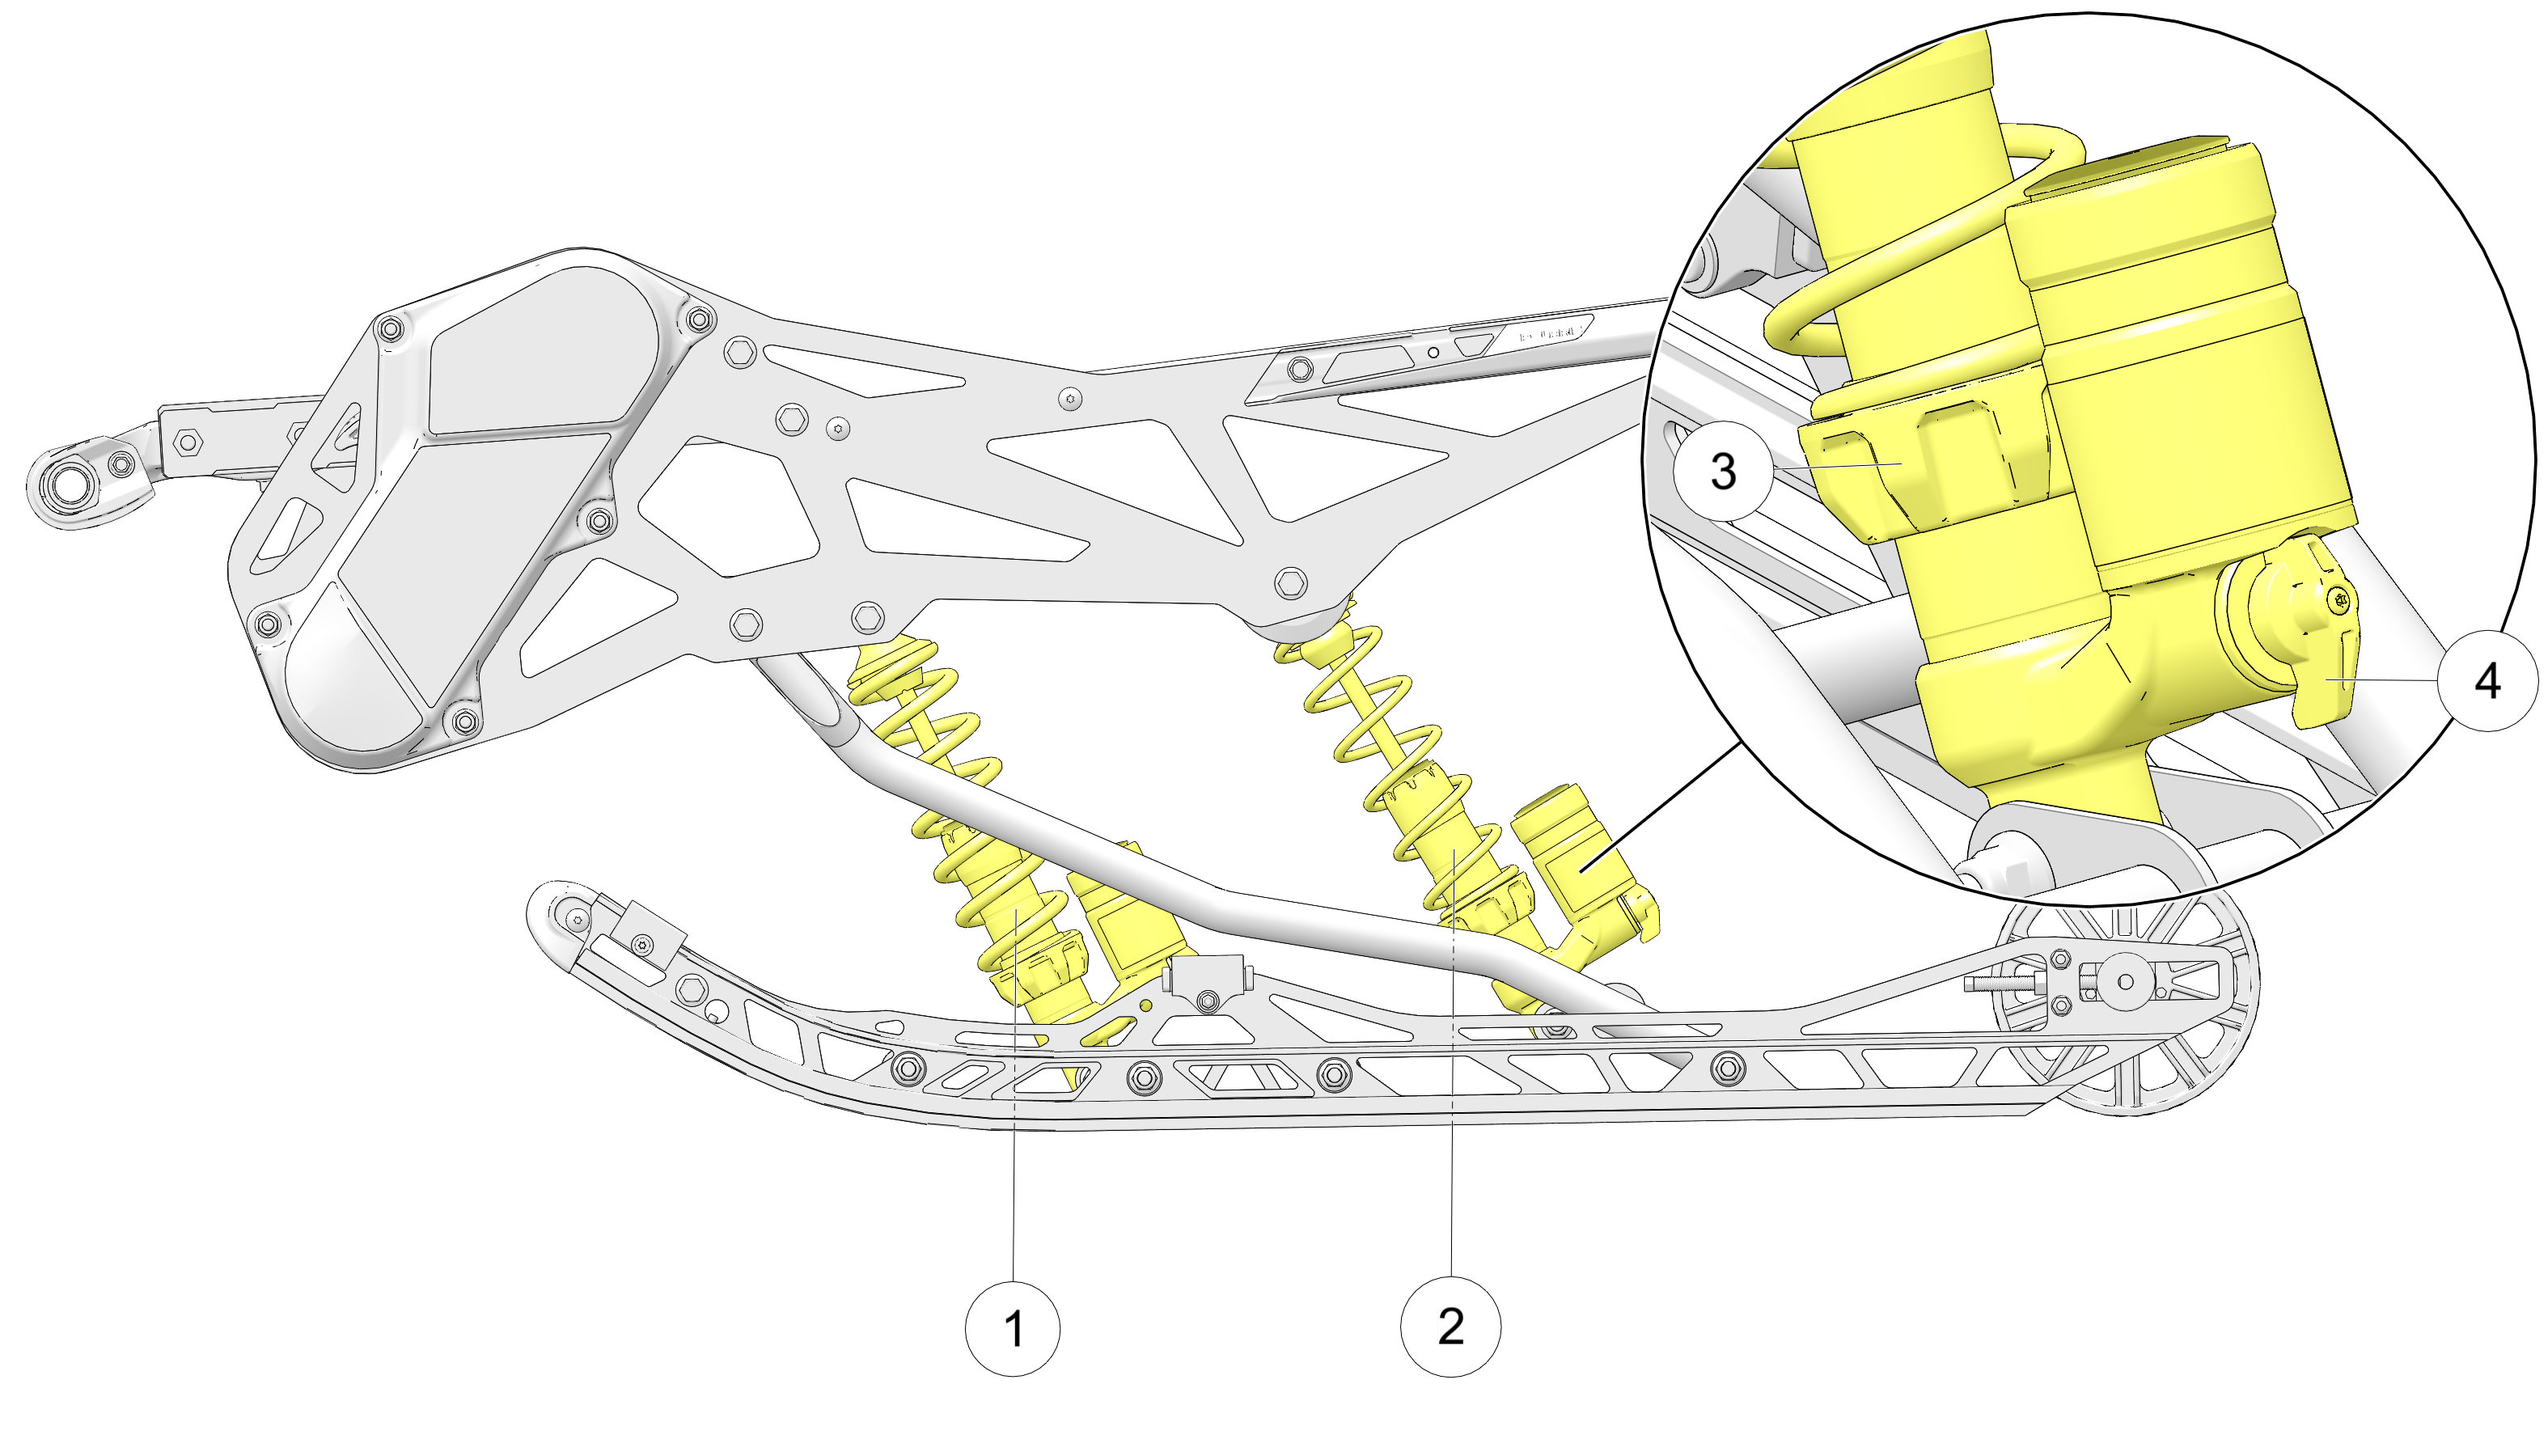
| For improved handling and additional control of the front ski, the Timbersled TRIO front shock can be added to the front forks and spindle of ARO and RIOT models. |
| caution |
|
DO NOT EXCEED MIN/MAX preload values (as shown in the tables on Front
Track Shock Spring Settings and Rear
Track Shock Spring Settings). Failure to comply may result in
personal injury or damage to equipment.
|
| NOTE |
| Always perform shock spring preload adjustments with the weight of the vehicle removed from the shock and the shock at full extension. Make spring preload adjustments in small (approximately 1/16th of an inch) increments and test ride quality between adjustments. |
| NOTE |
| For Timbersled RIOT bikes with monotube shocks (i.e. shocks with
NO clickers), the front track spring preload can also be
decreased to increase ride
softness and increased to increase ride stiffness and reduce bottoming
out.
However, for Timbersled RIOT bikes equipped with clickers,
using the clickers is typically the best way to adjust for these
ride quality characteristics.
Ski to ground pressure can also be adjusted with the rear track shock
clicker alone or in combination
with spring preload settings.
|
| NOTE |
| To learn more about compression and rebound damping with shock clickers, see the sections on QS3 Shocks ( FOX QS3 Shocks) and 1.5 Zero LSC-R Shocks ( FOX 1.5 Zero LSC-R Shocks). |
| NOTE |
| For improved handling and additional control of the front ski, the Timbersled TRIO front shock can be added to the front forks and spindle of ARO and RIOT models. |
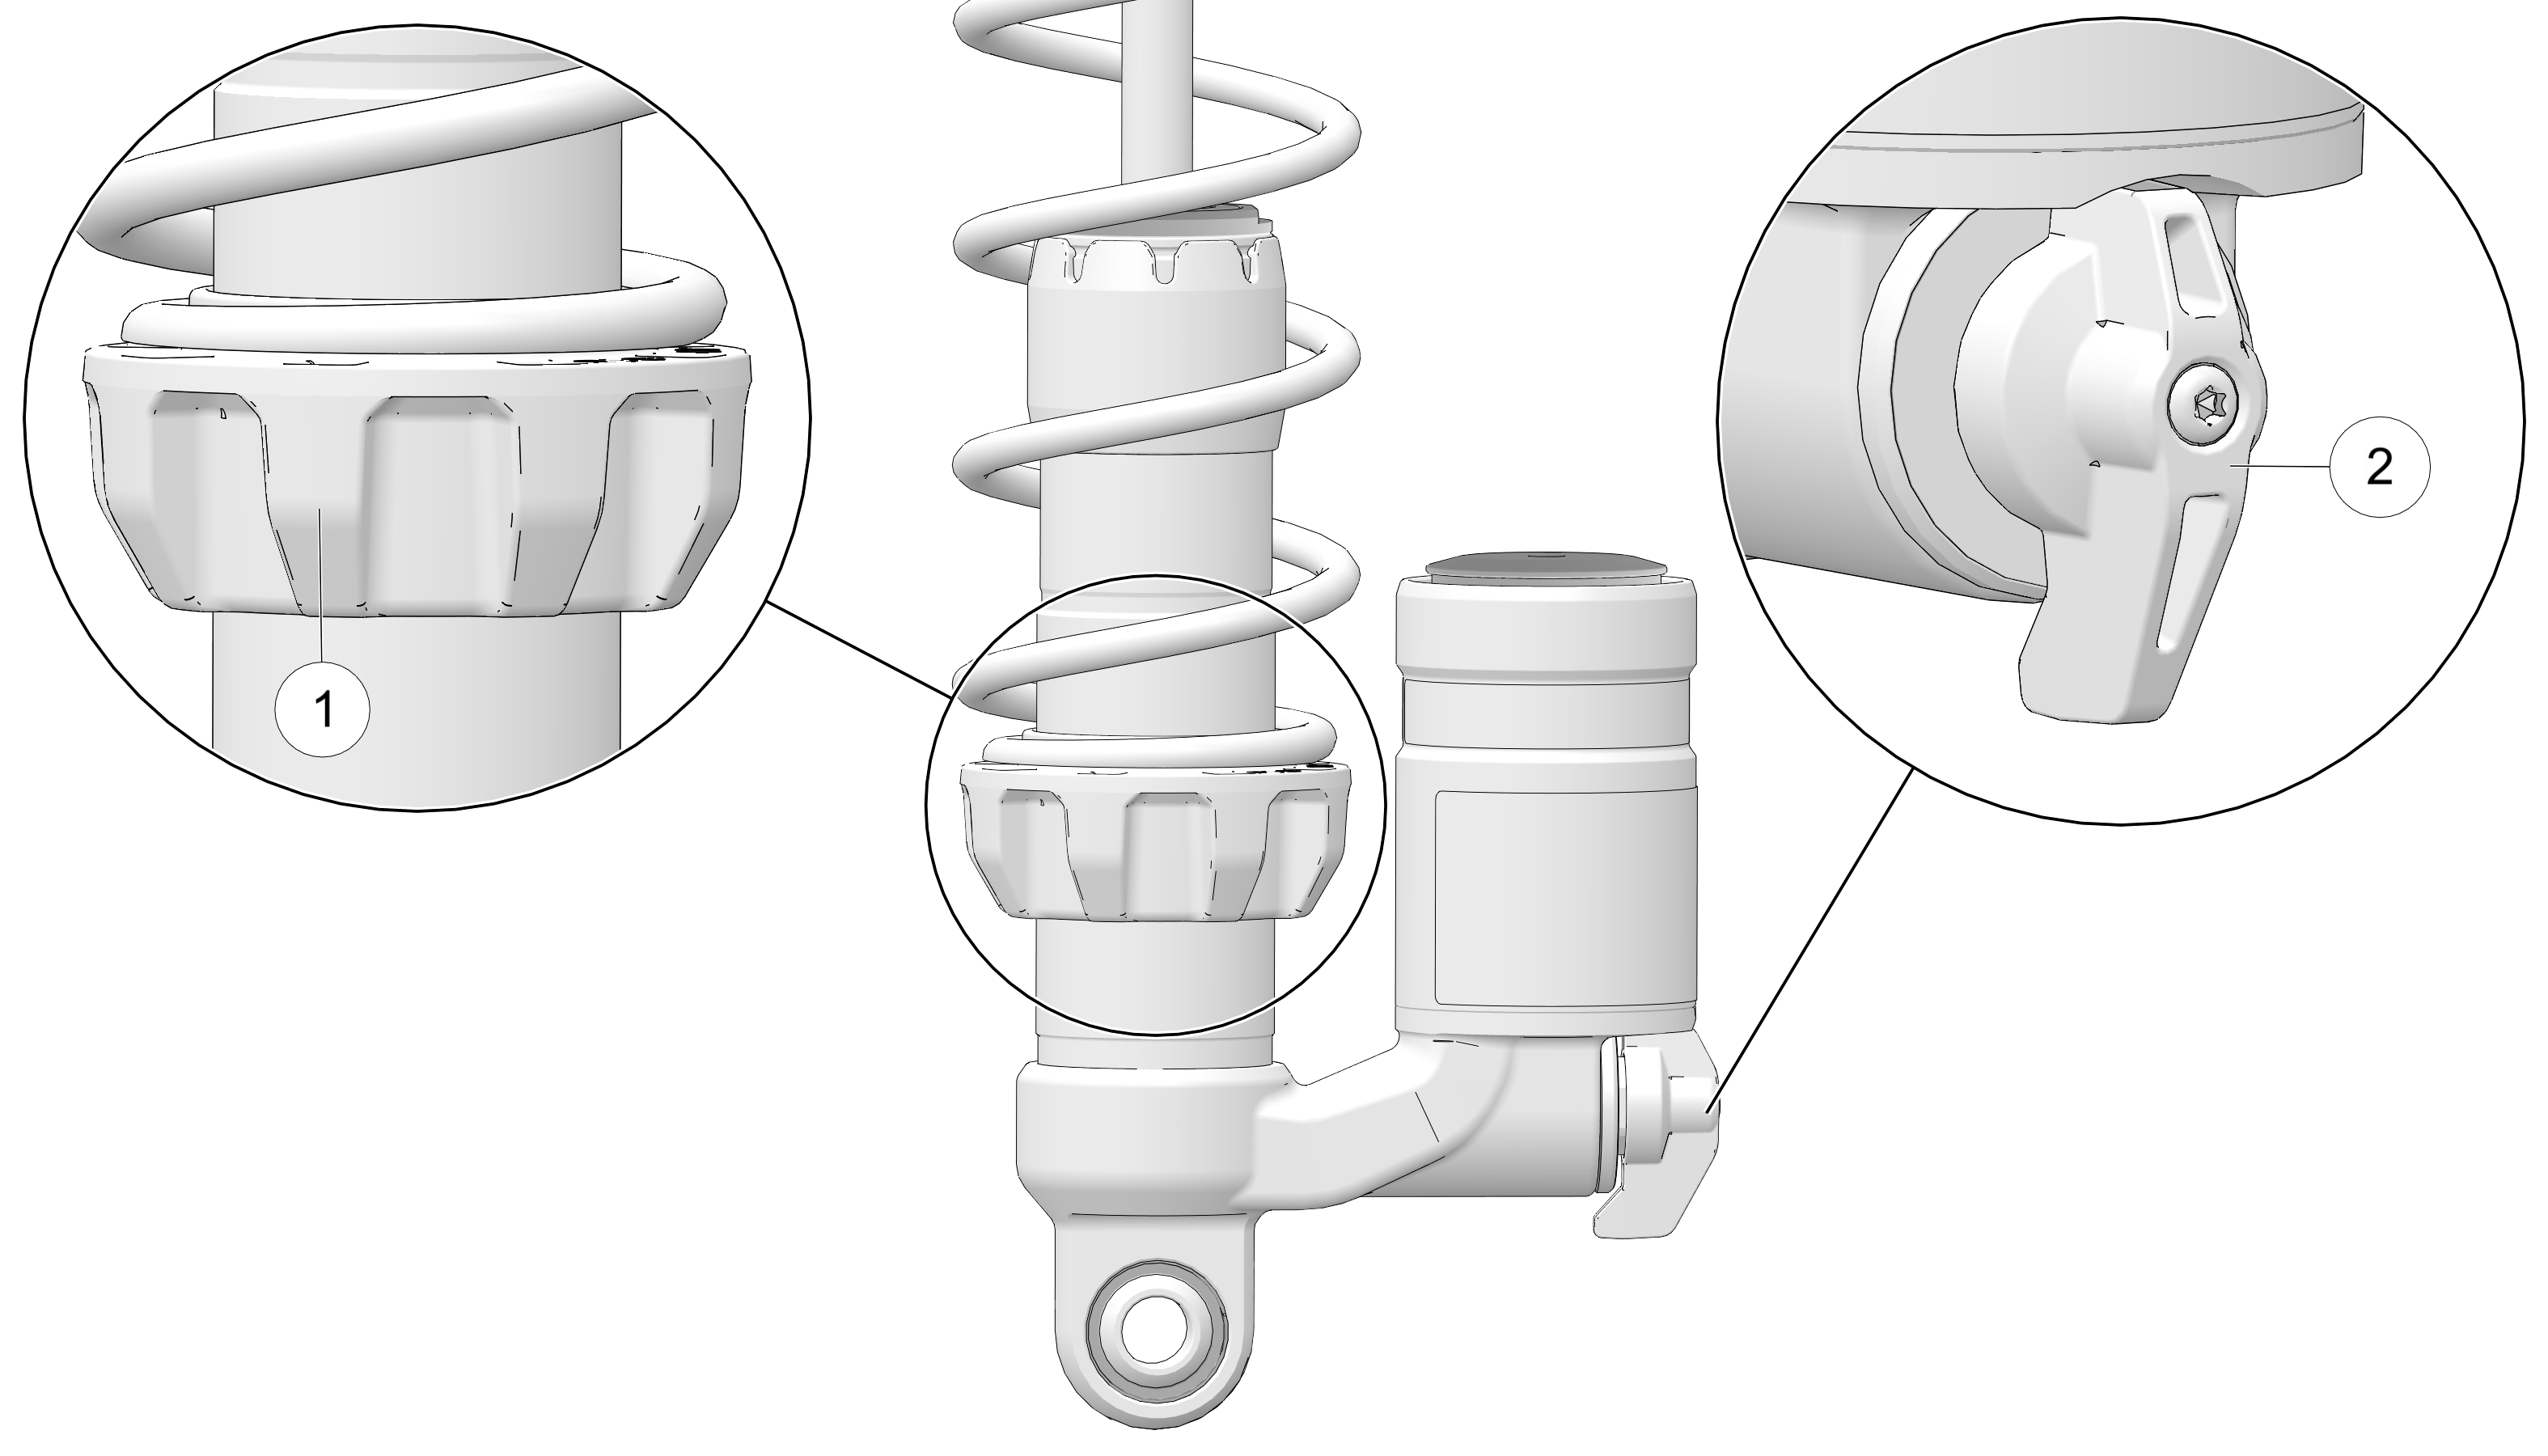
| NOTE |
| A spanner wrench (Part Number: 2871095–329) is needed to adjust the Timbersled IFP shock spring preload. |
| TIP |
| When ascending steep inclines with the Timbersled RIOT LE, temporarily turn the rear track clicker on the QS3 shocks clockwise to it’s highest compression damping setting to help the ski remain in contact with the ground during the ascent. |
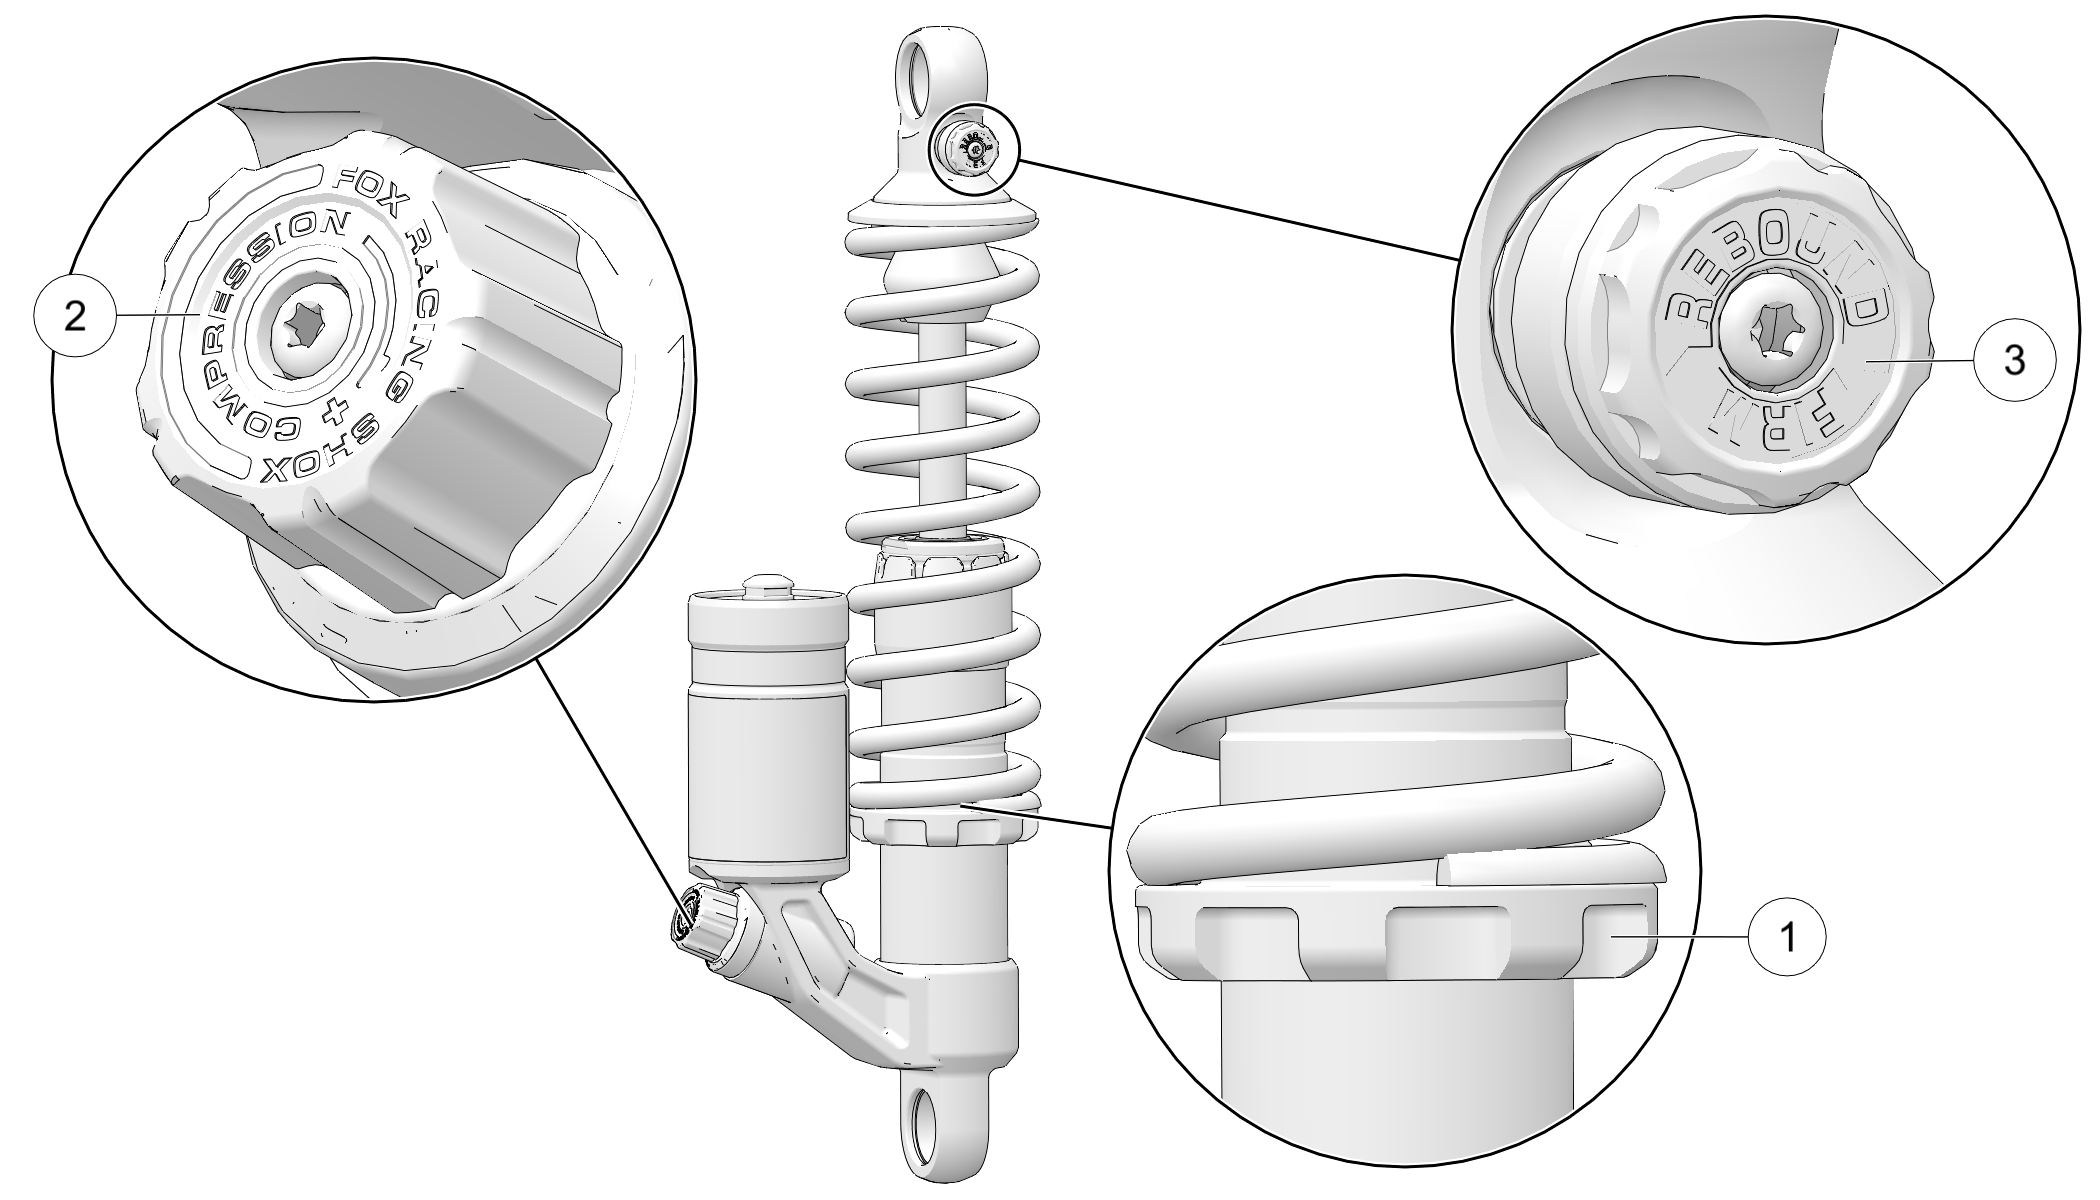
| NOTE |
| After setting the spring preload, it is suggested that you start with both compression and rebound damping set at their softest settings (i.e. clickers turned all the way counterclockwise) and slowly try out more compression and rebound damping until you achieve your perfect ride. |
| NOTICE |
|
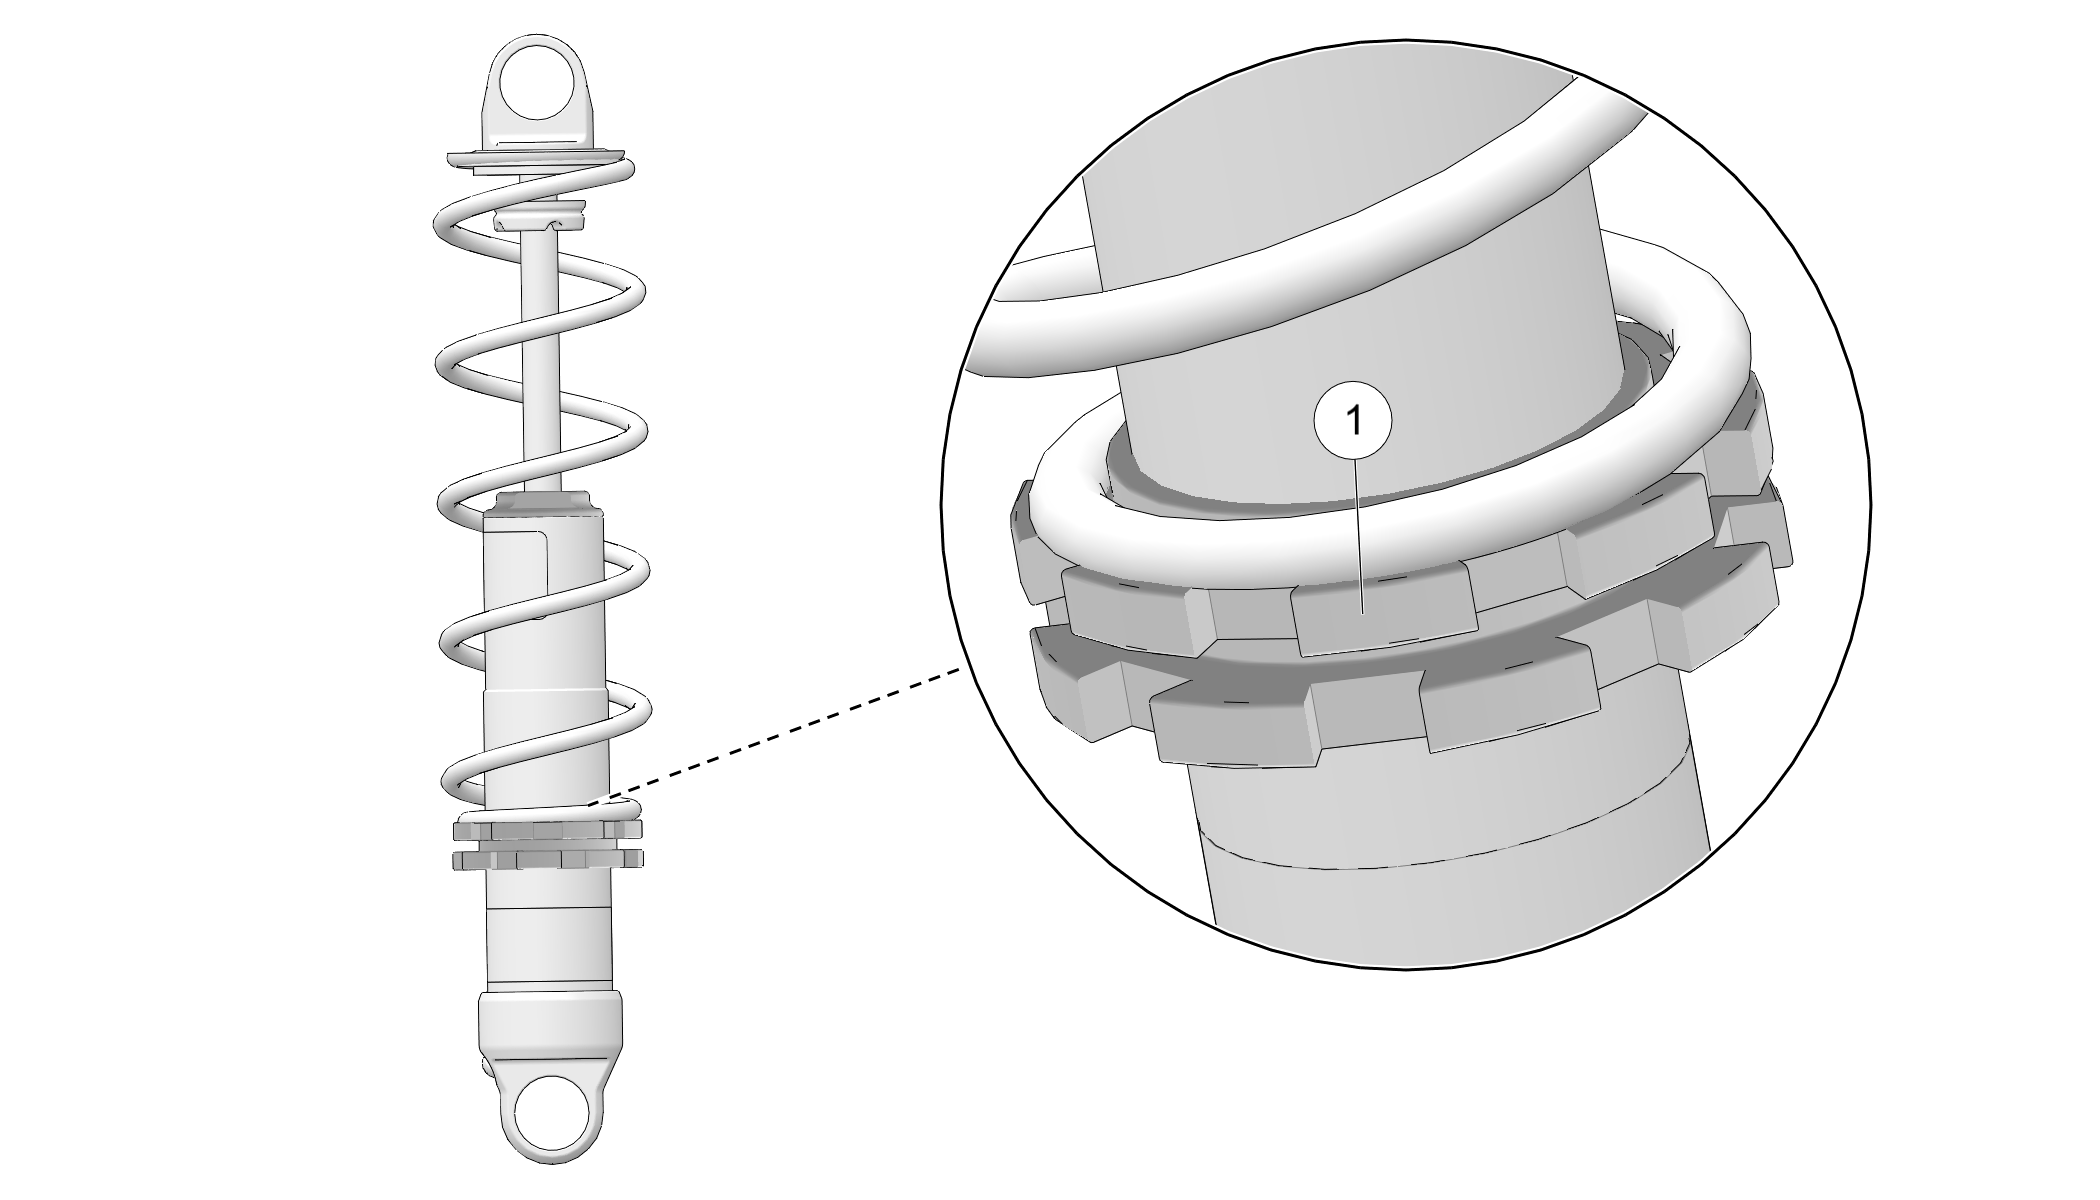
Never adjust spring preload to an installed length longer
than the factory length or shorter than the minimum length as shown
in the following chart.
Damage to the suspension could result. When decreasing preload, make
sure at least two turns of preload
are holding the retainer
against the spring.
|
| Model | Front Shock | Spring Rate | Factory Installed Length | Min. Allowable Installed Length |
|---|---|---|---|---|
|
RIOT 120 |
Timbersled IFP | 250 | 8–1/2” | 8–1/4” |
|
RIOT 120 LE |
FOX QS3 | 250 | 8–1/2” | 8–1/4” |
| ARO 129 | Timbersled IFP | 150 | 7–13/16” | 8–7/16” |
|
ARO 129 LE ARO 129 LE 3” ARO 137 LE |
FOX QS3 | 150 | 7–3/4” | 7–7/16” |
|
ARO SX 120 |
FOX 1.5 ZERO LSC-R | 200 | 7–13/16” | 7–9/16” |
| NOTE |
| If adjustments to the factory-installed springs are not sufficient for riders over 300 lbs. (136 kg), optional stiffer springs are available. Your Timbersled dealer can assist. |
| Model | Rear Track Shock | Spring Rate | Factory Installed Length | Min. Allowable Installed Length |
|---|---|---|---|---|
|
RIOT 120 |
Timbersled IFP | 80 | 8–1/2” | 7” |
|
RIOT 120 LE |
FOX QS3 | 80 | 8–1/2” | 7” |
|
ARO 129 |
Timbersled IFP | 175 | 7–13/16” | 8–7/16” |
|
ARO 129 LE ARO 129 LE 3” ARO 137 LE |
FOX QS3 | 175 | 7–7/8” | 7–7/16” |
|
ARO 120 |
FOX 1.5 ZERO LSC-R | 200 | 7–13/16” | 7–9/16” |
| Suggested TSS Pressures | |
| Setting | PSI |
| Minimum Setting | 200 |
| Factory Setting | 260 |
| Maximum Setting | 400 |
| NOTE |
| When the pump pressures up the shock instantly loses 20 psi from the volume it takes to fill the pump hose. You will need to compensate for this when checking pressures. |
| NOTE |
| When tuning your TSS shock, it is best to add or subtract air pressure in increments of 25 psi at a time. Be very careful to not get snow or water inside the valve stem; this can cause the shock to leak air. |
The O-ring movement equals the amount of TSS shock travel. The TSS shock has a max travel distance of 1.5” to bottom out. It is recommended that the targeted amount of shock travel be about 1-1/8” of stroke.
| NOTE |
| Each time you make a pressure adjustment (of 25 psi), slide the O-ring back down to its lowest point and ride for approximately 10 minutes before rechecking your shock travel distance. |
© Copyright Polaris Industries Inc. All rights reserved.