Content Source: 2019 Timbersled ARO Owner’s Manual (9928986 R03) > Safety Chapter

IMPORTANT

The Owner's Manual for this vehicle contains warnings, instructions and other information you must read and fully understand before safely riding or performing maintenance on this vehicle.Always follow the warnings and instructions in Owner's Manual.

Click the CONTENTS link above for the Table Of Contents, or download a full PDF of the Owner Manual in the Owner Support area of Polaris.com

Operator Safety

Follow the recommended maintenance program on Timbersled Recommended Maintenance Program to ensure that all critical components on the snow bike are thoroughly inspected at specific intervals outlined in the Periodic Maintenance Chart. Your dealer can perform this service.
WARNING
Driving a snow bike requires your full attention. DO NOT drink alcohol or use drugs or medications before or while driving. They will reduce your alertness and slow your reaction time.
Snow bikes are capable of traveling at high speeds. Use extra caution to ensure operator safety. Make sure your snow bike is in excellent operating condition at all times. Always check major and vital safety components before every ride.
All Timbersled snow bikes are designed and tested to provide safe operation when used as directed. Failure of critical machine components may result from operation with any modifications, especially those that increase speed or power. DO NOT MODIFY YOUR MACHINE. The snow bike may become aerodynamically unstable at speeds higher than those for which it is designed. Loss of control may occur at higher speeds. Modifications may also create a safety hazard and lead to bodily injury.

Host Bike

The Timbersled Snow Bike system is designed to be attached to a variety of host bikes. Read and understand your host bike’s operation manual and follow all safety and maintenance information. Failure to do so could result in serious injury or death.

Stay Clear of Track

Your snow bike is propelled by a revolving track that must be partially exposed for proper operation.
WARNING
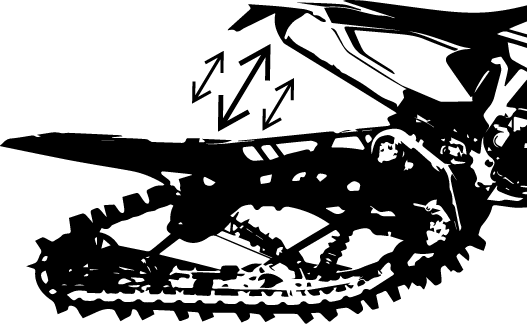
Serious injuries may result if hands, feet, or clothing become entangled in the track. Be alert when riding, and remain properly seated to stay clear of the track. Never hold the snow bike up or stand behind it while warming up the track. A loose track or flying debris could cause serious injury or death. We recommend having your dealer perform all track service and alignment procedures.

Riding Position

Operating a Timbersled requires skill and balance for proper control. Rider positions may vary with experience and the features available on some models, but under many conditions the proper position is to be seated with both hands on the handlebar grips for proper throttle, brake, and steering control. See your host bike’s owners manual for proper riding position.
WARNING
Improper riding position may reduce control and could result in serious injury or death. Always ride in a position that allows for control of your vehicle.

Rider Capacity

This Timbersled is designed for a single rider only. Never carry a passenger on this vehicle.

Riding Apparel

Helmet

Wearing a helmet can prevent a severe head injury. Whenever riding a Timbersled vehicle, always wear a helmet that meets or exceeds established safety standards.
Parents should verify that young operators have a helmet that fits, and should obtain one of proper size if it does not fit before allowing operation.
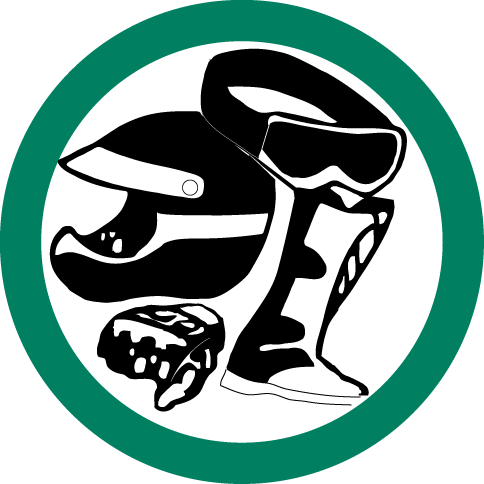
  • Approved helmets in the USA and Canada bear a U.S. Department of Transportation (DOT) label.

    Image
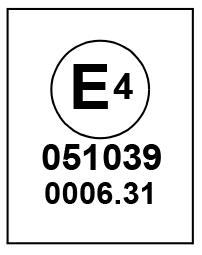
  • Approved helmets in Europe, Asia and Oceania bear the ECE 22.05 label. The ECE mark consists of a circle surrounding the letter E, followed by the distinguishing number of the country which has granted approval. The approval number and serial number will also be displayed on the label.

    Image

Eye Protection

Do not depend on eyeglasses or sunglasses for eye protection. Whenever riding a Timbersled vehicle, always wear shatterproof goggles or use a shatterproof helmet face shield. Timbersled recommends wearing approved Personal Protective Equipment (PPE) bearing markings such as VESC 8, V-8, Z87.1, or CE. Make sure protective eye wear is kept clean.

Clothing

Be prepared, be warm and be comfortable when riding. Be aware of the weather forecast, especially the windchill, and dress accordingly. See Windchill/Temperature Charts.
WARNING
Avoid wearing loose clothing or long scarves, which can become entangled in moving parts and cause serious injury. Always wear an approved helmet and eye protection.

Survival Preparation

For your safety, always ride in a group. Always tell someone where you're going and how long you expect to be gone. If it isn't possible to ride with others, and you must travel into remote areas, always carry survival equipment that's appropriate to the conditions you may encounter. Such equipment may include, but is not limited to: extra clothing, a sleeping bag, a flashlight, food and water, a signaling mirror, a means of building a fire, and a two-way radio or cellular telephone.
Always carry the owner’s manual on your snow bike. For added protection, purchase and carry the following items on your snow bike as well:

  • Extra Set of Spark Plugs
  • Tow Rope
  • Extra Oil
  • Fuel Deicer
  • Winter Survival Kit

  • Spare Drive Chain
  • Spare Chain Case Chain (if equipped)
  • Trail Map
  • First Aid Kit
  • Tool Kit

Excessive Speed

WARNING
High speed driving, especially at night, could result in serious injury or death. Always reduce speed when driving at night or in inclement weather.
Always observe all state and local laws governing snow bike operation and speed limits. Always be alert and pay attention to the trail ahead. If your speed is 40 MPH (64 km/h), your snow bike is traveling about 60 feet (18 m) per second. If you look back for only two seconds, your snow bike will travel about 120 feet (36 m). If your speed is 60 MPH (96 km/h), your snow bike will travel about 180 feet (55 m) in two seconds.
Traveling at night requires extra caution. If your host bike is equipped with a headlight, check headlight and taillight to ensure proper operation, and don’t over-drive your headlight beam. Always be able to bring your snow bike to a stop in the distance illuminated by the headlight.

Driver Awareness

Slow down when traveling near poles, posts, or other obstacles. Be especially alert if you're snow biking after dark. Always be on the alert for wire fences. Single strands are especially dangerous, since there may be a great distance between posts. Guy wires on utility poles are also difficult to distinguish.
Make sure the way is clear before crossing railroads and other roads and highways. The noise of your snow bike will drown out the sound of approaching vehicles. Look ahead, behind, and to both sides before turning or crossing railroad tracks or highways. Steep embankments may also hide your view. Always leave yourself a way out.
Variances in snow depth and/or water currents may result in uneven ice thickness. You may drown if you break through the ice. Never travel on frozen bodies of water unless you have first verified that the ice is sufficiently thick to support the weight and moving force of the snow bike, you and your cargo, together with any other vehicles in your party. Always check with local authorities and residents to confirm ice conditions and thickness over your entire route. Operators assume all risk associated with ice conditions on frozen bodies of water.
When teaching inexperienced operators to ride, set up a predetermined course for practice. Make sure they know how to drive and control the snow bike before allowing them to make longer trips. Teach them proper snow bike courtesy, and enroll them in driver's training and safety courses.

Disabled Operators

Safe operation of this rider-active vehicle requires good judgement and physical skills. Operators with cognitive or physical disabilities have an increased risk of loss of control, which could result in serious injury or death.

Mountainous Terrain Riding

Mountainous terrain operation, even for experienced riders, can present conditions and situations that could result in serious injury or death. Please review all of the information about riding in mountainous terrain on the following pages of this manual.
WARNING
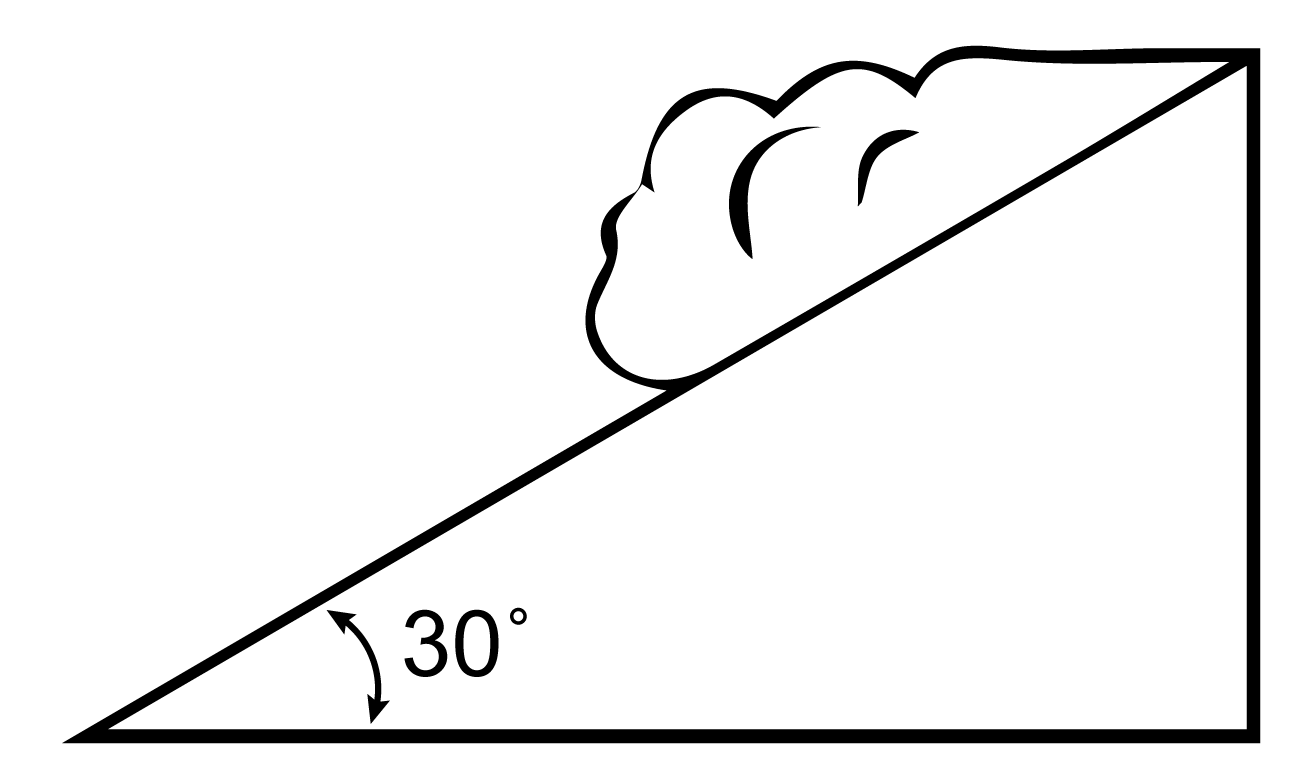
An avalanche can occur at any time, in any conditions and on any slope.
The avalanche information provided in this manual should be considered basic information and is not intended to replace your participation in an avalanche safety training course. After reviewing the avalanche information in this manual, be sure to participate in an avalanche safety training course before riding in mountainous terrain. The training course will provide more information as well as the opportunity to practice riding and using proper search and recovery techniques.
For more information, education, training courses, and links to international resources, visit www.avalanche.org or scan the QR code with your smartphone or other device.

Get the Safety Gear

In addition to carrying a spare chain, spark plugs and tools on each snow bike, each person in your riding group should wear the recommended snow bike riding apparel and carry (on their person) the following survival items when riding in mountainous terrain:

  • A digital avalanche beacon with new “fresh” alkaline batteries
  • An avalanche probe
  • A compact shovel and hand saw
  • A backpack (preferably an avalanche air bag backpack)
  • Emergency provisions, including the following items:
    • Small first aid kit
    • Extra pair of gloves
    • Extra dry socks
    • Tow rope, map, compass/GPS
    • Lighter or waterproof matches
    • Signal mirror and whistle
    • Bottled water
    • High calorie snack food
    • Compact emergency blanket
    • Cell phone
    • Radio

Image

Get to Know Your Safety Gear

Following the safety gear and apparel recommendations will increase your chances of survival if you encounter an avalanche or become stranded in the backcountry, but even experienced and properly-equipped snow bikers, hikers and skiers perish in avalanches or succumb to hypothermia. Using a beacon or probe for the first time during an avalanche recovery operation, or not knowing how to deploy your avalanche air bag backpack during a slide, should be considered UNACCEPTABLE to you and all members of your riding group. It’s critical that you and all members of your riding group know how to use the safety gear.
While you may know how to use your gear, you may have to rely on your riding group to find you in an avalanche. Make sure they know how to use their gear.
  • Dress in layers. Multiple layers of clothing provide the best barrier to cold and wind. Layers can be removed, but if you start out without enough layers, they cannot be added later. Avoid cotton materials, which will freeze if they get wet.
  • Wear highly visible gear.
  • Try on all gear and equipment to make sure it fits and doesn’t interfere with your riding capabilities. Place all survival aids in your backpack and wear the backpack at all times. Non-essential items can be stored on the snow bike in an accessory bag.
  • Read and follow the manufacturer’s user and maintenance instructions for all gear. If you have questions about how your gear works, contact the manufacturer for more information.
  • Practice using your beacons, shovels and probes with your riding group in real-world conditions wearing all of your gear. Have someone hide an active “transmitting” beacon by throwing it (not walking it) into a snowbank and timing your group’s search for it.
  • Test deploying your gear. If you own an avalanche air bag backpack, check with the manufacturer’s test deployment guidelines and bottle weight replacement specifications. Most air bag backpack manufacturers recommend testing the pack once a year so you know it works and feel comfortable with the bag and deployment time.
  • Make sure your probe and shovel are in good condition and that you know how to assemble them.

Get the Picture

Slopes steeper than 30º are more prone to avalanches, but any slope should be considered avalanche terrain, even small slopes with trees. Low-angle slopes are also avalanche terrain if they have steeper slopes above them.
NOTE
The 30º slope graphic is for illustration purposes only. The risk of an avalanche is always present in mountainous terrain, regardless of slope angle.
Always look for the following warning signs of unstable snow. If you see or hear any of these signs, riding on or below any slope is dangerous and should be avoided:

  • Recent avalanches
  • A “whumpfing” sound under a snowpack
  • Cracks across the top of a snowpack
  • A recent heavy snowfall
  • Blowing snow
  • Rain
  • Rapid warming

Image

Get Out of Harm’s Way

  • Before riding, always tell a responsible person (i.e. at the lodge or gas station) where your group is going.
  • Never ride alone. Always ride in a small, manageable group. Riding in a large group makes it more difficult to track riders or find missing members.
  • Go “one at a time”. Only one snow bike at a time should cross, ascend or highmark a slope. Other riders should watch from a safe location until the previous rider exits the slope.
  • Never park at the base of a slope or at the bottom of a gully or valley. When parking to take a break or watch other riders, park at the sides of the slope with the front of your snow bike pointed away from the slope.

Get to Know Your Snow Bike

Because Timbersled snow bikes feature tall track paddles, the rear suspension rails and sliders will sit above the snowpack on a groomed trail. Always deploy the scratchers and limit high speed operation when trail riding.
Always practice riding your snow bike in a safe, open, flat area before attempting your first ride in mountainous terrain. This is especially important for low-elevation riders who are not accustomed to riding a snow bike designed for deep snow.
Do not ride in mountainous terrain until you are comfortable riding and controlling your snow bike in deep snow.
  • Practice turning, leaning and braking, both on the trail and off the trail. When you’re comfortable with these maneuvers, practice more advanced maneuvers in deep flat snow.
  • Learn techniques from more experienced riders.
  • Practice traversing through deep snow, which is when you will often need to steer by leaning your body weight in the desired direction.
  • Practice using proper throttle control to maintain vehicle momentum and adequate track speed in deep snow. Everyone gets stuck at some point in time. If you know your snow bike is becoming stuck, try to turn downhill as much as you can before the snow bike comes to a stop.

Get the Forecast

Make a riding plan based on the current avalanche and weather forecast. It is important to remember that overnight weather conditions may have created unsafe riding terrain that was considered safe the day before. Visit www.avalanche.org or scan the QR code. Follow the page links to locate current avalanche reports and conditions for your area of operation.

Image

Get Avalanche Safety Training

Timbersled recommends you and all members of your riding group participate in an avalanche safety course. Visit www.avalanche.org/education or scan the QR code for education and training resources.

Image

Avalanche Awareness

Avalanches are a matter of timing. A steep slope can be safe one day, but unsafe the next day due to changing weather and wind conditions.
  • Always review the user instructions provided with your safety equipment and follow the recommendations for maintenance, testing and use. Always test your safety equipment to ensure it works properly before riding in mountainous terrain.
  • Always store your survival gear in your backpack and wear the backpack. Do not store your survival gear on the snowmobile.
  • Always research current avalanche conditions in your area of operation before riding. Check with local law enforcement, resort or lodging personnel, gas station attendants and other riders to learn about current conditions and any advisories in the area.
  • Read and understand the avalanche danger scale. Pay attention to any danger level warnings issued for your area of operation.
  • Always remain alert while riding in mountainous terrain. Be aware of snowpack conditions above you as you ride. Avalanches can occur at any time regardless of current condition reports.
North American Public Avalanche Danger Scale
Avalanche danger is determined by the likelihood, size and distribution of avalanches.
Danger Level Travel Advice Likelihood of Avalanches Avalanche Size and Distribution
5
Extreme
Image

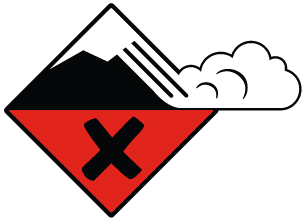
Avoid all avalanche terrain.

Natural and human-triggered avalanches certain.

Large to very large avalanches in many areas.

 
4
High
Image

Very dangerous avalanche conditions. Travel in avalanche terrain not recommended.

Natural avalanches likely; human-triggered avalanches very likely.

Large avalanches in many areas; or very large avalanches in specific areas.

 
3
Considerable
Image

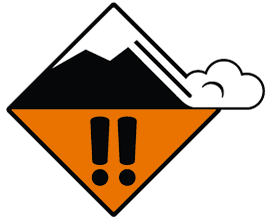
Dangerous avalanche conditions. Careful snowpack evaluation, cautious route-finding and conservative decision-making essential.

Natural avalanches possible; human-triggered avalanches likely.

Small avalanches in many areas; or large avalanches in specific areas; or very large avalanches in isolated areas.

 
2
Moderate
Image

Heightened avalanche conditions on specific terrain features. Evaluate snow and terrain carefully; identify features of concern.

Natural avalanches unlikely; human- triggered avalanches possible.

Small avalanches in specific areas; or large avalanches in isolated areas.

 
1
Low
Image

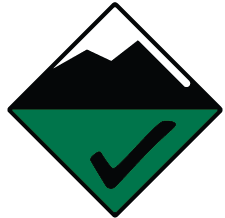
Generally safe avalanche conditions. Watch for unstable snow on isolated terrain features.

Natural and human-triggered avalanches unlikely.

Small avalanches in isolated areas or extreme terrain.


Safe backcountry travel requires training and experience. You control your own risk by choosing where, when and how you travel.

Ice and Snow Build-up

WARNING
Ice and snow build-up may interfere with the steering and braking of your snow bike, resulting in serious injury or death. Keep the snow bike free of snow and ice.
Before driving, manually turn the ski to the left and right to be sure ice and snow are not interfering with full left and right steering. If difficulty is encountered, remove ice and snow build-up that may be obstructing the steering.

Driving on Slippery Surfaces

WARNING
Never attempt an abrupt change of direction when operating on slippery surfaces. Proceed slowly and use extra caution. Driving on ice or hard-packed snow reduces steering and braking control, which may result in loss of control and serious injury or death. Slow down and use extra caution when operating on slippery surfaces.

Inadequate Snow Conditions

NOTICE
Driving in too little snow will result in excessive wear and damage to the slide rail, track, ski, ski skags, and/or spindle.
WARNING
Inadequate cooling and lubrication will lead to overheating of the slide rail and track, causing premature wear, damage and failure, which can result in serious injury. Reduce speeds and frequently drive into fresh snow to allow adequate cooling and polishing of the slide rail and track surfaces. Avoid operating for prolonged periods on ice, hard-packed surfaces or roads.

Operating in Deep Snow

If the snow bike becomes stuck in snow, clear the track and tunnel area of snow, then step down the snow in front of the snow bike so that when the throttle is opened, the snow bike will be able to climb up and over the snow.

Driving Downhill

When riding downhill, shift your weight to the rear of the snow bike and reduce your speed to a minimum. Apply just enough throttle to keep the engine from stalling, allowing the engine's compression to help slow the snow bike and keep it from rolling freely downhill.
WARNING
When driving on long downhill stretches, pump the brakes. Riding the brakes may cause the brake system to overheat, which may result in brake failure. Excessive or repetitive use of the brakes for high speed stops will also cause an overheated brake system. This condition may lead to a sudden loss of brakes and/or fire and may result in serious injury or death.

Driving in Hilly Terrain

WARNING
Climbing a hill or crossing the face of a slope may result in loss of balance and rollover, causing serious injury or death. Use caution and good judgement when driving in hilly terrain.
Use extra caution when operating in hilly terrain. If climbing a hill is unavoidable, keep your weight low and forward. If you must cross the face of a slope, keep your weight on the uphill side of the snow bike to maintain proper balance and avoid possible roll-over.
Slow down when reaching the crest of a hill. Be prepared to react to obstacles, sharp drops or other people or vehicles that may be on the other side of the hill.
If you're unable to continue up a hill, turn the snow bike downhill before it loses momentum. If this isn't possible, spin the track just enough to dig in to prevent it from rolling back down the hill. Stop the engine. Keeping away from the downhill side of the snow bike, pull the rear of the snow bike around and point the front end and skis downhill. Remount the snow bike, restart the engine, and descend the hill carefully.

Cold Weather Drive-Away

Whenever your snow bike has been parked for a length of time, especially overnight, always make sure the ski and track are loosened from ice and snow before attempting to drive. Apply the throttle with enough authority to put the snow bike into motion, but always operate within safety limits.
caution
Reference host bike’s owner’s manual to insure bike is adequately prepared for cold temperature conditions.

Maneuverability

While much control and maneuverability is achieved through the steering system and ski, maximum control is achieved by the shifting of your body weight. Maneuverability will change for lighter operators.

Driving Responsibly

Every snow bike handles differently, and even the most benign conditions may become dangerous if operators drive improperly. If you're new to snow biking, acquaint yourself with the snow bike and with what it will and won't do under various conditions. Even seasoned drivers should spend some time getting the feel for a snow bike before attempting ambitious maneuvers.
  • A snow bike depends on the rider's body position for proper balance in executing turns, traversing hills, etc. Always start on a smooth, level area to begin building your operating experience.
  • Before allowing someone else to use your snow bike, know the extent of their operating skills. Check to see if they've taken a safety course and have an operator's certificate. For their protection, as well as yours, make sure they take a safety course. Everyone can benefit from the course.
  • Don't “jump” your snow bike over large drifts or similar terrain. Jumping may injure your back because of spinal compression that could occur when the snow bike impacts the ground. The seat and suspension of your snow bike have been designed to provide protection under normal riding conditions. Your snow bike is not intended for this kind of use.
  • Be courteous to oncoming traffic by dimming your headlights (if equipped) and reducing your speed.
  • When traveling in a group of snow bikes, don't tailgate (follow too closely). Leave enough distance between snow bikes to provide ample stopping room and to provide protection from flying snow and debris. Allow even more distance when driving on slippery surfaces or when driving in darkness or other low visibility conditions. Be aware of any traffic around your vehicle. Drive defensively to avoid accidents.
  • If equipped, remove the key from the ignition when you leave the snow bike unattended.

Windchill/Temperature Charts

The following information is provided to help you determine when temperatures become dangerous for riding.

Windchill Chart (°F)

Wind Speed in MPH Actual Thermometer Reading (°F)
40 35 30 25 20 15 10 5 0 -5 -10 -15 -20 -25 -30 -35 -40 -45
Equivalent Temperature (°F)
Calm 40 35 30 25 20 15 10 5 0 -5 -10 -15 -20 -25 -30 -35 -40 -45
5 36 31 25 19 13 7 1 -5 -11 -16 -22 -28 -34 -40 -46 -52 -57 -63
10 34 27 21 15 9 3 -4 -10 -16 -22 -28 -35 -41 -47 -53 -59 -66 -72
15 32 25 19 13 6 0 -7 -13 -19 -26 -32 -39 -45 -51 -58 -64 -71 -77
20 30 24 17 11 4 -2 -9 -15 -22 -29 -35 -42 -48 -55 -61 -68 -74 -81
25 29 23 16 9 3 -4 -11 -17 -24 -31 -37 -44 -51 -58 -64 -71 -78 -84
30 28 22 15 8 1 -5 -12 -19 -26 -33 -39 -46 -53 -60 -67 -73 -80 -87
35 28 21 14 7 0 -7 -14 -21 -27 -34 -41 -48 -55 -62 -69 -76 -82 -89
40 27 20 13 6 -1 -8 -15 -22 -29 -36 -43 -50 -57 -64 -71 -78 -84 -91
45 26 19 12 5 -2 -9 -16 -23 -30 -37 -44 -51 -58 -65 -72 -79 -86 -93
50 26 19 12 4 -3 -10 -17 -24 -31 -38 -45 -52 -60 -67 -74 -81 -88 -95
55 25 18 11 4 -3 -11 -18 -25 -32 -39 -46 -54 -61 -68 -75 -82 -89 -97
60 25 17 10 3 -4 -11 -19 -26 -33 -40 -48 -55 -62 -69 -76 -84 -91 -98
Frostbite in >> 30 min. 10 min. 5 min.

Windchill Chart (°C)

Wind Speed in Km/h Actual Thermometer Reading (°C)
5 2 -1 -4 -7 -10 -13 -16 -19 -22 -25 -28 -31 -34 -37 -40 -43 -46
Equivalent Temperature (°C)
Calm 5 2 -1 -4 -7 -10 -13 -16 -19 -22 -25 -28 -31 -34 -37 -40 -43 -46
8 3 0 -4 -7 -11 -14 -18 -22 -25 -29 -32 -36 -39 -43 -46 -50 -53 -57
16 2 -2 -6 -10 -13 -17 -21 -24 -28 -32 -36 -39 -43 -47 -50 -54 -58 -62
24 1 -3 -7 -11 -15 -19 -22 -26 -30 -34 -38 -42 -45 -49 -53 -57 -61 -65
32 0 -4 -8 -12 -16 -20 -24 -28 -32 -36 -39 -43 -47 -51 -55 -59 -63 -67
40 -1 -5 -9 -13 -17 -21 -25 -29 -33 -37 -41 -45 -49 -53 -57 -61 -65 -69
48 -1 -5 -9 -13 -18 -22 -26 -30 -34 -38 -42 -46 -50 -54 -58 -62 -66 -70
56 -2 -6 -10 -14 -18 -22 -26 -31 -35 -39 -43 -47 -51 -55 -59 -64 -68 -72
64 -2 -6 -10 -15 -19 -23 -27 -31 -35 -40 -44 -48 -52 -56 -61 -65 -69 -73
72 -2 -7 -11 -15 -19 -23 -28 -32 -36 -40 -45 -49 -53 -57 -61 -66 -70 -74
80 -3 -7 -11 -15 -20 -24 -28 -33 -37 -41 -45 -50 -54 -58 -62 -67 -71 -75
88 -3 -7 -12 -16 -20 -24 -29 -33 -37 -42 -46 -50 -55 -59 -63 -67 -72 -76
96 -3 -8 -12 -16 -21 -25 -29 -34 -38 -42 -47 -51 -55 -60 -64 -68 -73 -77
Frostbite in >> 30 min. 10 min. 5 min.

Safety Labels and Locations

Safety and warning labels have been placed on the vehicle for the operator's protection. Make sure the operator understands the information on all labels. If any label becomes illegible or comes off, contact your POLARIS dealer for a replacement. Replacement safety labels are provided by POLARIS at no charge. The part number is printed on the label.
The safety labels are located on the tunnel/cowling of your snow bike.

Proper Use Warning

Image
Image
Image
WARNING
Prior to operation, read and understand Timbersled and OEM motorcycle owner’s manuals and all warnings.
  • ALWAYS wear a DOT approved helmet, eye protection, and protective clothing while operating this vehicle.
  • Never carry a passenger.
  • Before starting engine, check throttle and brake for proper operation.
  • Reduce speed and use extreme caution when operating in unfamiliar terrain.
  • Ensure that sprocket and track shrouds are in place and secure. Do not operate with shrouds removed.
Failure to follow these instructions could result in severe injury or death. If owners manual is missing contact Timbersled for a replacement.

Towing Warning

WARNING
NEVER pull or tow any person or object behind this Timbersled. Objects towed can easily collide with the rear of the track or other objects, resulting in severe injury or death.
NEVER sit on track tunnel. ALWAYS stay clear of track. Entanglement with track can cause severe injury or death.

Accessory Warning

WARNING

Suspension travel reduces distance between exhaust and tunnel. ALWAYS position cargo and accessories to avoid contact with engine, exhaust, or moving components.

  • FAILURE TO COMPLY MAY RESULT IN SUSPENSION INTERFERENCE OR FIRE AND BURN HAZARD.

Image

© Copyright Polaris Industries Inc. All rights reserved.