Content Source: 2019 Timbersled ARO Owner’s Manual (9928986 R03) > Maintenance Chapter

IMPORTANT

The Owner's Manual for this vehicle contains warnings, instructions and other information you must read and fully understand before safely riding or performing maintenance on this vehicle.Always follow the warnings and instructions in Owner's Manual.

Click the CONTENTS link above for the Table Of Contents, or download a full PDF of the Owner Manual in the Owner Support area of Polaris.com

Drive System

Drive Chain Tension

NOTE
Always ensure that your snowbike is positioned on a flat even surface with no wheel kit positioned under it before adjusting the drive chain. Also ensure that your snowbike is free of all snow and debris before adjusting.

TFS (Timbersled Fixed Strut) Models

Check the drive chain tension before riding. Position a ruler behind the top chord of the drive chain halfway between the counter shaft sprocket and the jack shaft sprocket. Position and steady the ruler so it does not move as chain free-play is measured. Measure a total of ½” to 5/8” up and down free play on the top side of the chain. Do this by pinching the chain with your fingers and lightly pushing and pulling up and down. If the chain needs to be adjusted, loosen both 15 mm frame rail slide bolts located on the right side of the Timbersled. Next, loosen the 13 mm inner jam nut on the inner frame tension adjuster bolt. Adjust the tensioner bolt in or out to achieve the correct chain tension. Re-torque the jam nut to 25 Nm. Re-torque the frame rail slide bolts to 60 Nm. Adjust the bolt as needed and tighten the jam nut. Recheck again for proper adjustment.

TSS (Timbersled Suspension Strut) Models

Always check the engine chain tension before riding. First, set the TSS shock air pressure to 250 psi. Next, position a ruler behind the top chord of the drive chain halfway between the counter shaft sprocket and the jack shaft sprocket. Position and steady the ruler so it does not move as chain free-play is measured. Measure a total of ½" to 5/8" of up-and-down free-play on the top side of the chain. Do this by pinching the chain with your fingers and lightly pushing and pulling up and down.
If the chain needs to be adjusted, loosen both 15 mm frame rail slide bolts located on the right side of the Timbersled. Next, loosen the 13 mm inner jam nut on the inner frame tension adjuster bolt. Adjust the tensioner bolt in or out to achieve the correct chain tension. Re-torque the jam nut to 25 Nm. Re-torque the frame rail slide bolts to 50 Nm. Adjust the bolt as needed and tighten the jam nut. Recheck again for proper adjustment.
IMPORTANT
The chain will become looser as the TSS suspension compresses. It is extremely important that you keep the chain adjusted properly for long chain life and reliability.
NOTE
The drive chain may loosen on the first ride. This is due to the slider breaking in. Retighten drive chain after the first few rides. If the problem persists, your dealer can assist.
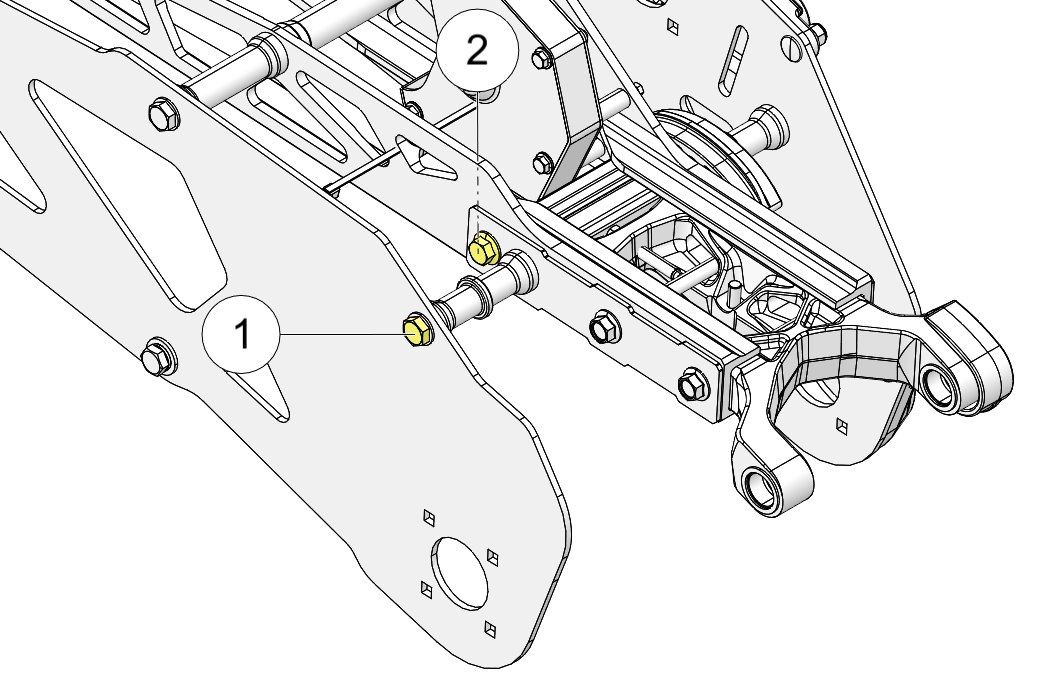
If the chain is too tight and the frame is difficult to compress, you may loosen the front right-hand side panel bolt and the front righ-hand frame bolt to allow the frame to slide easier. Re-torque both bolts to 60 Nm prior to tensioning the chain.

Image

Chain Case Chain Adjustment

It is recommended that you check the chain case chain adjustment each time the chain is lubed. Remove the fasteners that hold the chain case cover on. Place a ruler against the front side of the rear middle chain case cover bolt with the ruler facing forward reading from right to left towards the front of the Timbersled. Measure a total of 1/2” to 5/8” front to back free play on the back side of the chain. Do this by pinching the chain with your fingers and lightly pushing it front to back. If the chain needs to be adjusted, loosen the tensioner bolt from the inside of the side panel. Adjust as needed and tighten the bolt firmly. Check once more for proper adjustment.
caution
Do not over-tension chain. Improper tension can cause excessive wear to the chain tensioner roller.

© Copyright Polaris Industries Inc. All rights reserved.