Content Source: 2019 RUSH / SWITCHBACK / Pro-S / XCR Owner’s Manual (9928879 R02) > The Perfect Fit Chapter
| IMPORTANT |
|
The Owner's Manual for this vehicle contains warnings, instructions and other information you must read and fully understand before safely riding or performing maintenance on this vehicle.Always follow the warnings and instructions in Owner's Manual. Click the CONTENTS link above for the Table Of Contents, or download a full PDF of the Owner Manual in the Owner Support area of Polaris.com |
| NOTICE |
|
Always adjust the clicker at least one click below full
stiff (full clockwise) or shock damage will occur. |
| NOTE |
| Adding traction components, such as traction studs or additional ski skag carbides, or changing the factory equipped track, could change handling characteristics. Addition setup may be required. |
|
Ride Experience |
Adjustment |
|
|---|---|---|
|
Too “LITE”
|
 |
Increase rear track shock spring preload OR Decrease front track shock spring preload |
|
Too much “BITE”
|
 |
Decrease rear track shock spring preload OR Increase front track shock spring preload |
|
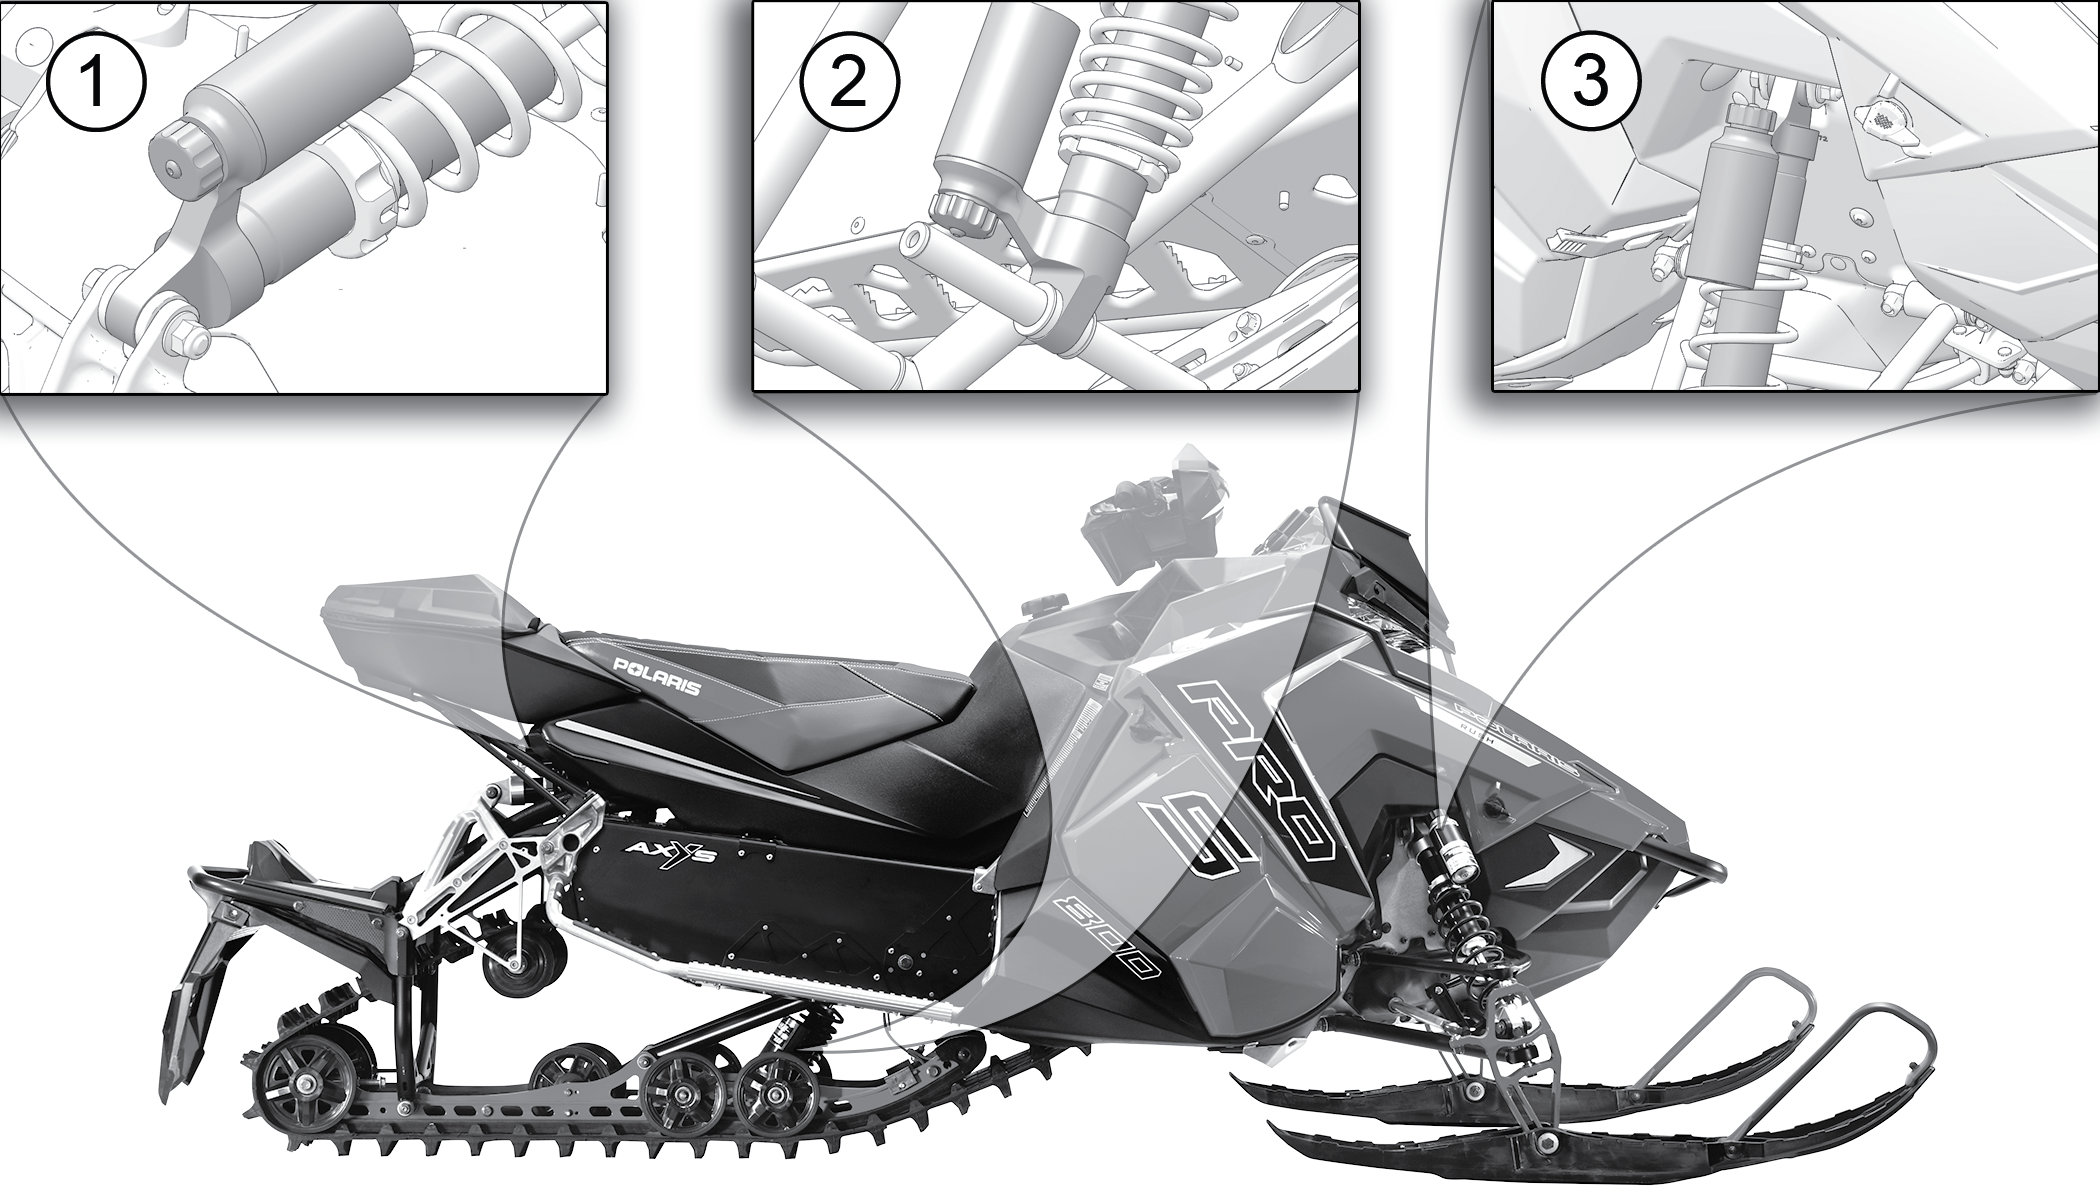
Front Suspension (IFS Shocks): Too Stiff Too Soft |
(IFS Shocks) Turn clickers 2 clicks SOFT Turn clickers 2 clicks HARD |
|
|
Ride Comfort Under Feet (Front Track Shock): Too Stiff Too Soft |
(Front Track Shock) Turn clicker 2 clicks SOFT Turn clicker 2 clicks HARD |
|
|
Rear Suspension (Rear Track Shock): Too Stiff Too Soft |
(Rear Track Shock) Turn clicker 2 clicks SOFT Turn clicker 2 clicks HARD |
|

| NOTE |
| Independent Front Suspension (IFS) shocks vary depending on model and available features. |
|
Spring Setting |
||||||||||
|---|---|---|---|---|---|---|---|---|---|---|
|
Model |
Spring Rate |
Preload (Factory Setting |
Preload (Minimum Setting) |
Preload (Maximum Setting) |
Spring |
|||||
|
lb/in |
N/mm |
in |
cm |
in |
cm |
in |
cm |
|||
|
RUSH PRO-S |
80 |
14 |
2-1/2 |
6.4 |
2-1/2 |
6.4 |
3-1/2 |
8.9 |
7043732 |
|
|
SWITCHBACK |
80 |
14 |
2-1/2 |
6.4 |
2-1/2 |
6.4 |
3-1/2 |
8.9 |
7043732 |
|
|
SWITCHBACK |
80 |
14 |
2-1/4 |
5.7 |
2-1/4 |
5.7 |
3-1/2 |
8.9 |
7043732 |
|
|
SWITCHBACK XCR |
100 |
17.5 |
2–3/4 |
7 |
2–3/8 |
6 |
3–1/2 |
8.9 |
7041576 |
|
|
RUSH XCR |
100 |
17.5 |
2–3/4 |
7 |
2–3/8 |
6 |
3–1/2 |
8.9 |
7041576 |
|
| caution |
| Never exceed the minimum/maximum spring preload settings. Always remove the vehicle weight from the spring prior to making adjustments. |
|
Model |
Clicker Setting (from full soft) |
|---|---|
|
All PRO-S Models |
3 |
|
SWITCHBACK ADVENTURE |
2 (Middle) |
|
RUSH XCR |
High Speed - 4 |
| Low Speed - 7 |
|
Spring Setting |
||||||||||
|---|---|---|---|---|---|---|---|---|---|---|
|
Model |
Spring Rate |
Preload (Factory Setting) |
Preload (Minimum Setting) |
Preload (Maximum Setting) |
Spring |
|||||
|
lb/in |
N/mm |
in |
cm |
in |
cm |
in |
cm |
|||
|
RUSH PRO-S |
95-280 |
16.6-49 |
1-1/2 |
3.8 |
1-1/2 |
3.8 |
1.85 |
4.7 |
7043957 |
|
|
SWITCHBACK |
95-280 |
16.6-49 |
1-1/2 |
3.8 |
1-1/2 |
3.8 |
1.85 |
4.7 |
7043957 |
|
|
SWITCHBACK |
95-280 |
16.6-49 |
1-3/8 |
3.5 |
1-1/4 |
3.17 |
1-3/4 |
4.44 |
7043957 |
|
|
SWITCHBACK |
95–300 |
26 |
1 |
2.54 |
3/4 |
1.9 |
1.625 |
4.1 |
7044794 |
|
|
RUSH XCR |
95–300 |
26 |
1 |
2.54 |
3/4 |
1.9 |
1.625 |
4.1 |
7044794 |
|
| caution |
|
Never exceed the minimum/maximum spring preload settings.
Always remove the vehicle weight from the spring prior to making
adjustments.
|
|
Model |
Clicker Setting (from full soft) |
|---|---|
|
All PRO-S Models |
3 |
|
SWITCHBACK ADVENTURE |
2 (Middle) |
|
SWITCHBACK XCR |
High Speed - 4 |
| Low Speed - 7 | |
|
RUSH XCR |
High Speed - 4 |
| Low Speed - 7 |
| NOTE |
| Rear track shocks vary depending on model and available features. |
|
Spring Setting |
|||||||||
|---|---|---|---|---|---|---|---|---|---|
|
Model |
Spring Rate |
Preload (Factory Setting) |
Preload (Minimum Setting) |
Preload (Maximum Setting) |
|||||
|
lb/in |
N/mm |
in |
cm |
in |
cm |
in |
cm |
||
|
RUSH PRO-S |
130* |
23 |
2.625 |
6.7 |
1.875 |
4.8 |
3.125 |
7.9 |
|
|
SWITCHBACK |
130* |
23 |
2.625 |
6.7 |
1.875 |
4.8 |
3.125 |
7.9 |
|
|
SWITCHBACK |
120* |
21 |
N/A |
N/A |
N/A |
N/A |
N/A |
N/A |
|
|
SWITCHBACK |
130 |
23 |
2.625 |
6.7 |
1.875 |
4.8 |
3.125 |
7.9 |
|
|
RUSH XCR |
130 |
23 |
2.625 |
6.7 |
1.875 |
4.8 |
3.125 |
7.9 |
|
|
RUSH PRO-S/SWITCHBACK PRO-S stock spring: Recommended for riders up to 280 lbs. (127 kg) OPTIONAL HD spring: Recommended for riders 280-350 lbs. (127-160 kg) or OPTIONAL for aggressive riders over 200 lbs. (91 kg) *OPTIONAL HD spring is the PRO-X spring 7043160-293 (RED), 7043160-133 (WHITE), 7043160-067 (BLACK) |
|||||||||
|
PRO-S (Heavy) |
150 |
26 |
2.625 |
6.7 |
1.875 |
4.8 |
3.125 |
7.9 |
|
| caution |
|
Never exceed the minimum/maximum spring preload settings.
Always remove the vehicle weight from the spring prior to making
adjustments.
|
|
Model |
Clicker Setting |
|
|---|---|---|
| All PRO-S Models | 3 | |
| SWITCHBACK ADVENTURE | 2 (Middle) | |
| SWITCHBACK XCR | High Speed | 4 |
| Low Speed | 7 | |
| RUSH XCR | High Speed | 4 |
| Low Speed | 7 | |
| NOTE |
|
The shock air pump is located in the protective bag under
the cargo rack. |
| NOTICE |
|
Do not over-tighten as this will damage the chuck seal. |
| NOTE |
|
If the shock has no air pressure, the gauge will not register pressure. |
| NOTICE |
|
Do not exceed 50 PSI (345 kPa). |
| NOTE |
|
While disconnecting, the sound of air escaping is from the pump hose, not from the shock. |
|
Total Combined Weight (Rider+Passenger+Gear+Cargo) |
Recommended Shock Air Pressure |
|---|---|
|
Up to 200 lbs. (0-90.7 kg) |
0-5 PSI (0-34 kPa) |
|
200-250 lbs. (90.7-113 kg) |
10 PSI (69 kPa) |
|
250-300 lbs. (113-136 kg) |
15 PSI (103 kPa) |
|
300-350 lbs. (136-159 kg) |
20 PSI (138 kPa) |
|
350-400 lbs. (159-181 kg) |
25 PSI (172 kPa) |
|
400-450 lbs. (181-204 kg) |
30 PSI (207 kPa) |
|
450-500 lbs. (204-227 kg) |
35 PSI (241 kPa) |
|
Do not exceed 50 PSI (345 kPa) |
|
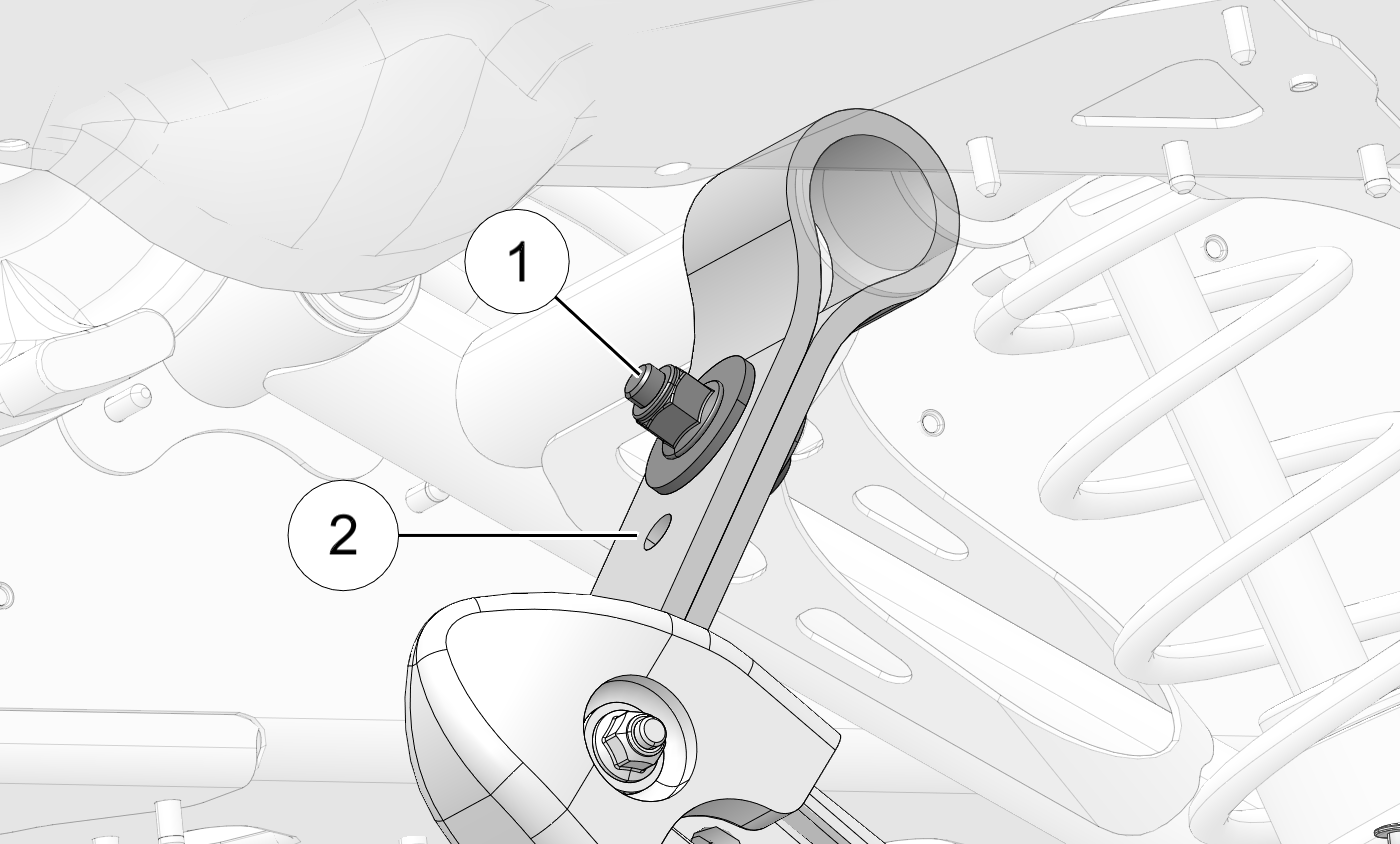
POLARIS recommends
leaving the limiter strap length at position ![]() to maintain the optimum ride
characteristics of the snowmobile. Riders who desire less ski pressure
and more weight transfer
toward the rear of the snowmobile can lengthen the
limiter strap by changing to position
to maintain the optimum ride
characteristics of the snowmobile. Riders who desire less ski pressure
and more weight transfer
toward the rear of the snowmobile can lengthen the
limiter strap by changing to position ![]() .
.

| TORQUE | |
|
16 ft-lbs (21 Nm). |
© Copyright Polaris Industries Inc. All rights reserved.