Content Source: 2019 600 Indy Owner's Manual (9928873 R01) > The Perfect Fit Chapter

IMPORTANT

The Owner's Manual for this vehicle contains warnings, instructions and other information you must read and fully understand before safely riding or performing maintenance on this vehicle.Always follow the warnings and instructions in Owner's Manual.

Click the CONTENTS link above for the Table Of Contents, or download a full PDF of the Owner Manual in the Owner Support area of Polaris.com

Rear Suspension Adjustments

Rider weight, riding style, trail conditions, and vehicle speed all affect suspension action.
Each rear suspension can be adjusted to suit rider preference and deliver excellent performance for a given set of conditions. However, all suspension designs and adjustments involve a compromise, or trade-off. For example, a suspension set up for snowcross racing would provide a very stiff ride on the trail. A suspension set up for trail riding would bottom out harshly on a snowcross course.
Refer to the suspension setup label on your snowmobile, or your POLARIS dealer can provide the initial suspension setup information. Additional adjustments can be made after initial setup. Make adjustments to one area at a time so you can evaluate the change. For further assistance, your dealer can assist.

Suspension Performance Tips

  • Rider weight usually determines the position at which the spring preload should be set. However, this may vary with riding style. With a little experimentation, each rider can find a preferred set-up. These adjustments are easy to make, involve very little time or effort, and greatly affect the ride.
  • In deep snow, a new rail slide will offer improved performance over a worn rail slide. It can also improve top speed.
  • When riding on ice or hard-packed snow, adding a set of bogie wheels to the rail may enhance the snowmobile’s performance. Bogie wheel kits are available from your dealer.
  • POLARIS offers track kits for improved flotation in deep snow. See your dealer for assistance.
TIP
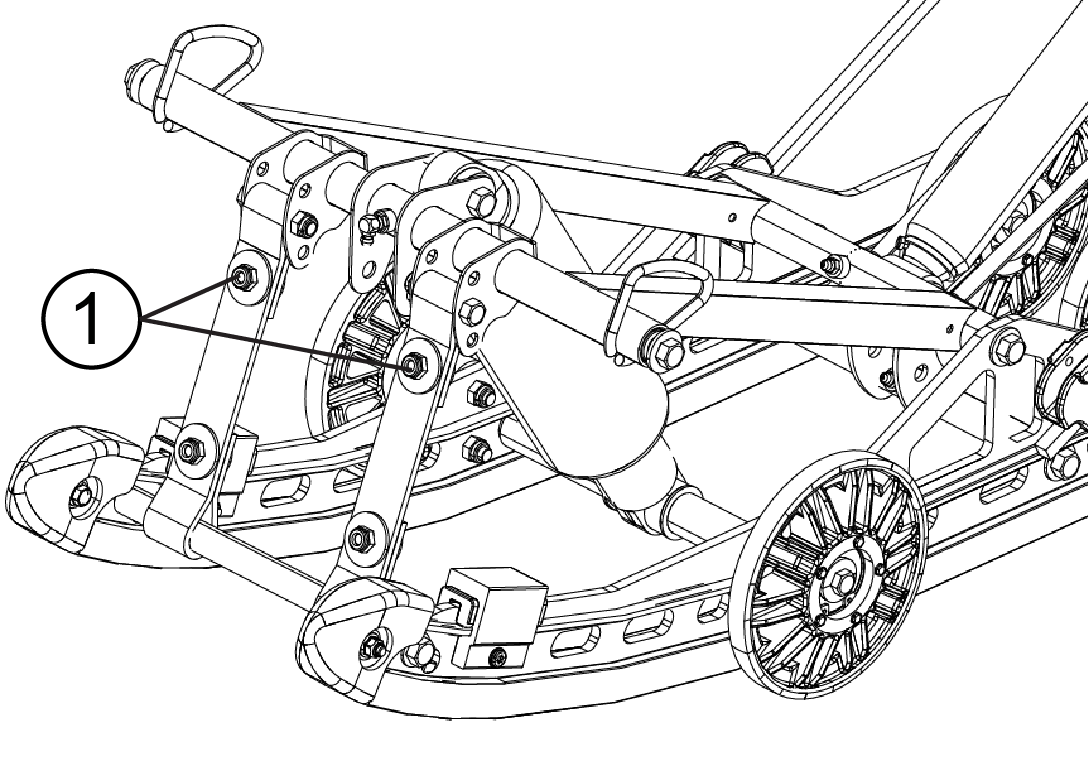
Keep the suspension pivot points lubricated. This will reduce moisture and rust build-up and ensure proper function of the suspension components. Grease rear suspension pivots before adjusting the rear suspension.
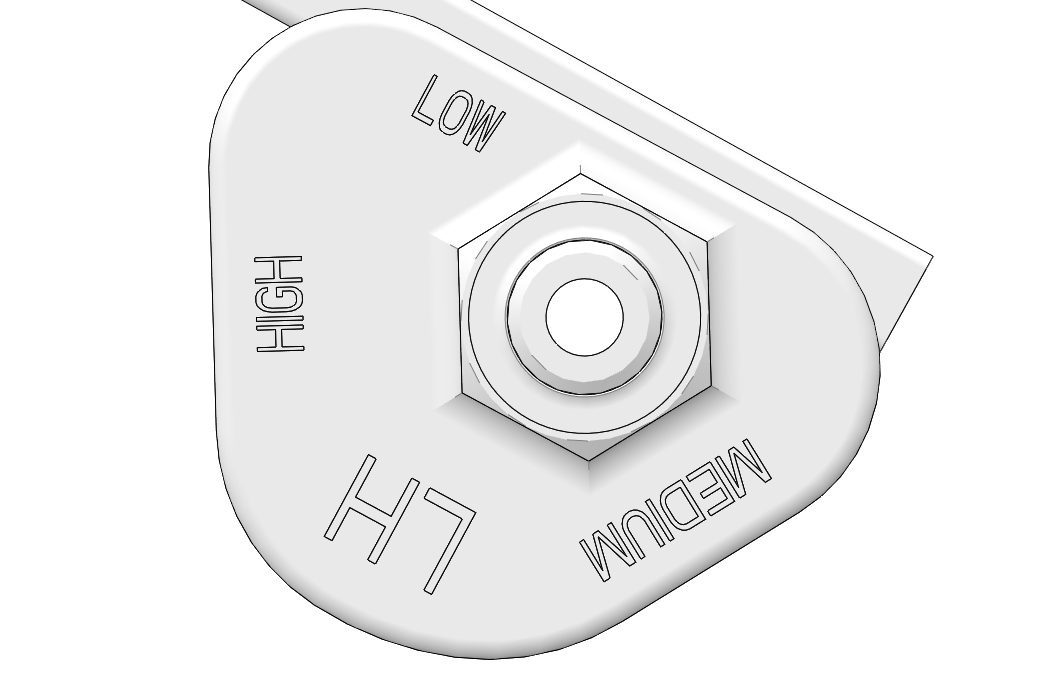
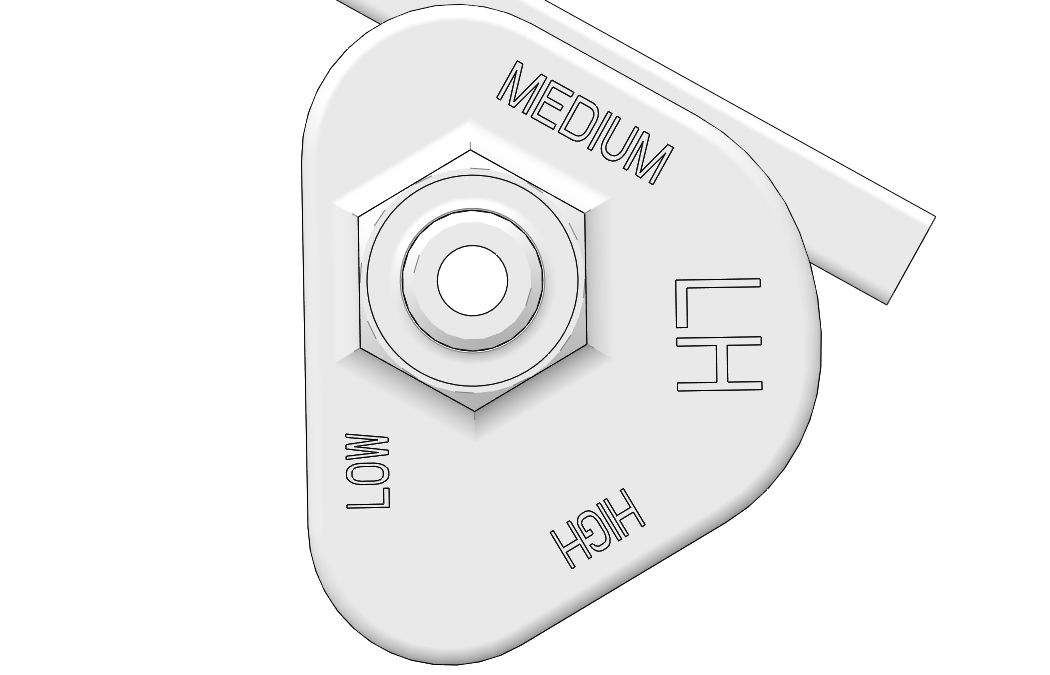
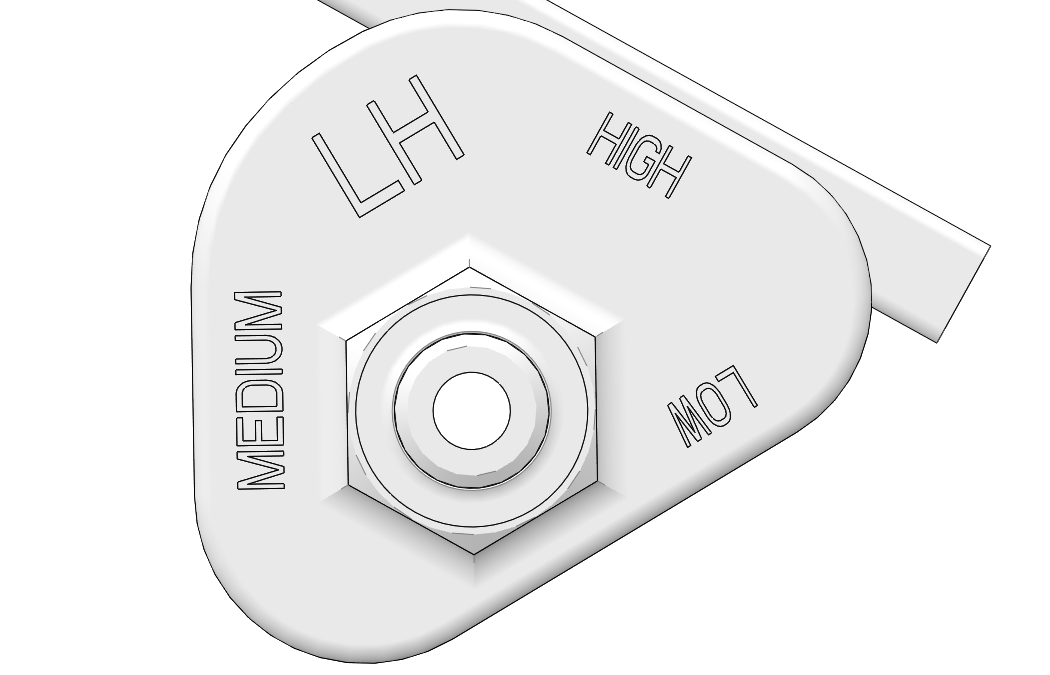
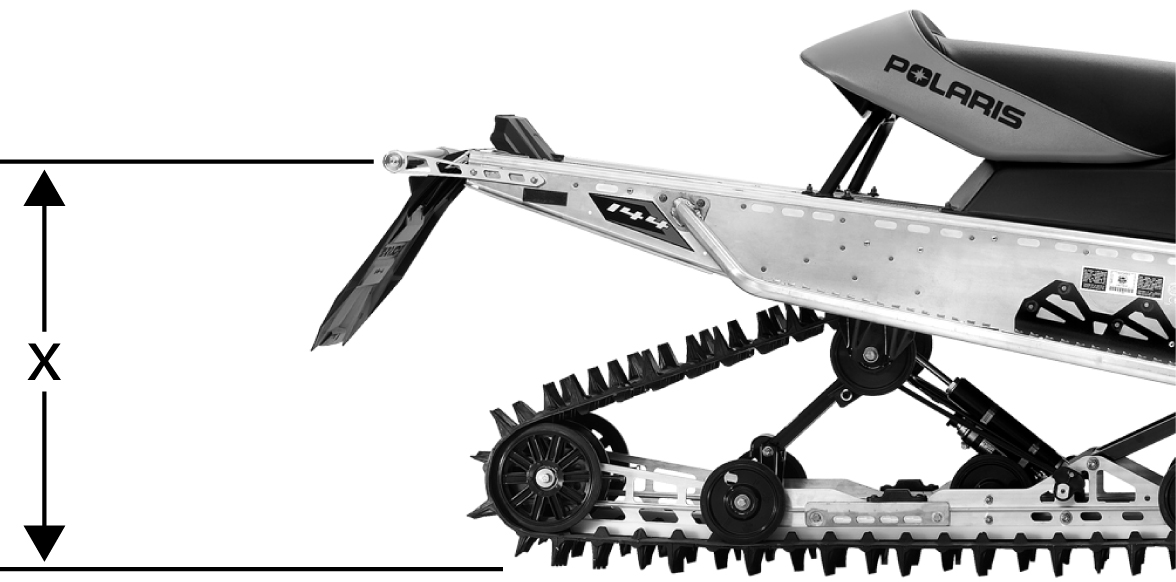
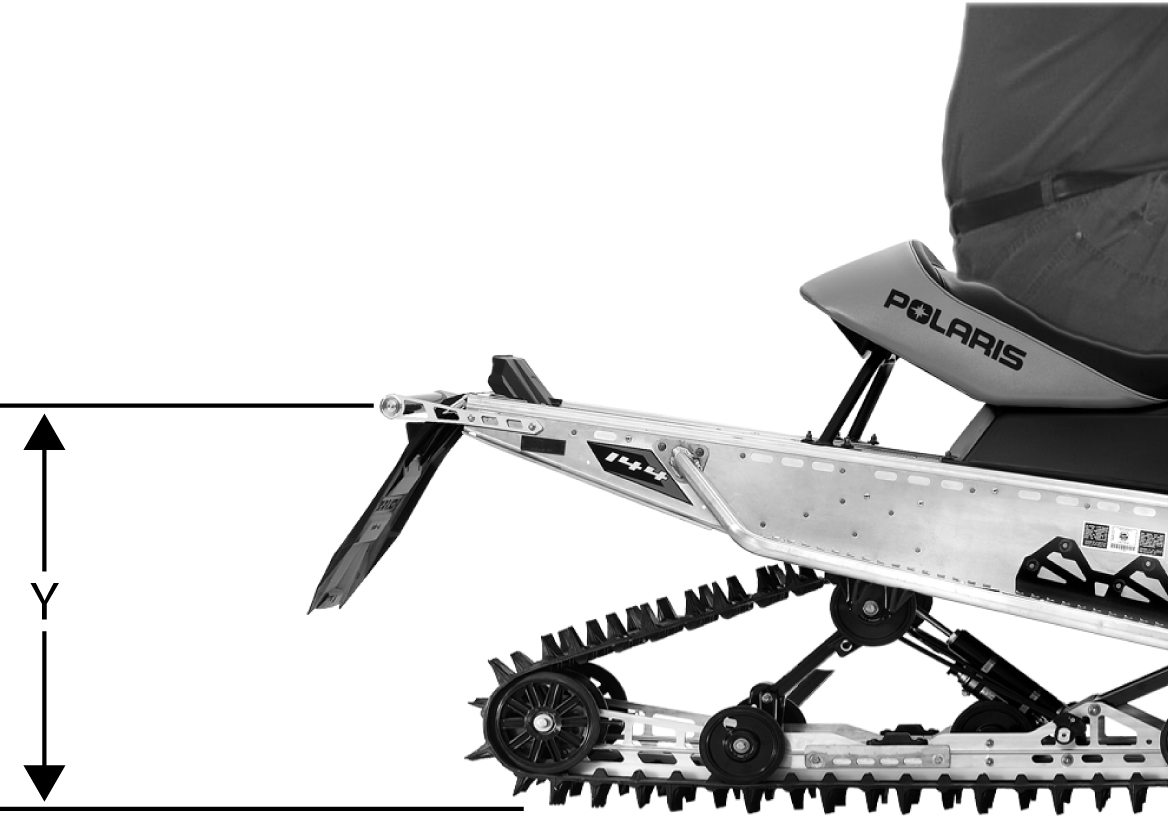
Track Tension

Track adjustment is critical for proper handling. Always maintain correct tension and alignment.

Initial Spring Preload Setting (Sag Method)

To set up the rear suspension torsion spring preload, measure the distance between the ground and rear bumper.
This is measurement X.
Take the first measurement with no rider and with the rear suspension at full extension.

TIP
The rear bumper may need to be lifted upward slightly to fully extend the suspension.
.


Image

Next, have the rider drop down hard on the seat and bounce up and down several times, collapsing the rear suspension. With the rider seated, measure the distance between the ground and the rear bumper at the exact location used for measurement X. This is measurement Y. To determine sag, commonly referred to as ride-in, subtract measurement Y from X (sag=X-Y). If the measured sag is incorrect, adjust the FRA position and/or rear torsion spring preload.

Image
Suspension Recommended Sag Adjustment See Page
INDY (121) 3-4 inches (7.5-10 cm) Torsion Spring Preload Torsion Spring Preload
TIP
This is only an initial setup, and final spring preload may vary based on rider preference and riding conditions. Accessory springs with a higher load rating are available for some models. Please see your dealer for availability.


Torsion Spring Preload

To adjust rear torsion spring preload, rotate the three-position cam using the engine spark plug tool. Adjustment is easiest when the cam is rotated from low to medium, and then to high. Rotating directly from low to high will require significantly more effort.
Different rate torsion springs are available if a firmer ride is desired. See your dealer for more information.
Image
Image
Image
Low Medium High

Limiter Strap Position (Ski Pressure)

Ski pressure is set at the factory to deliver the optimum balance between ride and handling. If a rider prefers more ski pressure for improved steering performance, adjustments can be made to the front limiter straps. Tighten the straps to increase ski pressure. Loosen the straps to reduce ski pressure.

  1. Remove the nuts and flat washers from the upper limiter strap.
  2. Relocate the strap to the desired position.
  3. Reinstall the nuts and washers. Tighten securely.

Image

Suspension Coupling

On all POLARIS snowmobile rear suspensions, there are two torque arms that control the movement of the rail beam. Prior to the advent of suspension coupling, these torque arms could move independently of each other. Rear suspension coupling links the movement of the front and rear torque arms to each other.
There are two types of rear suspension coupling.

Front To Rear Coupling and the Front Rear Scissor Stop (FRSS)

The front rear scissor stop (FRSS) couples the movement of the front torque arm with the rear torque arm and limits the amount of independence between the movement of the front torque arm and the rear torque arm.
When hitting a bump, the front torque arm starts to compress. The FRSS links the movement to the rear torque arm, causing it to compress and raise the rear suspension up as one, allowing the suspension to hit the bump only once and reducing kickback.
The factory setting is usually adequate for all riders and conditions.

Rear To Front Coupling and the Rear Rear Scissor Stop (RRSS)

The rear rear scissor stop (RRSS) couples the movement of the rear torque arm with the front torque arm and limits the amount of independent movement between the rear torque and the front torque arm.
Adjusting the RRSS either allows more weight to transfer to the rear for more traction, or allows less weight to transfer to the rear, resulting in improved cornering performance. An adjustment dot is located on the RRSS. This dot is on the longest end of the scissor stop.

Rear Rear Scissor Stop (RRSS) - Attributes

Moving the RRSS to a higher position will have the following effects on the suspension:
  • Reduced weight transfer
  • Improved chatter bump ride
  • Improved cornering performance
  • Increased load carrying capacity (2–up)

Weight Transfer During Acceleration

Image
Image
Image
Image
Image
High Low Medium Low
The preferred method for controlling weight transfer during acceleration is by adjusting the rear rear scissor stop (RRSS) . The factory setting is the best for most trail riding conditions.
To decrease weight transfer under acceleration (for improved cornering), rotate the RRSS to a higher position.
To increase weight transfer or ski lift during acceleration, rotate the RRSS to a lower position.
TIP
Your dealer can help you with initial setup and additional setup instructions to help you achieve your optimum ride. A scissor stop tool is also available from your dealer.

© Copyright Polaris Industries Inc. All rights reserved.