Content Source: Polaris Interactive Digital Display (9928803 R01) > Features and Controls Chapter

IMPORTANT

The Owner's Manual for this vehicle contains warnings, instructions and other information you must read and fully understand before safely riding or performing maintenance on this vehicle.Always follow the warnings and instructions in Owner's Manual.

Click the CONTENTS link above for the Table Of Contents, or download a full PDF of the Owner Manual in the Owner Support area of Polaris.com

System Settings

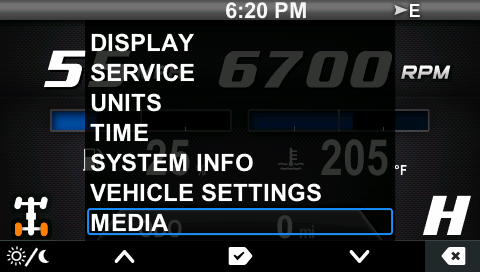
Select SYSTEM SETTINGS from the menu to:
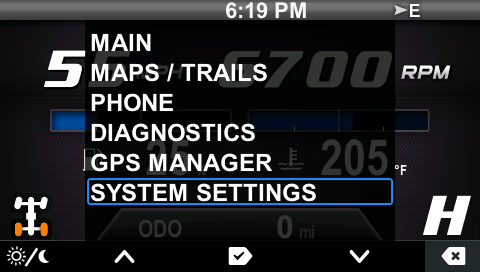
  • Access Display Settings
  • Access Service Information
  • Change Units
  • Access Time Settings
  • View System Information
  • View Vehicle Settings
  • Access Media Features (if equipped)

Image
To access the SYSTEM SETTINGS, do the following:
  1. Press any key to display the PIDD screen icons.
  2. Press Key 3 to display the main menu options.
  3. Toggle to System Settings. Press Key 3 to select.
    NOTE
    If demo mode is enabled, you can toggle through the resulting menu to view options without the risk of changing settings. This tool is useful as a tutorial or for training at your dealership.

Display

To view or adjust the display settings, do the following:
  1. In the System Settings menu, select DISPLAY.
  2. Toggle to the desired setting:
    • Day/Night/Auto mode
    • Brightness level
    • Language
    • Demo (enable/disable)
  3. Press Key 1 or Key 5 to change a setting.
    NOTE
    If Day is selected, changing the brightness will change the day mode brightness level. If Night is selected, changing the brightness will change the night mode brightness level.
    NOTE
    If Auto is selected, the display will automatically switch between Day and Night modes based on time of day and day of year.
  4. Press Key 3 to exit.

Service (if available)

To view your vehicle’s service information, do the following:
  1. In the System Settings menu, select SERVICE.
    • Engine Hours displays hours of engine operation since manufacture.
    • Interval is an editable setting that provides a service reminder at the set interval. Interval can be set to any 5-hour increment between OFF and 100 hours.
    • Hours to Service displays hours remaining to reach the set service interval.
  2. Press Key 5 to reset.
  3. Press Key 2 to increase the interval or Key 4 to decrease the interval, if desired. Press Key 3 to confirm a change or reset the existing interval.
  4. Press Key 2 to view additional odometer information:
    • Odometer
    • Oil Life
  5. Press Key 5 to reset oil life. A warning displays at startup if vehicle mileage exceeds the oil life mileage.
NOTE
Initial Oil Milage Warning is set to go off at 500 miles. After first reset, Oil Milage Warning will display every 1000 miles.

Units

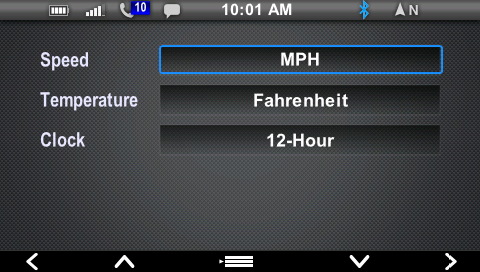
The units can be set to display U.S. customary units or the International System of Units (metric) and a 12-hour clock or a 24-hour clock.
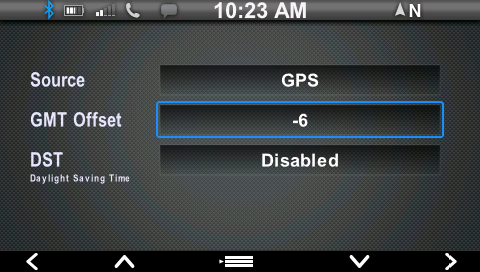
  1. In the System Settings menu, select UNITS.
    • Speed
    • Temperature
    • Clock
  2. Toggle to the desired setting.
  3. Press Key 1 or Key 5 to change the setting.
  4. Press Key 3 to exit.

Image

Time

  1. In the System Settings menu, select TIME.
    • Source (GPS satellites)
    • GMT (Greenwich Mean Time) Offset
    • DST (Daylight Savings Time) (Enable/Disable)
  2. Toggle to the desired setting.
    NOTE
    Enabling DST adds one hour regardless of the date. DST does not automatically update and must be selected by the rider.
  3. Press Key 1 or Key 5 to change setting.

Image

System Information

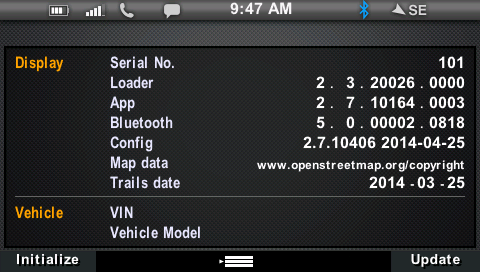
To view your System Information, do the following:

  1. In the System Settings menu, select SYSTEM INFO.
  2. View the following system information in this display.
    • PIDD Serial Number
    • Bootloader Version
    • Display Operating System Application Version
    • Software Configuration and Date
    • Map Data Version Build Date
    • Trails Data Version and Build Date
  3. Press Key 3 to exit.

Image

Vehicle Settings

  1. In the System Settings menu, select VEHICLE SETTINGS.
    • Clutching
  2. Key 2 starts and stops recording graph data.
  3. Key 4 downloads recorded graph data to a USB drive inserted in the vehicle’s USB port. Data is saved as a .csv file.

Image

Media

To access the Media settings, do the following:

  1. In the System Settings menu, select MEDIA.
  2. Toggle to desired setting.
    • Audio
    • Video Rear (if equipped)
    • Video Front (if equipped)
  3. Press Key 1 or Key 5 to change the setting.
  4. Press Key 3 to exit.

Image

Video Rear (if equipped)

  1. If enabled, the display will automatically switch to rear camera when vehicle is in reverse.
  2. Press Key 5 to toggle between front and rear video (if equipped).

Image

Video Front (if equipped)

  1. Press any key to display the PIDD screen icons.
  2. Press Key 1 repeatedly to display each home screen option.
  3. If enabled, front camera will follow the Auxiliary 2 home screen.
  4. Press Key 5 to toggle to Rear Video (if equipped).
  5. Press Key 1-4 to go to the primary riding screen.

Image

© Copyright Polaris Industries Inc. All rights reserved.