Content Source: Polaris Interactive Digital Display (9928803 R01) > Operation Chapter

IMPORTANT

The Owner's Manual for this vehicle contains warnings, instructions and other information you must read and fully understand before safely riding or performing maintenance on this vehicle.Always follow the warnings and instructions in Owner's Manual.

Click the CONTENTS link above for the Table Of Contents, or download a full PDF of the Owner Manual in the Owner Support area of Polaris.com

PIDD for Snowmobiles

Certain PIDD features are active only when using the display on snowmobiles. Some PIDD features may function only while the engine is running (such as Security and Diagnostics). If an PIDD feature seems nonfunctional, start the engine to access that feature. Do not allow an engine to run in an enclosed area without adequate ventilation.
Snowmobile-specific PIDD features include:
  • Left Hand Controls
  • Fuel Type Selection
  • Security (if enabled)
  • Average / Max Speed
PIDD features that are not active when installed on a snowmobile include:
  • Gear selection (reverse only)
  • All-Wheel Drive Indicator

Initialization Process

The PIDD initialization process must be performed on some snowmobiles (not required on all models) in order for a new or newly installed PIDD to function properly. It must also be performed every time the PIDD is updated with files from the Ride Command web site.
Models requiring initialization include:
  • 600 AXYS models
  • Any non-AXYS model for which an accessory PIDD is available
  1. Start the engine. Do not allow an engine to run in an enclosed area without adequate ventilation.
  2. In the System Settings menu, select SYSTEM INFO.
  3. Press and hold Key 1 until the next screen displays.
  4. Press Key 3. The display will reboot and begin the configuration process.

Left Hand Controls

The left hand controls on AXYS and 600/800 PRO-RIDE models allow riders to switch screens, zoom in or out and drop waypoints without removing their hands from the handlebars.
WARNING
Do not enter information or adjust this device while operating your vehicle. Distracted driving can result in loss of control, collision or accident, which may result in serious injury or death. Avoid using any features and devices while driving that may take your attention away from the road or trail and safe driving habits, even for a moment.
The operator assumes all risk associated with using this device. Please read the owner’s manual provided with your vehicle.

MODE and SET Switch

Pressing the MODE and SET switches quickly (press/release) or slowly (hold 2 seconds or longer) allows riders to change a variety of display options. The functionality of each switch is based on the screen the PIDD is displaying at the time.
Switch functions are outlined in the following tables. Review these tables to become familiar with the functions of each switch.

Switch Functions While Viewing Maps

Quick = Press/Release
Slow = Hold for 2+ seconds
Switch Motion Speed Result
SET Slow Toggle between MAPS/TRAILS and MAIN screens
SET Quick Zoom IN (+)
MODE Quick Zoom OUT (-)
MODE Slow Drop waypoint at current location

Switch Functions While Viewing Main Screens

Quick = Press/Release
Slow = Hold for 2+ seconds
Switch Motion Speed Result
SET Slow Toggle between MAPS/TRAILS screen and MAIN screens
SET Quick Toggle between Battery Voltage and Coolant Temperature
MODE Quick Toggle between Odometer, Trip 1 and Trip 2
MODE Slow Clear the current trip meter

Vehicle Settings

  1. Press any key to display the PIDD screen icons.
  2. Press Key 3 to display the main menu options.
  3. Toggle to System Settings. Press Key 3 to select.
  4. In the System Settings menu, toggle to VEHICLE SETTINGS (specific to snowmobiles). Press Key 3 to select.
    • Fuel type
    • Lock
    • Change Code
NOTE
Lock and Change Code display only if the engine is running and the PIDD has been initialized.

Fuel Type Selection

  1. In the Vehicle Settings menu, toggle to FUEL TYPE.
  2. Press Key 3 to select.
  3. Press Key 2 or Key 4 to toggle between the fuel types. When the screen displays the fuel type used in the fuel tank, press Key 3 to exit.

Image

PIDD Power Sources

NOTE
On snowmobiles equipped with an electric start battery and PIDD, always turn the key off when the PIDD is not in use. If the key remains in the RUN position after using the auxiliary engine stop switch to stop the engine, the PIDD remains active, drawing power from the battery.
NOTE
The PIDD is not dependent on the battery while the engine is running, but the battery supplies a constant power source when the engine is off or when the engine is transitioning between forward and reverse operation. If a battery is not installed, the PIDD reboots when the engine is started and when electronic reverse (PERC) is used.

Average Speed / Max Speed

When using the PIDD on a snowmobile, two additional features are available for KEY 2, Average Speed and Max Speed.
  1. Press any key to display the PIDD screen icons.
  2. Press Key 2 repeatedly to display each option.
    • Odometer (ODO)
    • Trip 1
    • Trip 2
    • Trip Hours (TRIP)
    • Engine Hours (ENG)
    • Average Speed (AVG)
    • Maximum Speed (MAX)
  3. Average Speed (AVG) displays the average speed of the vehicle since the last user reset.
  4. Max Speed (MAX) displays the fastest speed reached since the last user reset.
  5. To reset AVG or MAX, press any key to bring up the menu icons, then hold Key 2 to reset value.

Lock the Ignition

First Time Activation

Snowmobiles equipped with the PIDD are equipped with a security function that can be activated by an authorized Polaris dealer. If you have this feature activated, you can lock the ignition to prevent unauthorized use when leaving the snowmobile unattended. A locked system will limit engine speed to 3000 RPM, which prevents clutch engagement, and the snowmobile will not move when throttle is applied.
  1. Have the security system activated by your authorized Polaris dealer.
  2. The factory default security code is “000”. Change the default security code to a code of your own choosing.

Lock the Ignition

  1. Start the engine. Do not allow an engine to run in an enclosed area without adequate ventilation.
  2. Press any key to display the PIDD screen icons.
  3. Press Key 3 to display the main menu options.
  4. Toggle to System Settings > Vehicle Settings > LOCK.
  5. Press Key 3 to select. The ENTER CODE screen will display.
  6. Press Key 2 or Key 4 to enter the current 3-digit security code. Press Key 5 to toggle to each digit.
  7. If the code is not accepted, a BAD CODE screen will display.
  8. Follow the prompts and re-enter the current security code. When the code is accepted, the “locked” symbol and ENTER CODE screen displays. The ignition is locked.

Unlocking the Ignition

  1. Start the engine. The locked symbol and ENTER CODE screen displays. Do not allow an engine to run in an enclosed area without adequate ventilation.
  2. Press Key 2 or Key 4 to enter the current 3-digit security code. Press Key 5 to toggle to each digit.
  3. If the code is not accepted, a BAD CODE screen will display. Follow the prompts and re-enter the current security code.
  4. When the code is accepted, the “unlocked” symbol and SECURE OFF screen displays. The ignition is now unlocked.

Image

Change Security Code

The first time you change the security code, enter the default security code (000) at step 4.
  1. Start the engine. Do not allow an engine to run in an enclosed area without adequate ventilation.
  2. Toggle to System Settings > Vehicle Settings > CHANGE CODE.
  3. Press Key 3 to select. The ENTER CODE screen will display.
  4. Press Key 2 or Key 4 to enter the current 3-digit security code. Press Key 5 to toggle to each digit.
  5. After successfully entering the current security code, the CHANGE CODE screen will display. Enter your new 3-digit security code.
  6. Any time you change your security code, record the new code below for future reference. Keep this manual (or your security code) in a secure location where others will not be able to access your code.
NOTE
If you lose or forget your code please see your authorized Polaris dealer to have the code reset to the default code (000). Only authorized Polaris dealers may reset a lost or forgotten security code.

Detonation Elimination Technology (DET)

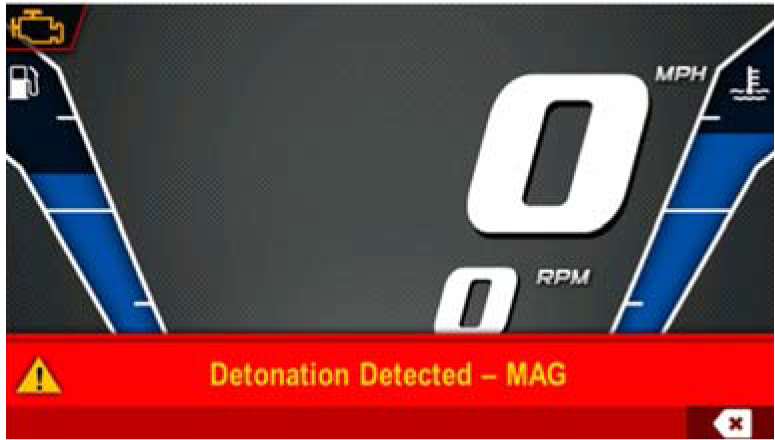
The DET system prevents damage to the engine from detonation by entering an engine protection mode whenever the DET system is active.
When excessive detonation is detected, the check engine light will illuminate. You may notice decreased engine performance and RPM when the DET system is activated. In most cases this is temporary and no action is required. The engine will return to its normal performance automatically.

Image
If severe detonation occurs:
  • The check engine light begins to flash steadily.
  • The PIDD displays “Detonation Detected - MAG (or PTO).”
  • The engine enters DET latching (limp home) mode.
  • On 2015 800 AXYS models, the ECU closes exhaust valves to limit engine power in DET latching mode. On all other 2015 AXYS and PRO-RIDE models, the ECU will shut down the engine during DET latching mode. In either event, restart the engine to reset the mode.
  • For all 2015 AXYS and PRO-RIDE models, the ECU will shut down the engine during a critical overheat condition.

Engine Overheat Indicators

Temperature Scale

NOTE
Please see your vehicle owner’s manual for more information. If engine overheating seems to be caused by something other than poor cooling conditions, see your dealer for service.

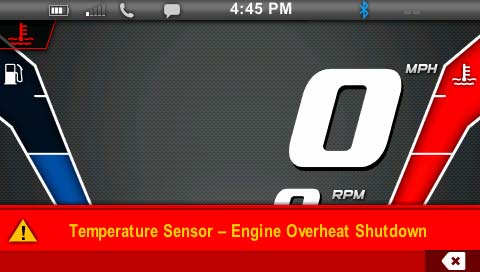
The engine temperature scale at the right side of the PIDD screen changes to RED and the check engine temperature indicator at the top left of the screen illuminates when the engine is overheating. Take action to cool the engine. The indicator will flash when engine temperature reaches critical levels. Stop the engine immediately.
A flashing indicator indicates continued operation could result in serious engine damage. The engine management system will automatically reduce engine power and create a misfire condition. Stop the engine immediately. Allow the engine to cool down.

Image

Bluetooth

Before Connecting

Compatibility

  1. Refer to your phone’s user manual before attempting to connect to the PIDD.
    • Review how to connect your phone to a Bluetooth device.
    • Review the different types of connections offered by your phone manufacturer and how the connection type affects information sharing.
  2. Verify that your phone is equipped with Bluetooth and that Bluetooth is turned on.
NOTE
Some of the features and functionality of the PIDD may vary due to the operations software on your phone.

Connection Management

Enabling/Disabling Bluetooth

  1. Press any key to display the PIDD screen icons.
  2. Press Key 3 to display the main menu options.
  3. Toggle to PHONE. Press Key 3 to select.
  4. The phone main menu screen displays.
  5. Press Key 3 to turn Bluetooth on or off.

Image
NOTE
The display will remember the state of Bluetooth at the next power-up. It will automatically connect to a paired device following the order set in the priority list.
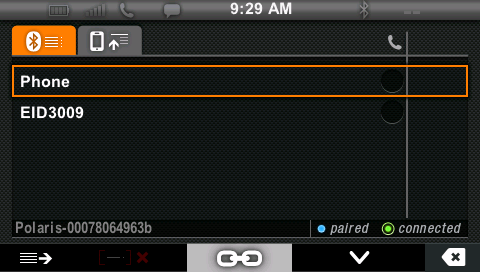
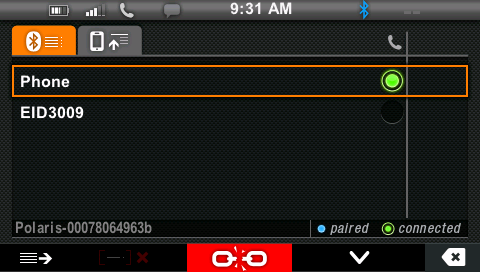
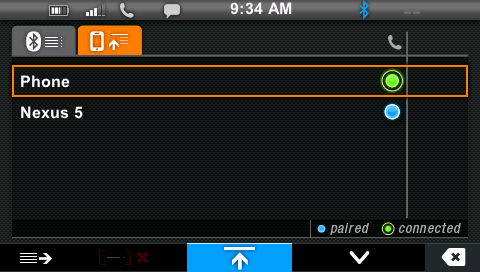
Bluetooth Settings

  1. With the phone main menu screen displayed, press Key 4 to open Bluetooth Settings.
  2. When the display opens Bluetooth Settings it becomes discoverable to other Bluetooth devices. After 5 seconds the display will start searching for devices.
  3. When the search is completed, the PIDD displays any devices found. Press Key 4 to toggle through the list. The indicators at the lower right edge of the screen indicate whether the selected device is paired and/or connected.
  4. The PIDD will perform the search again every 10 seconds until the device is paired.

Image
The display will not search for devices again unless one of the following occurs:
  • You exit and re-enter the display
  • The device is disconnected
Devices must be discoverable to show up in the list. Your phone settings may need to be changed to allow notifications and missed calls and text messages to display.
Color/Indicator Description
BLUE The device is paired but not connected.
GREEN The device is paired and connected.
NONE The device is not paired.

Pairing From the Device

To pair from the device follow the device’s instructions to pair with the display. Accept the request on the display when it appears. The device will automatically connect after pairing.
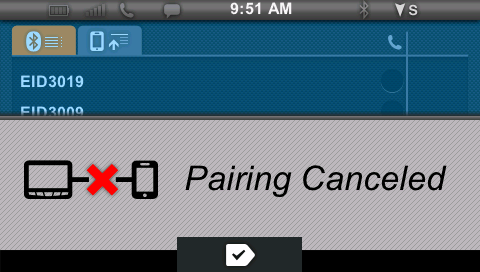
If an error occurs during pairing, or if the pairing is rejected by either device, the Pairing Canceled screen displays.

Image

Connecting a Formerly Paired Device

NOTE
Phone compatibility may vary. Some functions are dependent on phone settings that must be set by the user. Refer to your phone’s user manual for more information.

  1. To connect a device that was previously paired, toggle to the device in the display. Press Key 3.
  2. After connecting, the display will request the number of missed calls and update the display.

Image

Disconnecting a Device

To disconnect a device, toggle to the device in the display. Press Key 3.

Image

Unpairing a Device

  1. If the device is connected, disconnect the device before unpairing.
  2. To unpair a device, toggle to the device in the display. Press Key 3 to unpair.
  3. The confirmation screen displays. Press Key 3 to confirm.

Image

Changing Device Automatic Connection Priority

  1. To change which device automatically connects, toggle to the desired device in the display. Press Key 1 to display the priority screen.
  2. Press Key 3 to move the selected device up the list.
  3. Press Key 5 to exit.

Image

Phone

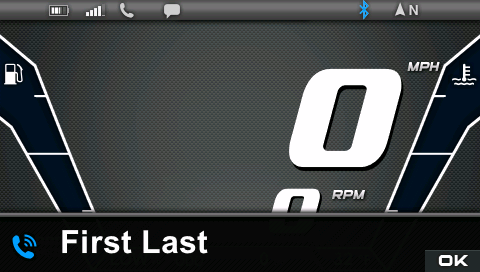
If a phone call is received while the phone is connected, the caller’s name (if available) or phone number (if supported) displays. Press Key 5 to acknowledge and remove the notification.

Image
NOTE
If the text messaging symbol in the upper left corner of the display does not illuminate (in white), the device is either not connected or not compatible with this feature. Check your phone’s text notification settings to make sure this feature is enabled.

View Missed Calls List

  1. With the phone main menu screen displayed, press Key 1 to request missed calls. The screen displays the phone symbol and “Reading Data.”
  2. If an error occurs during the request, an error message screen displays. Press Key 3 to accept.
    • For a “Data Request Timeout” message, press Key 3 to repeat the request.
    • For a “Data Error from Phone” message, verify that your phone is compatible and that Bluetooth is turned on before repeating the request.
  3. If the phone is compatible, the screen displays the most recent missed calls (up to 20) or “No Missed Calls”.
  4. Press Key 2 or Key 4 to toggle through the list.
  5. Press Key 3 to refresh the list.

Image

View Unread Text Messages List

  1. With the phone main menu screen displayed, press Key 2 to request unread text messages. The screen displays the text message symbol and “Reading Data”.
    NOTE
    To switch between Missed Calls and Unread Text Messages while navigating either menu, press Key 1.
  2. If an error occurs during the request, an error message screen displays.
    • “Data Request Timeout”: Press Key 3 to accept. Press Key 1 to repeat the request.
    • “Data Error from Phone”: Press Key 3 to accept. Verify that your phone is compatible and that Bluetooth is turned on before repeating the request.
  3. If the phone is compatible, the screen will display a list of the unread messages. If there are no unread messages since the device was paired, “No new messages since connected” displays.
    NOTE
    Most Android phones will display ALL unread messages. Other phones may display unread messages only since connection with the display.
  4. Press Key 2 or Key 4 to toggle through the list.
  5. Press Key 3 to refresh the list.

Bluetooth Not Responding

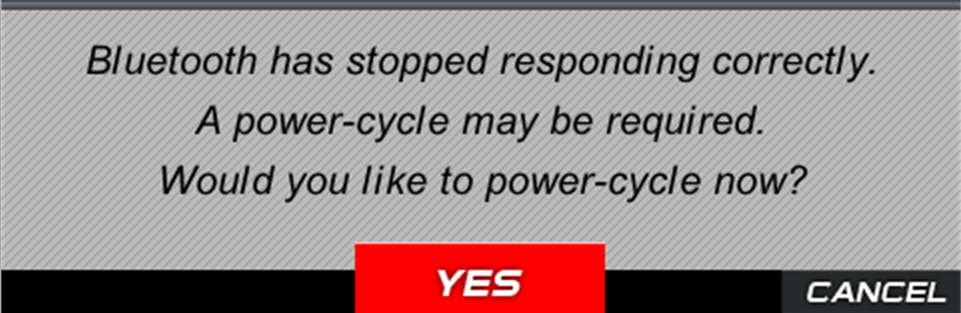
Press Key 3 to reboot or press Key 5 to cancel. Bluetooth may not be functional until the device is rebooted.

Image

Connect Your Smartphone to the PIDD

The PIDD can be used with most smartphones. Ride Command™ can be used to provide trail data for the PIDD device. Before registering and connecting the PIDD to Ride Command™, use the following steps to connect your smartphone to the PIDD.
  1. Open your phone’s Bluetooth menu and make your phone discoverable.
  2. On the vehicle, turn the ignition key to the ON/RUN position. The engine does not have to be running.
  3. View the Bluetooth settings on your phone. The PIDD Connect Bluetooth Adapter should appear as “Polaris - # # # #” (the last 4 digits of the adapter’s address).
  4. When the adapter is visible, select it to connect your phone to the adapter.
  5. Launch the PIDD and verify that the connection status bar indicates the phone is connected.

Ride Command™ for PIDD

Ride Command™ is the #1 resource for power sports enthusiasts. Ride Command™ provides everything you need to enhance your riding experience. For the PIDD, Ride Command™ provides downloadable trails. For more information about all of our free features, please visit http://ridecommand.polaris.com/pidd.

USB Hardware Recommendations

For software updates, Polaris recommends using a SanDisk® or similar USB flash drive with a minimum of 4G in available memory, formatted using the FAT32 file system. For assistance, search the web for “How to format FAT32”. For best results, remove all files from the flash drive before starting the update process.
NOTE
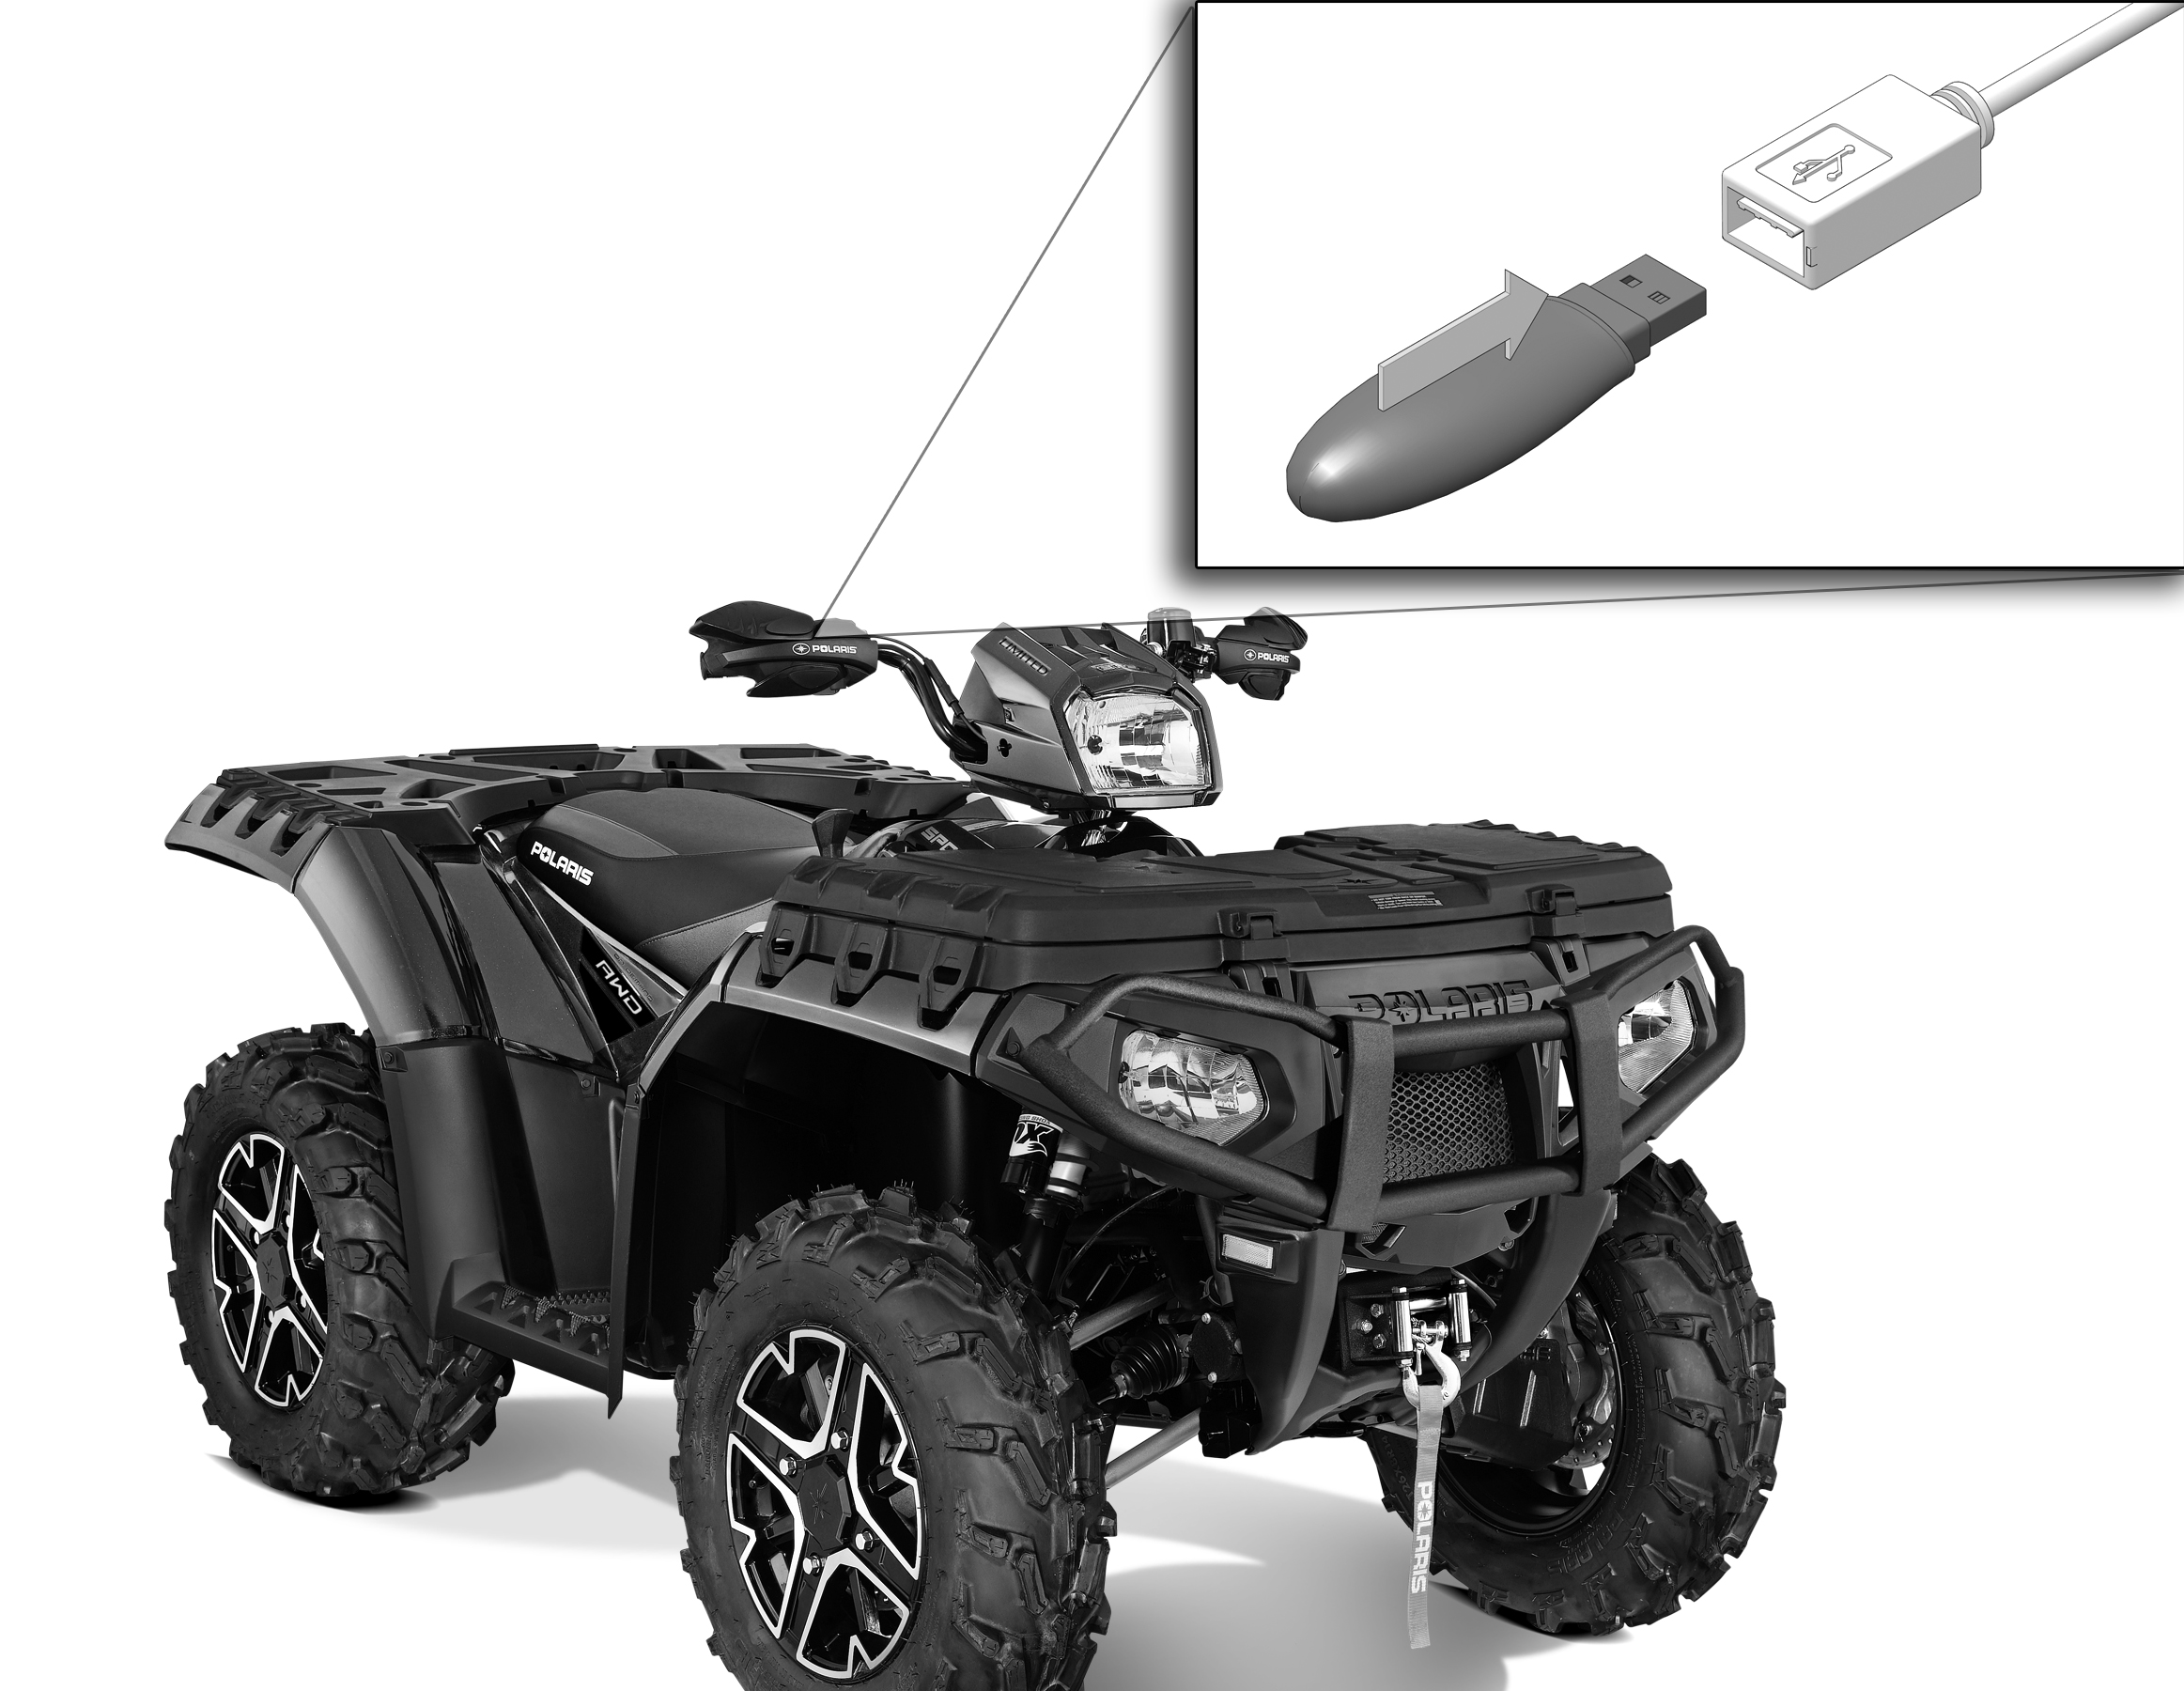
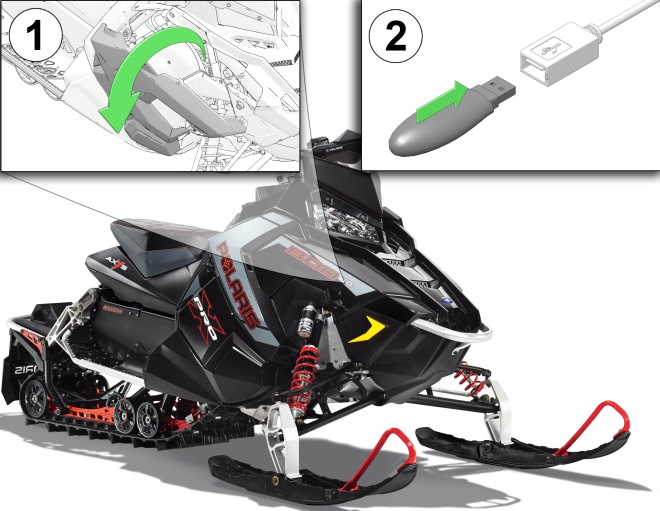
You MUST remove all other files from the USB flash drive before performing the update. The USB connection is not designed or intended to support the connection of any phone or device other than the recommended USB drive. The vehicle’s USB connection is designed to support PIDD updates and allow the user to upload and download tracks and waypoints.

RZR MODELS

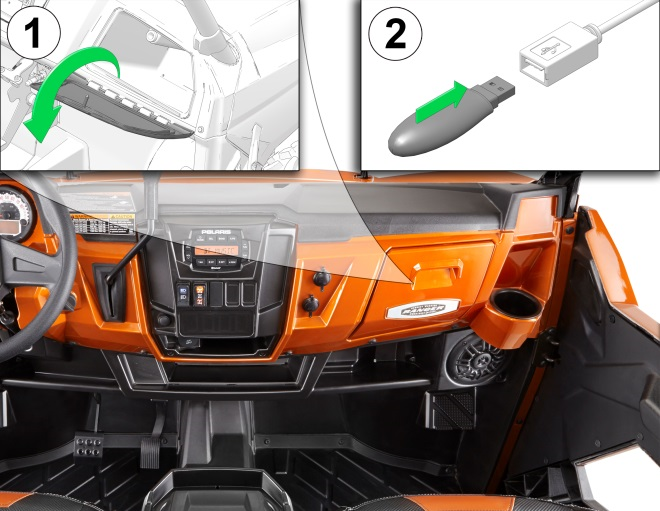
The USB connector (if equipped) is located behind the storage compartment/glove box on the dash.

Image

RANGER MODELS

The USB connector (if equipped) is located inside the glove box.

Image

ATV MODELS

The USB connector (if equipped) is located on the front side of the right handlebar controls.

Image

SNOWMOBILE MODELS

The USB connector (if equipped) is located under the hood near the rear of the hood vents. Open the right side panel to access the connector.

Image

Update Maps/Trails Data

The Trails data and the Maps/Trails data on your PIDD can be updated using files downloaded from your Ride Command™ account.
NOTE
Before updating the PIDD, fully charge the vehicle’s battery (if equipped). A 12-volt minimum is required for completing the updates. You can have the battery on a battery tender while performing the update.
NOTE
New trail data is available every 90 days. For the latest trails and maps, update the PIDD every 90 days.

Download the Data

  1. Go to http://ridecommand.polaris.com/pidd
  2. Select Digital Displays.
  3. Select Download Trails Data (recommended every 90 days) or Download Trails and Map Data (recommended seasonally) for your vehicle type.
  4. Accept the User Acknowledgement.
  5. Choose “Save” if prompted to Run or Save. The download may take several minutes depending on your internet connection speed.

Copy Files to USB Flash Drive

Connect the recommended USB flash drive to the computer used to download updates from http://ridecommand.polaris.com/pidd.
The general procedures for extracting the files and saving them to the USB drive are outlined below. Your procedure may differ slightly depending on your computer’s operating system.
NOTE
You must first extract the files from the folder and place them on the flash drive. The files cannot be in the file folder on the flash drive to perform the update.
MAC Computers:
  1. Locate the downloaded zipped file (.zip) on your computer. Double-click the file to extract the contents.
  2. Locate the extracted files and copy them onto the USB flash drive.
WINDOWS Computers:
  1. Locate the downloaded executable file (.exe) on your computer. Double-click the file. Select “Run”.
  2. Make a note of the file path shown in the “Extract to” window. Click “Extract”.
  3. Navigate to the file location noted in the previous step. Open the folder and copy all of the extracted files onto the USB flash drive.

Updating the PIDD

  1. Before updating the PIDD, always export your existing tracks and waypoints to a USB drive to avoid losing them. When the PIDD update is performed, all formerly saved tracks and waypoints will be erased from the PIDD.
  2. After downloading an update from your Ride Command™ account and saving the extracted files to the USB flash drive, connect the flash drive to the USB connector on your vehicle.
    NOTE
    Always download the most recent data from http://ridecommand.polaris.com/pidd before updating the PIDD.
  3. Turn the ignition key to the ON/RUN position. If your vehicle does not have a battery, start the engine and allow the idle to stabilize before continuing. Do not allow an engine to run in an enclosed area without adequate ventilation.
  4. Press any display key to display the PIDD screen icons.
  5. Press Key 3 to display the main menu options.
  6. Toggle to System Settings. Press Key 3 to select.
  7. In the System Settings menu, select SYSTEM INFO.
  8. Compare the “Trails date” on this screen with the “date modified” of the newly downloaded file on your USB drive or computer.
  9. Continue with the update only if the new file date is more recent than the date listed in the PIDD.
    NOTE
    New trail data is available every 90 days. For the latest trails and maps, update the PIDD every 90 days..
  10. Press Key 5 twice to continue.
  11. If an error message occurs, perform one or all of the following actions to resolve the issue.
    • Remove and reconnect the USB flash drive securely.
    • Make sure the Ride Command files are not inside a folder on the flash drive.
    • Make sure only Ride Command files are on the flash drive. Remove any other files if necessary.
    • Try using a different USB flash drive.
  12. If files are found by the device, you’ll be prompted to restart in bootloader mode. Press Key 3 to confirm.
  13. After the restart, read the warning message.
    WARNING
    Maps/Trails are supplied as an aid and should not be used for any purpose requiring precise measurement of direction, distance of location. Polaris makes no warranty as to the accuracy or completeness of this map data.
  14. Press Key 3 to accept. The screen displays the files found on the USB flash drive.
  15. Press Key 3 or Key 4 to toggle to the desired file. Press Key 5 to select.
  16. Press Key 5 to confirm.
    NOTE
    Do NOT turn the ignition key off while the file is downloading. A Trails Data update will take about 5 minutes. A Trails and Map Data update will take about 35 minutes.
  17. Wait for the process to complete. If the update indicator at the upper left corner of the screen is spinning, the update is processing even if the status bar stops moving.
    NOTE
    If an error message displays, if the update takes much longer than expected or if a black screen displays when Maps are selected (after update is complete), an interruption or other event may have resulted in corrupt files. Perform the update manually by following the Manual PIDD Update procedure.
  18. The PIDD will reboot automatically when the download is complete.
  19. Turn the ignition key off.
  20. Remove the USB flash drive from the vehicle. Close the protective cover on the USB connector.
  21. Return the USB connector to its secured position if it was moved when connecting.
  22. Repeat steps 3-7 to verify the update in SYSTEM INFO. The “Trails date” should now reflect the more recent file date.
  23. Press Key 3 to exit.
  24. Perform the following steps for snowmobiles after every update.
    • 800 AXYS models: Turn the ignition key off. Start the engine to allow the PIDD to automatically initialize (AWD indicator will disappear when completed).
    • 600 AXYS and all non-AXYS models: Turn the ignition key off. Perform the manual initialization procedure.

Manual PIDD Update

Use this procedure only in the event of a failed update using the previous procedure.
  1. Delete the formerly downloaded (corrupt) files from the USB drive. Return to http://ridecommand.polaris.com/pidd and download new files.
  2. Turn the ignition key off for at least 10 seconds.
  3. Connect the flash drive to the USB connector on your vehicle.
  4. Press and hold any PIDD key while turning the ignition key to the ON/RUN position. Continue to hold the PIDD key until “Booting...” is no longer displayed. Release the PIDD key.
  5. Perform steps 13-24 of the Update the PIDD procedure.
  6. For more assistance:
    • See your Polaris dealer
    • Go to http://ridecommand.polaris.com/pidd
    • Go to Polaris.com (Select your product group and click on the “Help” link at the upper right corner of the page. When the help page displays, look for “Helpful Links” at the right side of the page).

Verify the Update in MAPS/TRAILS Display

WARNING
Maps/Trails are supplied as an aid and should not be used for any purpose requiring precise measurement of direction, distance of location. Polaris makes no warranty as to the accuracy or completeness of this map data.
  1. Press any key to display the PIDD screen icons.
  2. Press Key 3 to display the main menu options.
  3. Toggle to MAPS/TRAILS. Press Key 3 to select.
  4. Read the warning message that displays.
  5. Press Key 3 to accept.
  6. Press any key to display the PIDD screen icons.
  7. Press Key 1 multiple times to zoom out.
  8. Verify that the updated trails data is on map. Toggle to System Settings > SYSTEM INFO. The Trails and Map dates should now reflect the more recent file dates.

© Copyright Polaris Industries Inc. All rights reserved.